Integrating vivo Push Notifications
Follow this guide to integrate the vivo Push Client. The RC SDK supports receiving push notifications from the vivo Push Service.
Before integrating third-party push services, ensure you have configured the Android Application ID in the Console. Refer to Push Integration Overview for details.
Configuring vivo Push in the Console
To receive push notifications from RC's IM service via vivo Push, you need to provide your vivo Push application details in the Console.
-
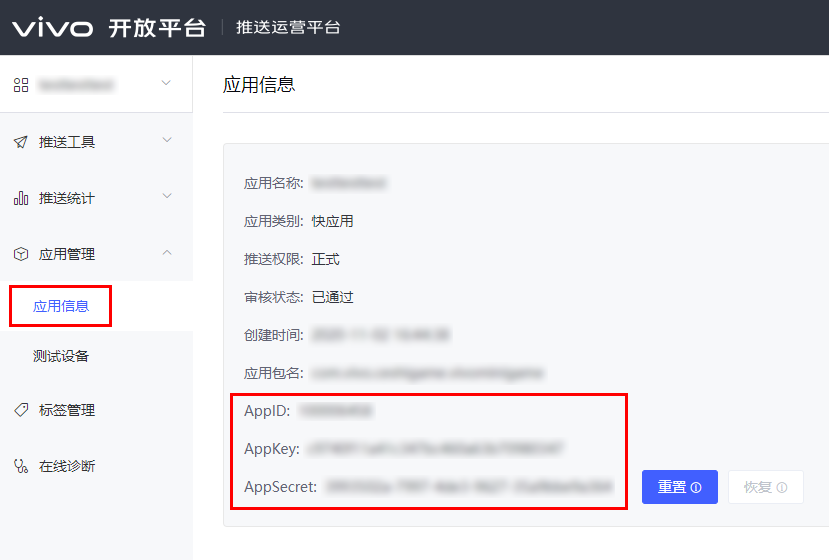
Go to the vivo Developer Platform - Push Server Platform and record the AppID, AppKey, and AppSecret of your vivo application.
tipIf you don't have a vivo developer account or haven't created an application yet, refer to the vivo documentation vivo Push Integration Process.
-
Open the Console, navigate to the Application Identifier page, click Configure Push, locate Android > vivo Push, and enter the AppID, AppKey, and AppSecret obtained in the previous step.
-
(Optional) Configure the Push Notification Title. Set the default push notification title. Generally, this title setting is not used when converting client messages to push notifications. When calling RC server APIs
/push.json,/push/user.json, or/push/custom.jsonto send push notifications, if no notification title is provided, the title configured here will be used. For messages sent from the server, if the sender's user ID does not have a username registered in RC's server, this "Push Notification Title" will also be used. -
Configure the Push Mode. For differences between production and test pushes, refer to the vivo documentation vivo Push Usage Guide.
-
(Optional) Configure the Push Channel Type and Category (secondary message classification). If no values are provided when sending messages or push notifications via client or server APIs, the values configured here will be used by default. Refer to the vivo documentation Push Message Classification Guide for configuration details.
-
Save the settings. All configurations take effect after 15 minutes.
You have completed all necessary vivo push configurations in the Console. You can now proceed with client integration.
Configuring the Client to Receive vivo Push
Add dependencies in your app's build.gradle and configure vivo's VIVO_APP_ID and VIVO_APP_KEY.
android {
 defaultConfig {
    //...
    manifestPlaceholders = [
        VIVO_APP_ID : "xxxxxxxxxx",
        VIVO_APP_KEY: "xxxxxxxxxx"
    ]
 }
}
dependencies {
    // x.y.z represents the current IM SDK version
    implementation 'cn.rongcloud.sdk.push:vivo:x.y.z'
}
Enabling vivo Push Service
Before initializing the SDK, call the following code to initialize the RongPushPlugin module.
RongPushPlugin.init(getContext());
If the RongPushPlugin module cannot be found, check if you have already integrated RC's built-in push channel.
Obfuscation Configuration
Add the following rules to your obfuscation file to prevent SDK content from being re-obfuscated. Ensure custom callback classes are not obfuscated.
-dontwarn com.vivo.push.**
-keep class com.vivo.push.**{*; }
-keep class com.vivo.vms.**{*; }
-keep class   xxx.xxx.xxx.PushMessageReceiverImpl{*;}
Handling Push Notification Click Events
-
Customizing Push Notification Click Events: Learn how to implement the SDK's default redirection behavior and customize click event handling. Refer to Customizing Push Notification Click Events.
-
Customizing Push Notification Styles: Notifications received from third-party vendors are system notifications, which are displayed directly by the device's underlying system. Therefore, customization is not supported.