Integrating FCM Push Notifications
- The FCM push channel is suitable for officially released Android devices overseas (with built-in Google GMS services) and will be enabled in overseas network environments.
- After integration, we recommend testing according to the conditions and steps described in Testing FCM Push Notifications.
RC's server-side has integrated communication components with FCM backend. When the app running on the message recipient's device is killed or suspended in the background, the IM SDK's persistent connection channel will be disconnected. If messages need to be delivered at this time, RC's server will send message requests to the FCM backend, which then delivers the messages to the client application running on the user's device.
Integrating FCM in Android Projects
This section follows Google's recommended setup workflow to describe how to add Firebase to your Android project through the Firebase Console. During this process, you must manually add plugins and configuration files to your project.
To help you get started quickly, the following steps have been simplified. For detailed steps, you can refer to Google Documentation or Firebase Chinese Documentation.
Prerequisites
- Install the latest version of Android Studio or update it to the latest version.
- Ensure your project meets the following requirements:
- (SDK ≧ 5.6.3) Use Android 5.0 (API 21) or higher;
- (SDK < 5.6.3) Use Android 4.4 (API 19) or higher;
- Use Jetpack (AndroidX), which requires the following versions:
com.android.tools.build:gradle 3.2.1or highercompileSdkVersion 28or higher
- Set up a physical device or use an emulator to run your application. Note that the FCM client is part of the [Firebase SDK that depends on Google Play services] and requires Google Play services to be installed on the device or emulator.
- Log in to Firebase using your Google account.
To add Firebase to your application, you need to perform several tasks in both the Firebase Console and your open Android project (e.g., downloading the Firebase configuration file from the console and moving it to your Android project).
Step 1: Create a Firebase Project
-
In the Firebase Console, click Add Project.
- To create a new project, enter the project name you want to use. You can also modify the project ID displayed below the project name if needed.
- To add Firebase resources to an existing Google Cloud project, enter the project name or select it from the dropdown menu.
-
Click Continue. Finally, click Create Project (or Add Firebase if using an existing Google Cloud project).
Firebase will automatically provision resources for your Firebase project. Once this process is complete, you will be directed to the overview page of your Firebase project in the Firebase Console.
A Firebase project is essentially a Google Cloud project with additional Firebase-specific configurations and services enabled. When creating a new Firebase project, you are actually creating a Google Cloud project behind the scenes. For details, refer to the Firebase Chinese documentation Relationship Between Firebase Projects and Google Cloud.
Step 2: Register Your Android App in Firebase
To use Firebase in your Android application, you need to register your app with the Firebase project. The process of registering an app is often referred to as "adding" the app to the project.
-
Go to the Firebase Console.
-
In the center of the project overview page, click the Android icon or "Add App" to start the setup workflow.
-
Enter your app's package name in the Android Package Name field.
- The package name is the unique identifier for your app on devices and in the Google Play Store.
- The package name is often referred to as the application ID.
- Find your app's package name in the module (app-level) Gradle file (typically app/build.gradle) (example package name: com.yourcompany.yourproject).
- Note that the package name is case-sensitive, and once you register this Firebase Android app in the Firebase project, you cannot change its package name.
-
Complete any other optional configurations if needed. Then click Register App.

Step 3: Add Firebase Configuration File to Your Android Studio Project
This step describes how to add the Firebase Android configuration file to your application.
-
After registering the app, click Download google-services.json to obtain the Firebase Android configuration file (
google-services.json).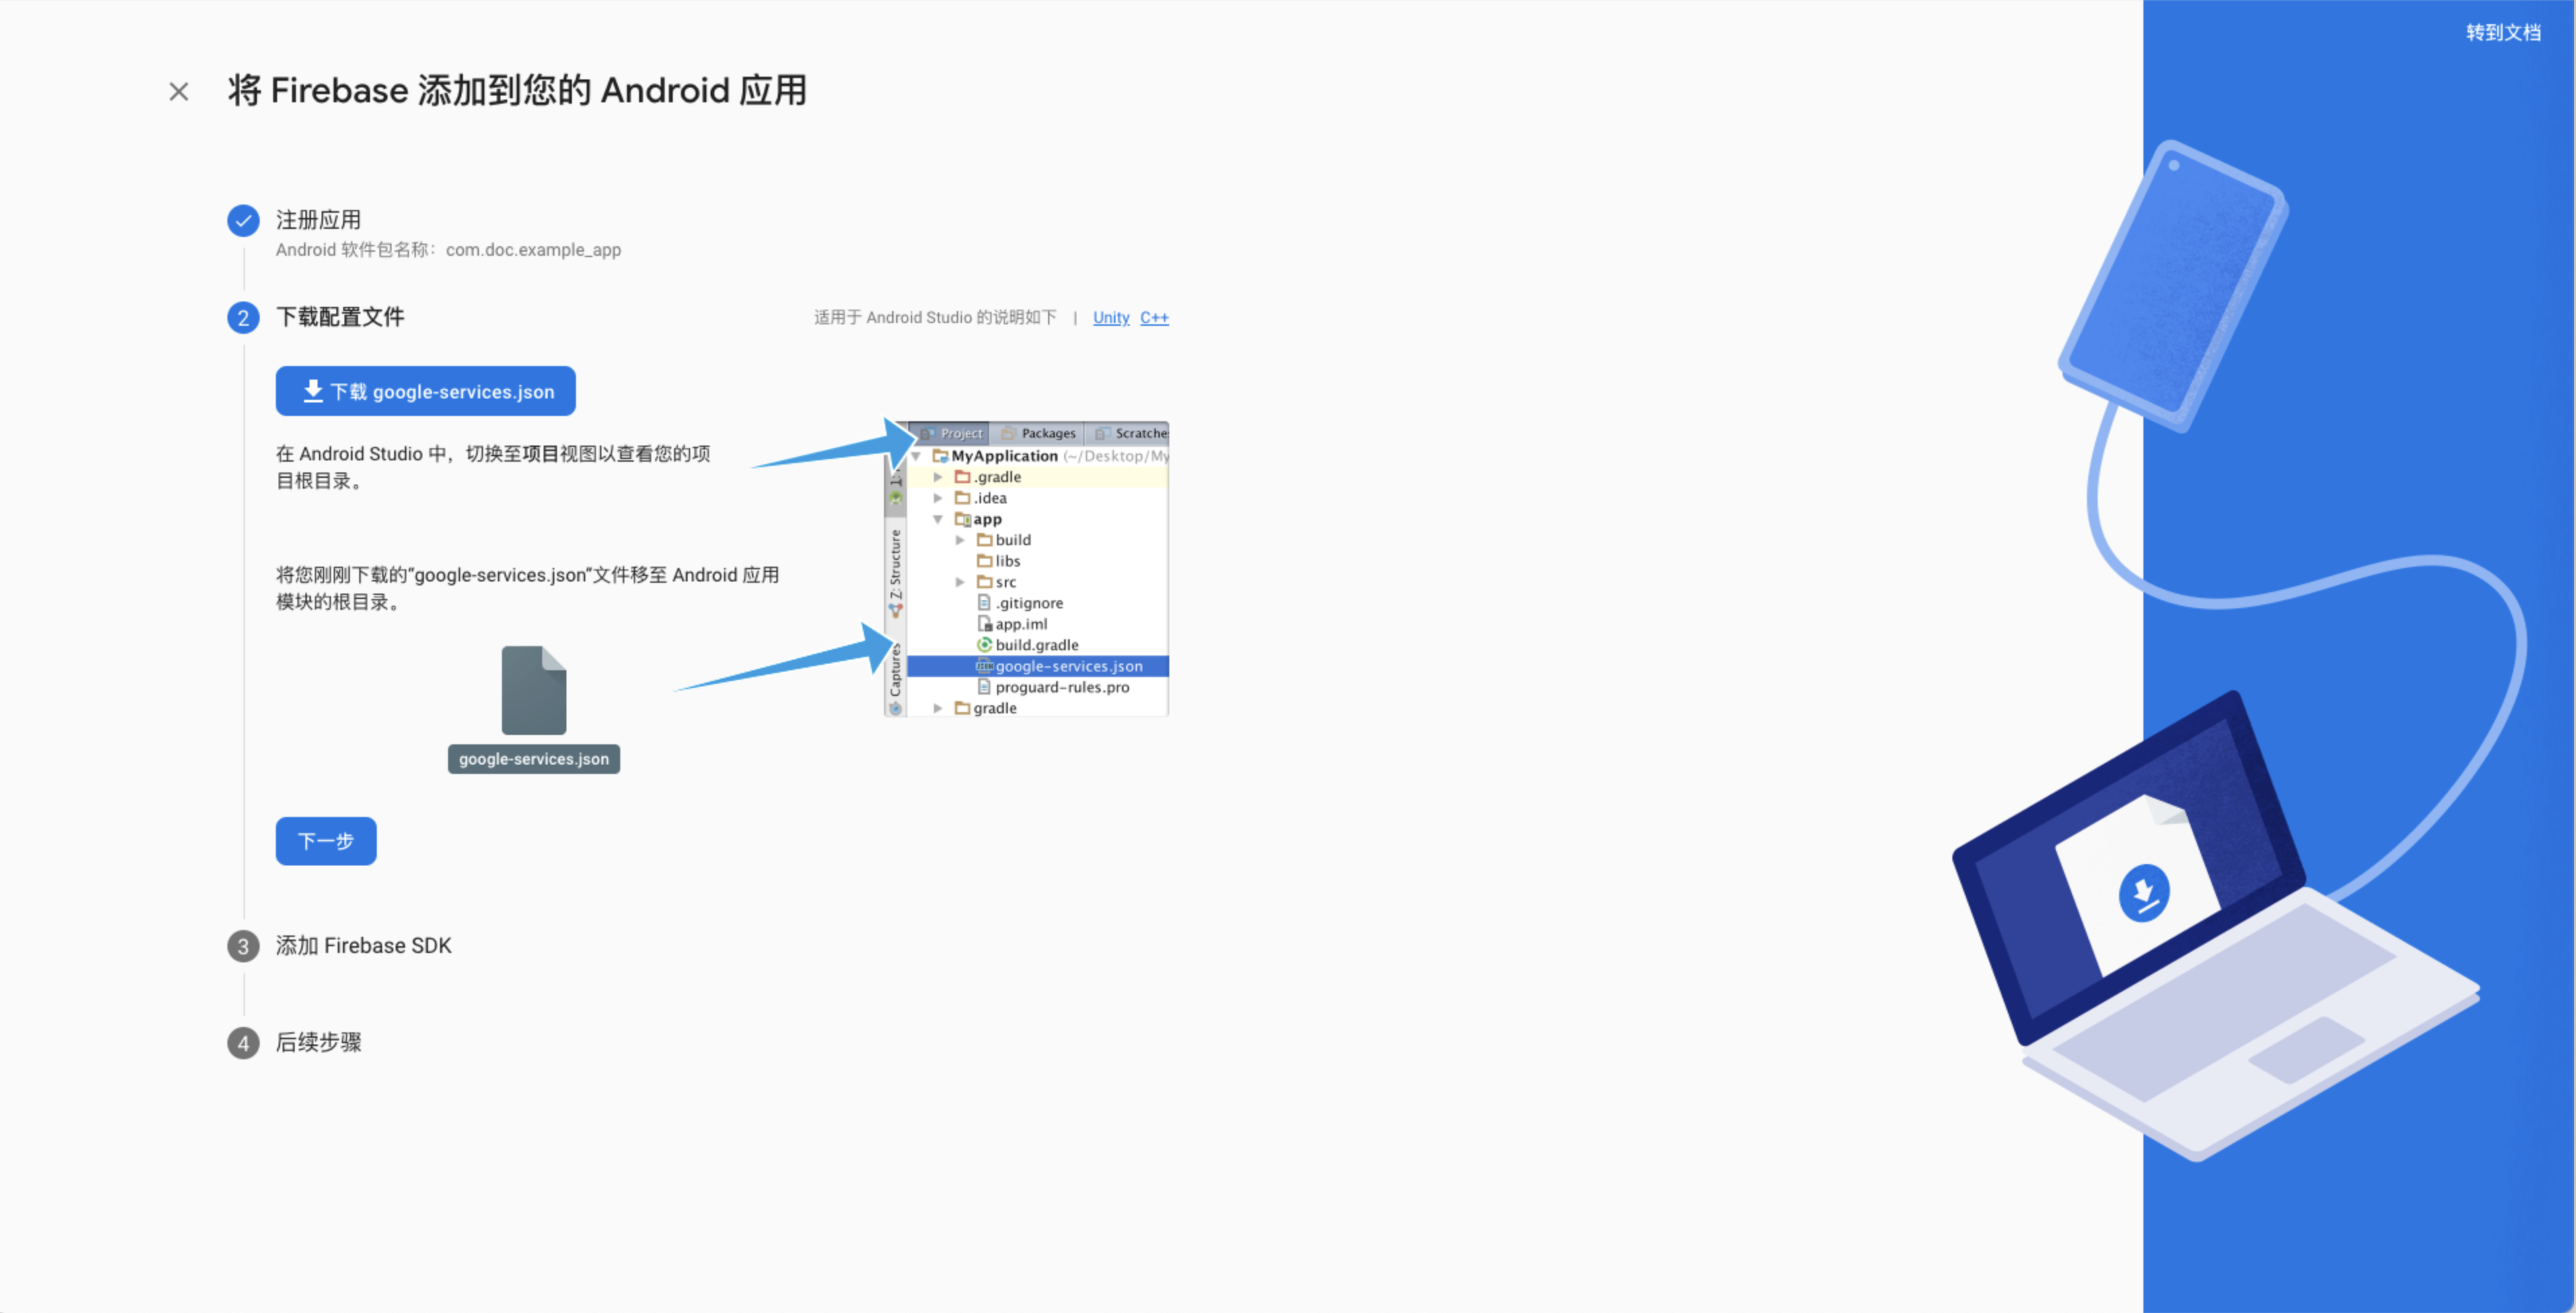
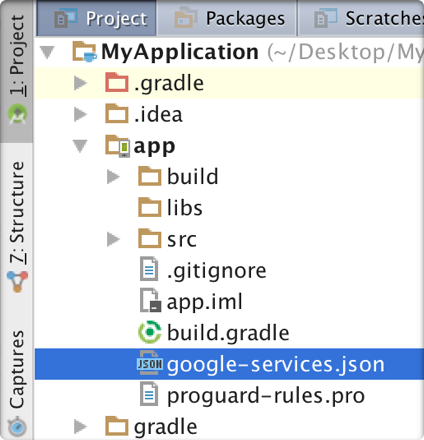
-
Move the configuration file to your app's module (app-level) directory.
- For more details about this configuration file, visit [Understanding Firebase Projects].
- You can download the Firebase configuration file again at any time.
- Ensure the configuration file name does not include additional characters, such as (2).
-
To enable Firebase products in your app, add the
google-servicesplugin to your Gradle file.Note: All Firebase SDKs use the google-services Gradle plugin (
google-services), but this plugin is unrelated to Google Play services.-
Method 1: Add the plugin using Gradle's
buildscriptblock. Both Google Documentation and Firebase Chinese Documentation use this method.-
Modify the root-level (project-level) Gradle file (
build.gradle) by adding a rule in the buildscript block to import the Google Services Gradle plugin. Ensure you have added Google's Maven repository.buildscript {
repositories {
// Check if this line exists (if not, add it):
google() // Google's Maven repository
}
dependencies {
// ...
// Add the following configuration:
classpath 'com.google.gms:google-services:4.3.13' // Google Services plugin
}
}
allprojects {
// ...
repositories {
// Check if this line exists (if not, add it):
google() // Google's Maven repository
// ...
}
} -
In your module (app-level) Gradle file (typically
app/build.gradle), apply the Google Services Gradle plugin:apply plugin: 'com.android.application'
// Add the following line:
apply plugin: 'com.google.gms.google-services' // Google Services plugin
android {
// ...
}
-
-
Method 2: Use Gradle's plugins DSL. If you are familiar with Gradle's plugins DSL syntax and already use it in your project, you can use this method.
-
By default, the plugins DSL only supports core plugins published in the Gradle Plugin Portal. Since the
google-servicesplugin is not in this repository, you need to first add Google's plugin repository address.Declare Google's Maven repository in the root-level (project-level) Gradle settings file (
settings.gradle).pluginManagement {
// (Optional) Introduce the google-services plugin and declare its version when declaring the repository
//plugins {
// id 'com.google.gms.google-services' version '4.3.13'
//}
repositories {
google()
gradlePluginPortal()
}
}
rootProject.name='exampleProject'
include ':app' -
In your module (app-level) Gradle file (typically
app/build.gradle), apply the Google Services Gradle plugingoogle-servicesand declare its version:plugins {
id 'com.google.gms.google-services' version '4.3.13'
}Note: If the
google-servicesplugin has already been introduced using the plugins DSL in thepluginManagement {}block ofsettings.gradleand its version has been declared, you can directly apply the plugin in the module (app-level)app/build.gradlefile without redeclaring the version:
-
-
plugins {
    id 'com.google.gms.google-services'
}
Step 4: Add Firebase SDK to Your Android App
- In your module-level (app-level) Gradle file (typically
app/build.gradle), declare dependencies and enable FCM push:
android {
 defaultConfig {
    //...
    manifestPlaceholders = [
        FCM_PUSH_ENABLE : "true"
    ]
 }
}
dependencies {
    // x.y.z represents the current IM SDK version number
    implementation 'cn.rongcloud.sdk.push:fcm:x.y.z'
}
For more details, refer to Firebase's Chinese documentation Set up a Firebase Cloud Messaging client app on Android.
At this point, you have successfully integrated Firebase into your Android project.
Proceed to complete the next steps: Authorize FCM Requests in the Console.
Authorize FCM Requests in the Console
Requests sent from RC to FCM must be authorized. Therefore, you need to provide RC with the service account credentials associated with your FCM project. You must manually upload these credentials to the Console.
Step 1: Obtain Google Service Account Credentials
Firebase projects support Google [Service Accounts]. You need to obtain credentials from your Google service account and then authorize RC servers to call Firebase server APIs using these credentials.
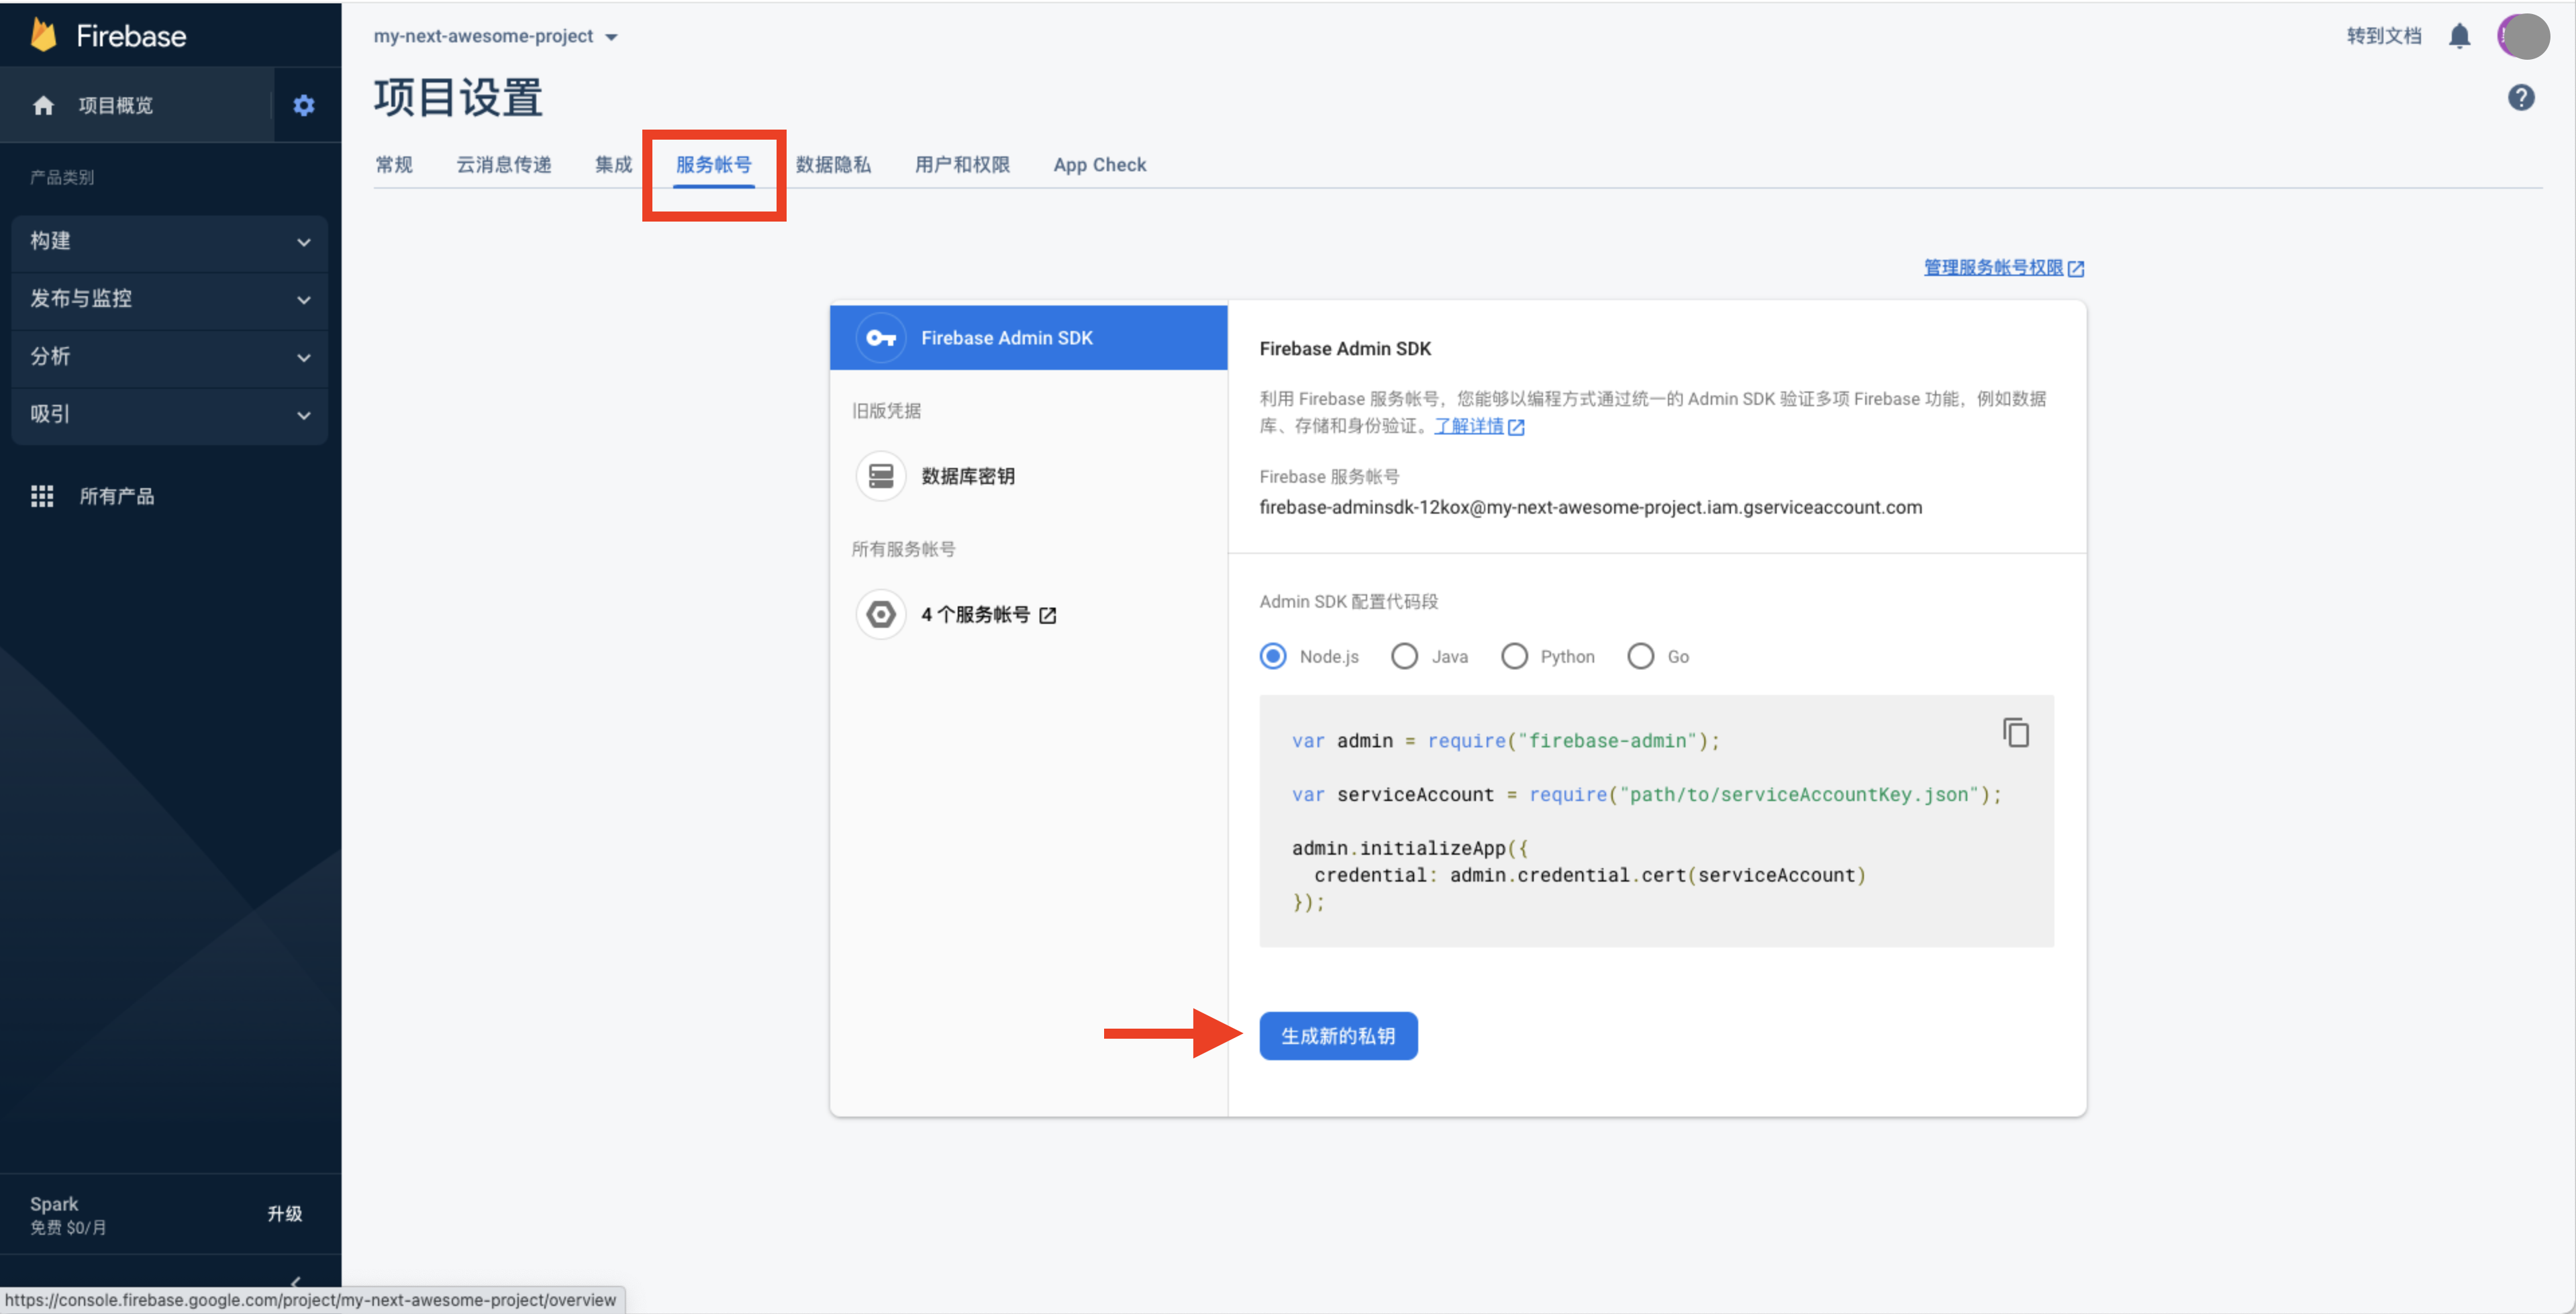
To authenticate the service account and grant it access to Firebase services, you must generate a private key file in JSON format. To generate a JSON private key file for your service account, follow these steps:
- In the Firebase Console, go to Settings > Service Accounts.
- Click "Generate New Private Key," then confirm by clicking "Generate Key."
- Securely store the JSON file containing the key. You will need to upload this file to the RC Console later.
Step 2: Upload FCM Credentials to the Console
Go to the RC Console, navigate to Application Identifier > Android > Google (FCM), and fill in the credentials obtained in the previous step.
-
Select Authentication Method:
-
Certificate (Recommended): Upload the private key JSON file generated from your service account.
-
API Key (Uses legacy Server Key authorization and legacy FCM API): Enter the server key obtained from your service account.
Warning
If your project is configured with API Key as the authentication method, note that as of June 20, 2023, sending messages (including upstream messages) using FCM's legacy XMPP and HTTP APIs has been deprecated by FCM and will be removed by June 2024. RC's push service backend will also remove this capability at that time. Therefore, you must migrate to the certificate authentication method (FCM's JSON private key file) as soon as possible. For detailed instructions, refer to the above section Obtain Google Service Account Credentials.
-
-
Push Method (see Firebase Chinese documentation FCM Message Types):
- Pass-through Message Method: The IMLib SDK receives the pass-through data, parses it, and displays a notification. Developers can also customize the handling. RC delivers data containing FCM "data messages" and "notification messages."
- Notification Message Method: The Android OS directly displays the notification in the notification panel. RC only delivers data corresponding to FCM "data messages."
-
Intent: Customizes the action associated with the notification click, corresponding to FCM's
click_actionfield. If specified, when the user clicks the notification, the Activity matching this Intent will be launched by default. It is recommended to prefix the Intent with your app's package name to ensure uniqueness.For example, specify the Intent in the Console as:
com.yourapp.demo.ExampleActivityIn your app's
AndroidManifest.xml, you need to specify an Activity that can match this Intent.<activity android: name = ".ExampleActivity">
<intent-filter>
<action android: name = "com.yourapp.demo.ExampleActivity" />
...
</intent-filter>
</activity> -
Priority (see Firebase Chinese documentation Set the Priority of a Message):
- Normal: When the app is running in the foreground, normal-priority messages are delivered immediately. When the app is in the background, message delivery may be delayed. For messages that are not time-sensitive (e.g., new email notifications, UI synchronization, or background app data synchronization), it is recommended to use normal delivery priority.
- High: FCM attempts to deliver high-priority messages immediately, even if the device is in Doze mode. High-priority messages are suitable for time-sensitive, user-visible content.
-
Push Notification Title: When calling the server-side API interfaces
/push.json,/push/user.json, or/push/custom.jsonto send push notifications, if the notification title is not provided, the "Push Notification Title" set below will be used. When sending messages from the server, if the sender's user ID does not have a username in the RC backend, this "Push Notification Title" will also be used. Generally, this title is not displayed when messages are sent from the client and converted to push notifications. -
Push Channel Type: By default, RC uses the Default push channel for GCM pushes. If you need to use a Private push channel, select "Private Channel" and set the Channel ID.
Enable FCM Push Service on the Client
-
Before initializing the SDK, initialize the
RongPushPluginmodule.RongPushPlugin.init(getContext());If the
RongPushPluginmodule cannot be found, check if you have already Integrated RC's Self-Built Push Channel. -
(Optional) After enabling FCM push, if you need to re-enable Analytics data collection, call the
setAnalyticsCollectionEnabled()method of theFirebaseAnalyticsclass. For example:setAnalyticsCollectionEnabled(true);
If you do not need to receive push notifications, you can disable the push service (for the current device) by setting the enablePush parameter in the SDK initialization configuration to false. You can also configure the device not to receive push notifications when disconnecting.
Test FCM Push
After completing the above steps, you can directly test whether the push integration is successful.
Device Requirements
It is recommended to use an Android device officially sold overseas to test FCM push notification reception. Detailed requirements for test devices are as follows:
- The test device must be a physical device. Emulators cannot receive remote push notifications.
- The test device must support Google GMS (Google Mobile Services). You can directly use an Android device officially sold overseas. Note that devices sold in mainland China generally do not come with GMS pre-installed. Some brands of devices cannot install GMS due to lack of authorization.
- Due to Google's compliance requirements, domestic phone manufacturers have imposed stricter restrictions on GMS usage. Some manufacturers have disabled GMS on phones that have passed Google certification, so even if Google services are installed and a VPN is enabled, many domestic phones still cannot receive FCM pushes.
Network Requirements
It is recommended to test in a simulated overseas network environment. Detailed requirements are as follows:
- If testing in mainland China, the test device must use a foreign IP address to establish an IM connection with RC and access RC services using an overseas IP. If a domestic IP is used, the RC backend will consider the device to be in China and will not enable the FCM channel.
- The test device's network environment must be able to access Google's network services normally. Otherwise, even if an FCM push is triggered, the device will not be able to receive the push from Google's FCM service.
Test Steps
Assume testing is being done in the development environment. The app uses the development environment's App Key.
Specific steps are as follows:
- After the app successfully connects to RC, kill the app process.
- Go to the Console's IM Server API Debugging page, switch to the app's development environment, navigate to Messages > Message Services > Send One-to-One Message, and directly send a one-to-one message.
- Check if the phone receives a push notification from the app.
Troubleshooting
- If the app being tested belongs to RC's overseas data centers (North America or Singapore), check whether
setServerInfohas been executed before SDK initialization to set the navigation domain for the overseas data center. . - Send a message directly from the Google FCM service backend to the device. If the message is not received, first check whether the integration was done correctly based on the above documentation.
- Check whether the app has been restricted by the device as a background-restricted app. On Android P or later, FCM will not send push notifications to apps that have been background-restricted by the user (e.g., via Settings > Apps & Notifications > [appname] > Battery). See Android developer documentation Background-Restricted Apps.
- Avoid frequently sending the same content to the same device, as this may result in the device being blocked by the FCM backend, preventing push notifications from being received.
- Check whether the test device uses a ROM for domestic phones. Some brands no longer support manually installing GMS. It is recommended to replace the device with one sold overseas or update the test device's system.
If the issue persists, you can submit a ticket and provide your message ID.
Obfuscation Script
-keep public class com.google.firebase.* {*;}
Handling Push Notification Click Events
-
Custom Push Notification Click Handling: Explains how to implement SDK default redirection behavior and customize click event handling. See Custom Push Notification Click Handling.
-
Custom Push Notification Styling: Only supported when the Console's FCM message delivery method is set to Data Message. See Custom Push Notification Styling.
Notes for CallKit SDK Customers
When the Console's FCM message delivery method is set to Data Message, IMKit/IMLib by default won't display notifications for RTC signaling messages (call invitations, hang-ups, etc.). This can be resolved by:
IM SDK received FCM data messages will wake up the app. You can call IM connection methods immediately in the Application's onCreate. After successful connection, the SDK will automatically display notifications.
Notes for CallLib SDK Customers
When the Console's FCM message delivery method is set to Data Message, IMKit/IMLib by default won't display notifications for RTC signaling (call invitations, hang-ups, etc.). You can implement Custom Push Notification Styling by overriding the preNotificationMessageArrived method in PushEventListener to implement custom notification display logic.