Integrating Huawei Push
Follow this guide to integrate Huawei Push Kit and enable RC SDK to receive push notifications from Huawei Push Service.
Before integrating third-party push services, ensure you have configured the Android Application ID in the RC Console. Refer to Push Integration Overview.
Configuring Huawei Push in RC Console
To receive RC IM service push notifications via Huawei Push, you need to provide your Huawei Push application details in the RC Console.
-
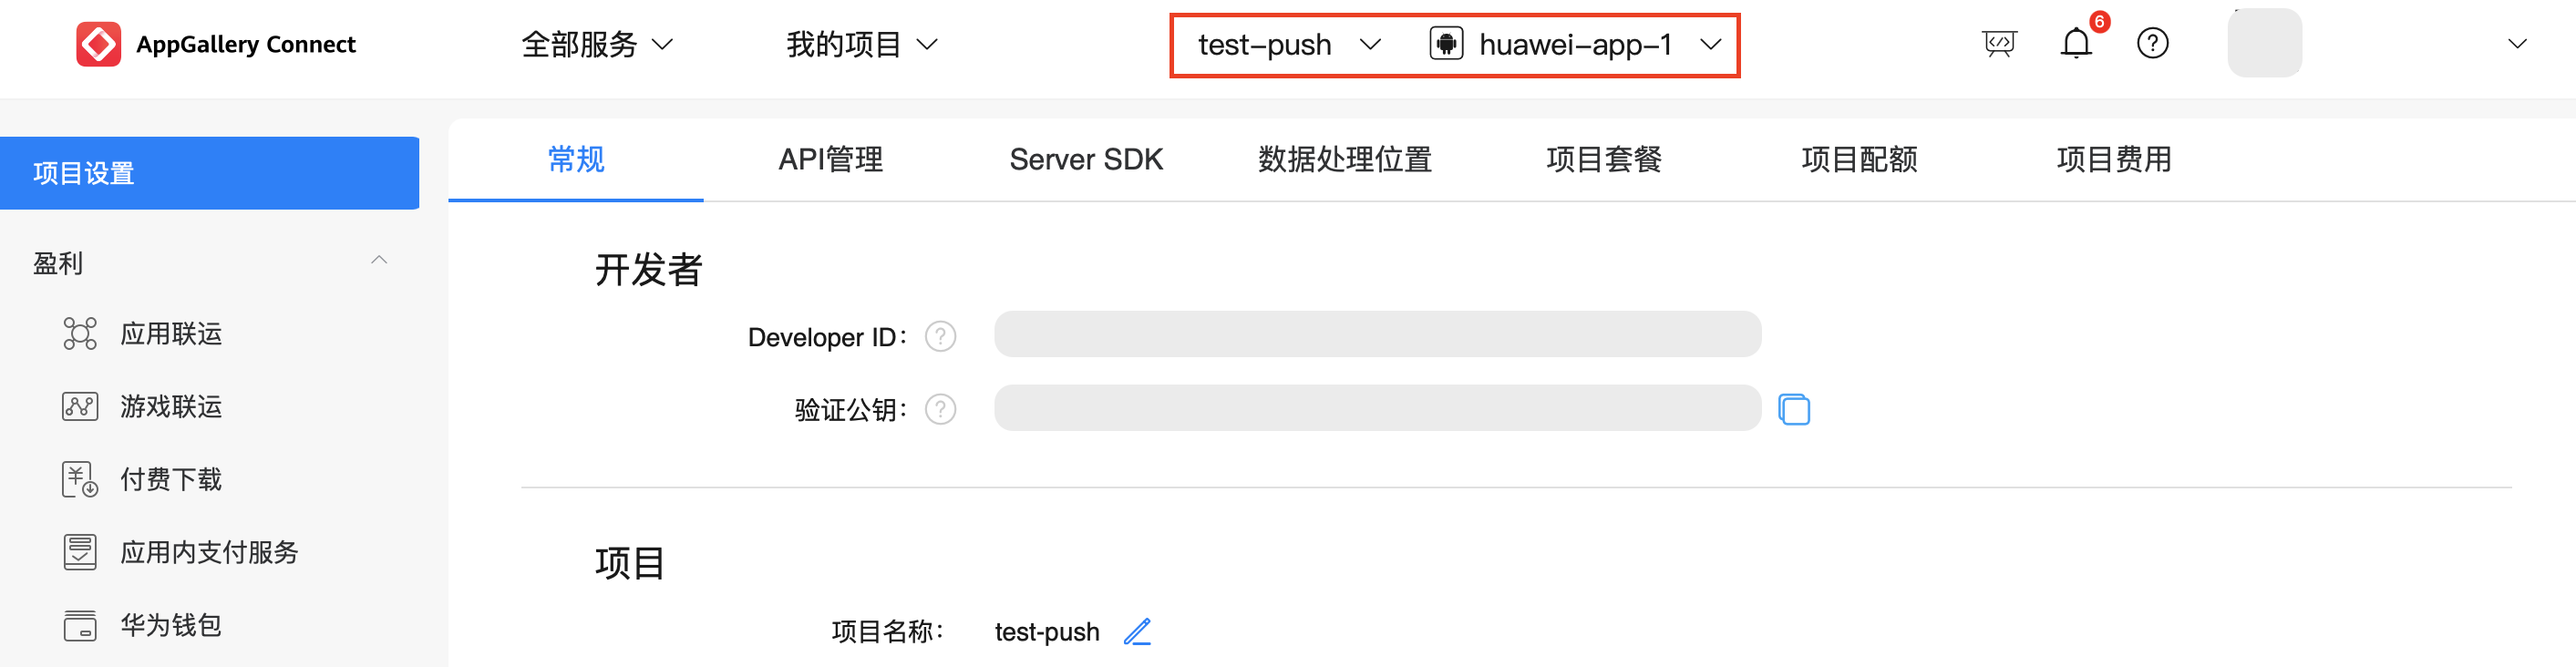
Go to the Huawei AppGallery Connect website, click My Projects, locate your project in the list, and select the target application from the top navigation bar.
As shown below, "test-push" is the project name, and "huawei-app-1" is the application associated with this project.
 tip
tipIf you don't have a Huawei developer account or haven't created projects/applications, first create an account, project, and application. Refer to Huawei developer documentation: Create Account, Create Application. Ensure the project has associated applications with Push Service enabled and signature certificate fingerprints configured. For any questions about configuring push services on Huawei Console, see Huawei's official documentation Configure AppGallery Connect.
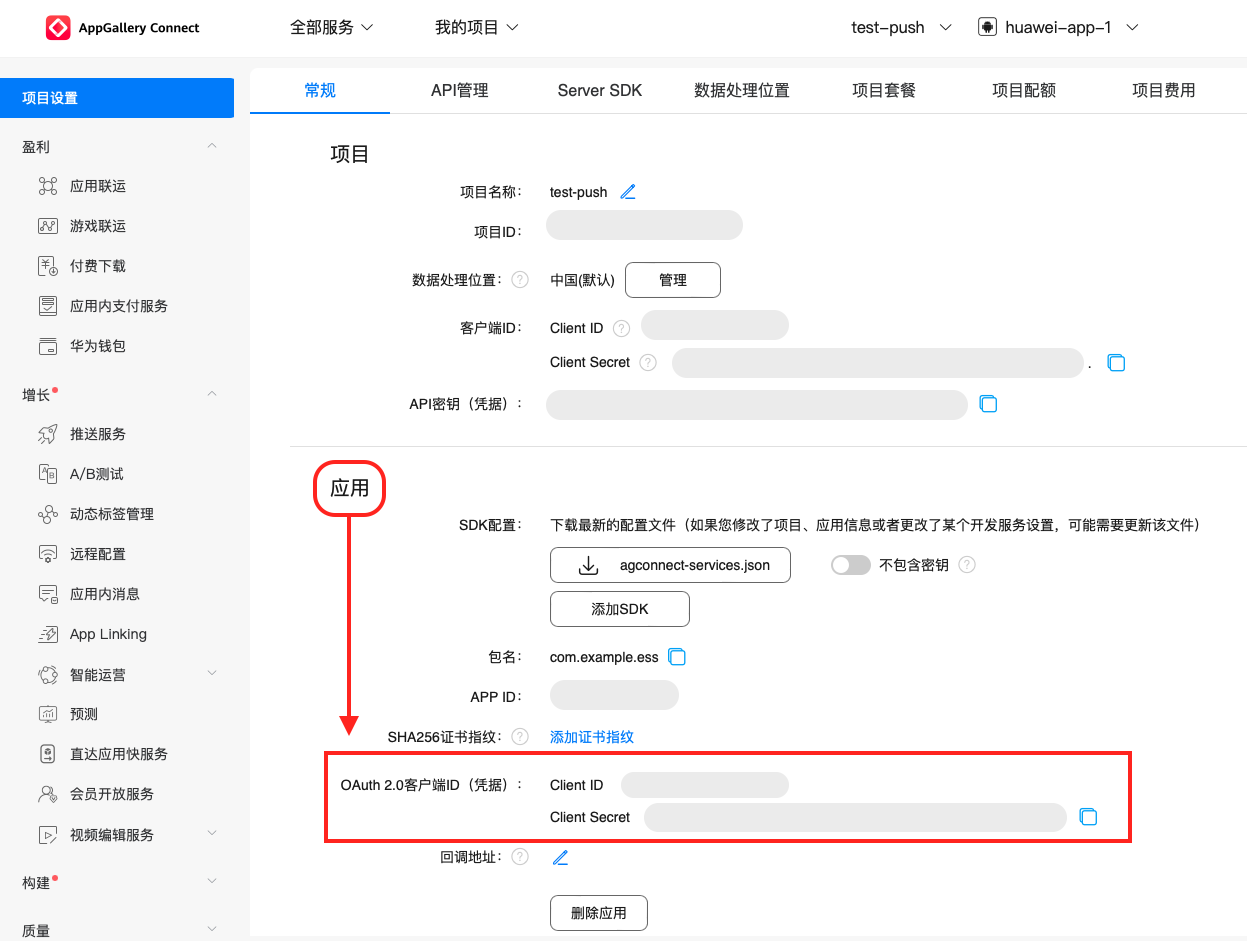
Record the Client ID (same as App ID) and Client Secret under the application.
-
Open the RC Console, navigate to Application Identifier page, click Configure Push, find Android > Huawei Push, and enter the Client ID and Client Secret obtained in the previous step.
-
(Optional) Configure the custom click action Intent. Refer to Huawei's official documentation Custom Click Actions.
- The intent format must end with
end. - After defining the intent, configure the following
intent-filterin the Activity'sAndroidManifest.xmlaccording to the defined intent.
- The intent format must end with
-
(Optional) Configure push badge count. Refer to Huawei's official documentation Desktop Badges.
- badgeAddNum: The badge increment number (not the actual displayed count) must be an integer between 1-99. For example, if an app currently has N unread messages and add_num is set to 3, each new message will increment the badge count by 3 (N+3).
- Activity: The fully qualified path of the app's entry Activity class. Example: com.example.hmstest.MainActivity
-
(Optional) Configure the default Huawei Push channel message classification identifier (e.g.,
IM). This field becomes effective after completing Huawei's Message Classification Application or Special Permission Application. See Huawei's official documentation Message Classification Standards. Once configured, all Huawei push notifications for this package name will carry this field by default. Note: If a Huawei Push Category is specified when sending messages from client/server, the specified configuration takes precedence. -
Configure Push Notification Title. Set the default push notification title. Generally, this title setting isn't used when client-side messages are converted to push. When calling RC server APIs
/push.json,/push/user.json, or/push/custom.jsonto send push notifications without a title parameter, this configured title will be used. For server-side messages, if the sender's user ID has no username registered in RC server, this "Push Notification Title" will also be used. -
Save settings. All configurations take effect after 15 minutes.
You've completed all necessary Huawei Push configurations in RC Console. Now proceed to client-side integration.
Configuring Client to Receive Huawei Push
First, add the Huawei Push client SDK to your Android project.
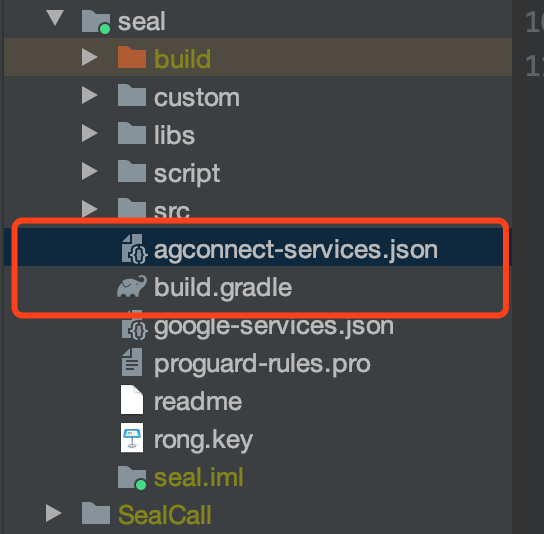
Following Huawei's developer documentation Integrate HMS Core SDK, you need to add the "agconnect-services.json" file to your app. Click agconnect-services.json to download the configuration file.

Place the downloaded agconnect-servics.json file in the root directory of your app module as shown:
Import Huawei Push SDK
The Huawei Push client SDK must be obtained from Huawei's Maven repository. Android Studio repository configurations differ for Gradle plugin versions below 7.0, 7.0, and 7.1+. Refer to "Configure HMS Core SDK Maven Repository Address" in Huawei's official documentation Integrate HMS Core SDK.
This example demonstrates configuration for Gradle plugin versions below 7.0. Add the following to your project's build.gradle:
allprojects {
    repositories {
        //Add Huawei Maven
        maven {url 'http://developer.huawei.com/repo/'}
    }
}

buildscript{
    repositories {
        //Add Huawei Maven
        maven { url 'http://developer.huawei.com/repo/' }
    }
    dependencies {
        // Add this line
        classpath 'com.huawei.agconnect:agcp:1.6.1.300'
    }
}
Under "buildscript > dependencies", add AGC plugin configuration. Refer to Huawei's official documentation AGC Plugin Dependencies to select the appropriate AGC plugin version.
After adding Huawei's Maven repository, you can directly import the Huawei Push client SDK by adding dependencies in your app's build.gradle. Always use the latest SDK version - refer to Huawei's official documentation Push Service SDK Version Updates.
Add the following to your app module's build.gradle:
android {
 defaultConfig {
    //...
    manifestPlaceholders = [
        HW_PUSH_ENABLE : "true"
    ]
 }
}
 dependencies {
    // x.y.z represents current IM SDK version
    implementation 'cn.rongcloud.sdk.push:huawei:x.y.z'
}
...
// Add to the bottom of the file
apply plugin: 'com.huawei.agconnect'
Huawei Push SDK Requirements: The latest Push SDK requires HMS Core (APK) version 4.0.0.300 or higher on the device. If not installed, your app will automatically prompt users to install it when calling HMS Core.
Default supported devices include: Some EMUI 4.0 and 4.1 phones, and all EMUI 5.0+ Huawei phones.
Enable Huawei Push Service
Enable Huawei Push Service before initializing RC SDK. RC SDK will register with Huawei Push Service and report the obtained Huawei Push Token to RC server.
Before SDK initialization, call the following code to initialize the RongPushPlugin module:
RongPushPlugin.init(getContext());
If the RongPushPlugin module cannot be found, verify whether you've integrated RC's built-in push channel.
Obfuscation Configuration
Refer to Huawei's official documentation Configure Obfuscation Scripts.
Handling Push Notification Click Events
- Customizing Push Notification Click Actions: Learn how to implement SDK's default redirect behavior or customize click handling. See Customize Push Notification Click Actions.
- Customizing Push Notification Styles: Notifications received from third-party vendors are system notifications displayed directly by the OS, so customization isn't supported.
Badge Unread Count
RC doesn't maintain app badge counts, and RC client SDK doesn't support badge display control. .