Input Area
The input area in IMKit is created and controlled uniformly by RongExtension, supporting custom input modes, custom extension panels (plugins), and custom emojis.
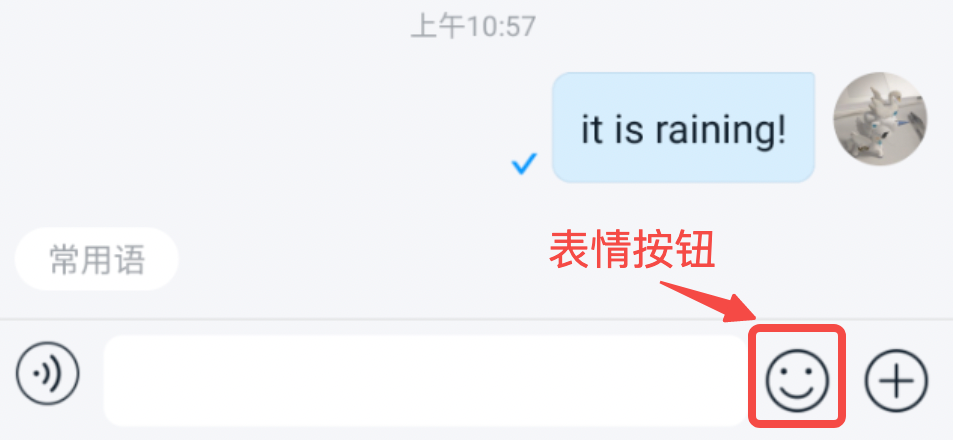
From left to right in the input area shown below are the voice/text toggle button, content input box, emoji panel button, and extension panel button.

Modify Input Bar Layout Modes
The IMKit input bar provides voice/text toggle, content input, and extension panel functionalities, and supports modifying the input layout modes. For example, you can remove the voice/text toggle button and extension panel, retaining only the content input functionality.
Currently, multiple layout modes are available:
| Layout Mode | XML Resource | Enum |
|---|---|---|
| Voice/text toggle + content input + extension panel | SCE | STYLE_SWITCH_CONTAINER_EXTENSION |
| Voice/text toggle + content input | SC | STYLE_CONTAINER |
| Extension panel + content input | EC | --- |
| Content input + extension panel | CE | STYLE_SWITCH_CONTAINER |
| Content input only | C | STYLE_CONTAINER |
To modify globally, you can change the default input mode. Copy the entire content of rc_conversation_fragment.xml, create a file with the same name under res/layout/ in your application project, locate the RongExtension component, and add app:RCStyle="SCE" to change the default input display mode.
To modify dynamically, inherit IMKit's ConversationFragment to implement a custom conversation page Activity. Override the setInputPanelStyle() method in the ConversationFragment subclass. The enum values accepted by this method can be found in the table above.
public class ChatFragment extends ConversationFragment {

    @Override
    public void onViewCreated(@NonNull View view, @Nullable Bundle savedInstanceState) {
        super.onViewCreated(view, savedInstanceState);
        mRongExtension.getInputPanel().setInputPanelStyle(STYLE_CONTAINER_EXTENSION);

    }
}
Hide the Emoji Panel Button in the Input Area
This feature is available starting from IMKit SDK version 5.3.2.
When an app does not require emoji input functionality, the button to access the emoji panel can be hidden via IMKit's global configuration.
Hide the emoji panel button before entering the conversation page.
RongConfigCenter.featureConfig().setHideEmojiButton(true);
Input Area Extension Panel
RC refers to the panel displayed when clicking the + button in the input area as the extension panel, which showcases currently available plugins.

Extension Panel Plugin List
The complete plugin list in IMKit is shown below. By default, the extension panel includes only built-in plugins (Gallery and File). For other plugins, integrate the plugin libraries provided by IMKit.
| Module Name | Plugin Name | Description |
|---|---|---|
| Built-in Plugin | ImagePlugin | Gallery plugin |
| Built-in Plugin | FilePlugin | File plugin |
| LocationExtensionModule | DefaultLocationPlugin | Plugin with only location functionality (used when real-time sharing is disabled). Requires locationKit library. |
| LocationExtensionModule | CombineLocationPlugin | Plugin with both location and real-time location sharing functionalities. Requires locationKit library. |
| SightExtensionModule | SightPlugin | Short video plugin. Available after integrating the sight library. |
| ContactCardExtensionModule | ContactCardPlugin | Contact card plugin. Available after integrating the contactcard library. |
| RecognizeExtensionModule | RecognizePlugin | Voice input plugin. Available after integrating the recognizer library. |
| RongCallModule | AudioPlugin | Voice call plugin. Available after integrating CallKit. |
| RongCallModule | VideoPlugin | Video call plugin. Available after integrating CallKit. |
Add Voice-to-Text Input Plugin
IMKit has developed a voice-to-text plugin library recognizer based on the iFlyTek SDK. After integrating the recognizer library, IMKit automatically generates a voice input entry in the extension panel. Users can click the voice input button to convert recorded speech into text displayed in the input area.
-
Download the IMKit source code, then copy the
recognizerdirectory to your application project. -
Add the following configuration to
settings.gradlein the project root directory.include ':recognizer' -
Add the dependency in the app's
build.gradle.// The plugin version must match the main SDK version.
implementation project(path: ':recognizer') -
Before entering the conversation page, register the voice-to-text module
RecognizeExtensionModulewith IMKit's input areaRongExtensionviaRongExtensionManager. This module adds the voice input pluginRecognizePluginto the extension panel. It is recommended to configure this uniformly during the app's lifecycle.RongExtensionManager.getInstance().registerExtensionModule(new RecognizeExtensionModule());
Add Other Plugins
To learn how to add other plugins to the extension panel, refer to the following documentation:
Dynamically Configure Extension Panel Plugins
The above plugin modules in IMKit all implement the IExtensionModule interface class. By implementing the getPluginModules and getEmoticonTabs methods and registering with RongExtension via RongExtensionManager, you can provide extension panel plugins (IPluginModule instances) and custom emoji tabs (IEmoticonTab instances) to IMKit.
If your application needs to dynamically add, remove, or rearrange plugins in the extension panel, you do not need to implement the IExtensionModule interface class. Instead, it is recommended to create a custom extension panel configuration to meet these requirements.
-
Inherit
DefaultExtensionConfigto create a custom extension panel configuration classMyExtensionConfig, and override thegetPluginModules()method. You can add or remove plugins or adjust their positions.public class MyExtensionConfig extends DefaultExtensionConfig {
@Override
public List<IPluginModule> getPluginModules(Conversation.ConversationType conversationType, String targetId) {
List<IPluginModule> pluginModules = super.getPluginModules(conversationType,targetId);
ListIterator<IPluginModule> iterator = pluginModules.listIterator();
// Remove plugins
while (iterator.hasNext()) {
IPluginModule integer = iterator.next();
// Example: Remove FilePlugin
if (integer instanceof FilePlugin ) {
iterator.remove();
}
}
// Add plugins, e.g., a custom plugin MyConnectionPlugin
pluginModules.add(new MyConnectionPlugin());
return pluginModules;
}
} -
After SDK initialization, call the following method to set the custom input configuration. The SDK will display the extension panel based on this configuration.
RongExtensionManager.getInstance().setExtensionConfig(new MyExtensionConfig());
Custom Extension Panel Plugins
You can add custom plugins to IMKit's extension panel. Custom plugins must implement the IPluginModule interface class. Refer to the IPluginModule.java in the IMKit source code and its implementation classes.
Here is an example of implementing a custom plugin MyConnectionPlugin.
public class MyPlugin implements IPluginModule {
      /**
     * Get the plugin icon.
     *
     * @param context Context
     * @return Drawable of the icon
     */
    @Override
    public Drawable obtainDrawable(Context context) {
        return context.getResources().getDrawable(R.drawable.my_plugin); // Example code
    }
    /**
     * Get the plugin title.
     *
     * @param context Context
     * @return Title string
     */
    @Override
    public String obtainTitle(Context context) {
        return context.getString(R.string.my_plugin);// Example code
    }
    /**
     * Called when the plugin is clicked.
     * 1. If you need data from the Extension, call the corresponding methods of the Extension.
     * 2. If you need to start a new activity after clicking, use {@link Activity#startActivityForResult(Intent, int)}
     * or {@link RongExtension#startActivityForPluginResult(Intent, int, IPluginModule)}.
     * <p/>
     * Note: Do not hold references to the fragment or extension objects for long periods to avoid memory leaks.
     *
     * @param currentFragment The fragment associated with the plugin.
     * @param extension The RongExtension object.
     * @param index The plugin's position in the plugin panel.
     */
    @Override
    public void onClick(Fragment currentFragment, RongExtension extension, int index) {
			Intent intent = new Intent(currentFragment.getActivity(), MyPluginActivity.class);
      extension.startActivityForPluginResult(intent, requestCode, MyPlugin.this);
    }
    /**
     * Handle activity result data.
     * <p/>
     * In {@link #onClick(Fragment, RongExtension, int)}, you may start a new activity in two ways:
     * <p/>
     * 1. Using the system's {@link Activity#startActivityForResult(Intent, int)} method.
     * This requires handling the result in the corresponding Activity's {@link Activity#onActivityResult(int, int, Intent)}.
     * <p/>
     * 2. If you use {@link RongExtension#startActivityForPluginResult(Intent, int, IPluginModule)},
     * after receiving the result in ConversationFragment's {@link Activity#onActivityResult(int, int, Intent)},
     * you must call {@link RongExtension#onActivityPluginResult(int, int, Intent)} for RongExtension to pass the result
     * back via the IPluginModule's onActivityResult method.
     * <p/>
     *
     * @param requestCode The request code used to start the activity (not exceeding 255).
     * @param resultCode The result code returned by the activity.
     * @param data The returned data.
     */
    @Override
    public void onActivityResult(int requestCode, int resultCode, Intent data) {

    }
}
After creating a custom extension panel plugin, refer to Dynamically Configure Extension Panel Plugins to add the custom plugin to the extension panel.
Customize UI via XML Resources
You can adjust the layout, font size, colors, and background by modifying the corresponding layout files. Do not remove SDK default controls or arbitrarily change View IDs.
| IMKit Resource File | Location | Description |
|---|---|---|
| rc_extension_board.xml | res/layout | Layout file for the input area container. Copy the entire content from the IMKit source file and create a file with the same name under /res/layout. |
| rc_extension_input_panel.xml | res/layout | Layout file for the input bar. Copy the entire content from the IMKit source file and create a file with the same name under /res/layout. |
The above XML resources can also be obtained from the Official SDK Download page.