Voice-to-Text Implementation Guide
- If you're using versions below 5.22.0, or require custom third-party speech-to-text: Continue reading this document for detailed implementation solutions for legacy versions or custom integration scenarios.
Prerequisites
Before starting, ensure you've created an application and completed client SDK integration.
This guide demonstrates speech-to-text implementation using 5.X IMKit SDK. For IMLib SDK, you'll need to manually obtain the HQVoiceMessage's FileUrl (remote address). After converting the voice message to text using third-party SDKs, use RongCoreClient's setMessageExtra method to store the converted text in the message's extra field. Web platforms cannot implement this functionality using this documentation.
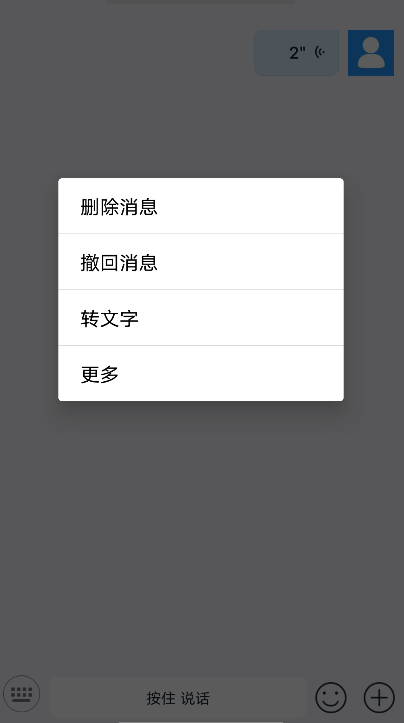
Speech-to-Text Functionality: The IMKit SDK records voice messages (supporting up to 60 seconds). In the chat UI, long-press a voice message bubble to access the context menu. Select "Convert to Text" to initiate third-party SDK conversion, then display the transcribed text. Supported languages depend on third-party capabilities.
Demo Preview
Implementation Steps
1. Customize Long-Press Message Menu
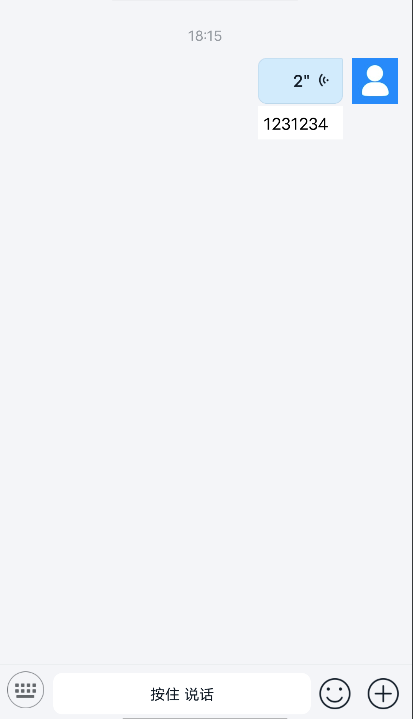
Add a "Convert to Text" option when long-pressing HQ voice messages in the chat UI. Handle the conversion in the onMessageItemLongClick callback by calling third-party APIs, then store the result in the Message's Extra field. Use refreshMessage to update the message display.
- Android
- iOS
MessageItemLongClickAction speechToText =
        new MessageItemLongClickAction.Builder()
                .titleResId(R.string.speech_to_text)
                .actionListener(
                        new MessageItemLongClickAction.MessageItemLongClickListener() {
                            @Override
                            public boolean onMessageItemLongClick(
                                    Context context, UiMessage uiMessage) {
                                // Get message object
                                Message message = uiMessage.getMessage();
                                // Set message extra
                                message.setExtra("1231234");
                                // Store extra in local database
                                RongCoreClient.getInstance().setMessageExtra(message.getMessageId(),"1231234",null);
                                // Refresh message display
                                IMCenter.getInstance().refreshMessage(message);
                               return true;
                            }
                        })
                .showFilter(
                        new MessageItemLongClickAction.Filter() {
                            @Override
                            public boolean filter(UiMessage uiMessage) {
                                //Show option only for HQ voice messages
                                Message message = uiMessage.getMessage();
                                return (message.getContent() instanceof HQVoiceMessage);
                            }
                        })
                .build();
MessageItemLongClickActionManager.getInstance()
        .addMessageItemLongClickAction(speechToText);
// 1.Override long-press menu to add convert option:


- (NSArray<UIMenuItem *> *)getLongTouchMessageCellMenuList:(RCMessageModel *)model {
   NSMutableArray<UIMenuItem *> *menuList = [[super getLongTouchMessageCellMenuList:model] mutableCopy];
   if ([model.content isKindOfClass:[RCHQVoiceMessage class]]) {
       UIMenuItem *forwardItem = [[UIMenuItem alloc] initWithTitle:@"Convert to Text"
                                                            action:@selector(audioToString)];
       [menuList addObject:forwardItem];
   }
   return menuList.copy;
}
// 2. Handle conversion by calling third-party APIs and storing result in Message Extra:
// Declare property in subclass
@property (nonatomic, strong) RCMessageModel *currentSelectedModel;

// Implement conversion handler


- (void)audioToString {
   // Implement speech-to-text logic
   NSString *result = @"Converted text";
   [[RCCoreClient sharedCoreClient] setMessageExtra:self.currentSelectedModel.messageId value:result completion:^(BOOL ret) {
       dispatch_async(dispatch_get_main_queue(), ^{
           self.currentSelectedModel.extra = result;
           self.currentSelectedModel.cellSize = CGSizeZero;
           [self.conversationMessageCollectionView reloadData];
           RCMessageModel *model = [self.conversationDataRepository lastObject];
           if (model.messageId == self.currentSelectedModel.messageId ) {
               [self scrollToBottomAnimated:YES];
           }
       });
   }];
}
2. Modify HQ Voice Message Display Style
Android Implementation
iOS Implementation Process
Import the following classes and register the custom cell in the chat interface:
- (void)registerCustomCellsAndMessages {
    [super registerCustomCellsAndMessages];
    ///Register custom voice-to-text message Cell
    [self registerClass:[CustomHQVoiceMessageCell class] forMessageClass:[RCHQVoiceMessage class]];
}


### 3. Modify Voice Message Sampling Rate

Since most vendors' voice-to-text functionality supports 16K sampling rate, you need to integrate the [IMKit source code](https://github.com/rongcloud) and add sampling rate configuration at the following locations if modification is required.

**Android Modification Location**

```java
mMediaRecorder.setAudioSamplingRate(SamplingRate.RC_SAMPLE_RATE_16000.getValue());
<img
  src={require('../assets/rc-audio-record-manager.png').default}
  width="300"
/>

**iOS Modification Location**

```objectivec
rcHQVoiceRecorderHandler.recordSettings = @{
                AVFormatIDKey : @(kAudioFormatMPEG4AAC_HE),
                AVNumberOfChannelsKey : @1,
                AVEncoderBitRateKey : @(16000)
            };
<img
  src={require('../assets/rc-audio-record-ios.png').default}
/>