Red Packet Scenario Implementation
Scenario Description
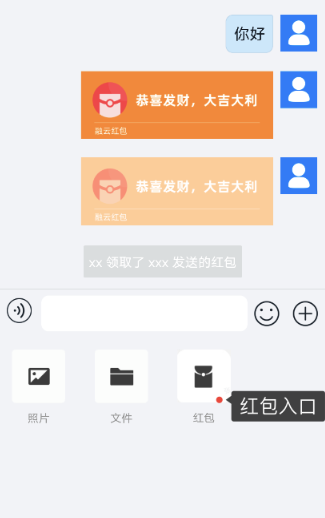
Users can send red packets (containing actual currency, virtual currency, points, etc.) to specified friends in one-to-one chat or group chat conversations. Both senders and recipients can clearly perceive the status of whether the red packet has been claimed (unclaimed, claimed).
Example Effect
No UI integration is provided. You may adjust the UI according to your business logic.
Red Packet Message Flow
1. Prerequisites
Before starting, ensure you have created an application and completed client SDK integration.
2. Define Red Packet Message
2.1 Define Red Packet Message Type
You can use the IMLib SDK's custom message feature to create a red packet message type (e.g., RedPacketMessage). The message content structure should be defined according to your business requirements, ensuring consistency across multiple platforms (Android / iOS / Web).
Reference implementations for Android / iOS custom message classes:
- Android: CustomRedPacketMessage.java
- iOS: CustomRedPacketMessage.h
- iOS: CustomRedPacketMessage.m
- Server SDK: RedPacketMessage.java
Web Example Code:
// 1. RongIMLib.registerMessageType must be called before connect(), otherwise it may cause abnormal message receiving behavior.
// 2. Please try to register all custom messages involved in the application in one unified registration, and only call registration once for the same type of message for easier management.

const messageType = 'app:red_packet' // Message type
const isPersited = true // Whether to store
const isCounted = true // Whether to count
const searchProps = [] // Search fields, no need to set for Web. When search field value is set to a number, the value range is (-Math.pow(2, 64), Math.pow(2, 64)) and must be an integer
const isStatusMessage = false // Whether it is a status message. Status messages are not stored, not counted, and can only be received when the recipient is online.
const PersonMessage = RongIMLib.registerMessageType(messageType, isPersited, isCounted, searchProps, isStatusMessage)
3. Register and Receive Red Packet Messages
- Android
- iOS
- Web
// Register custom message type, register after SDK initialization
ArrayList<Class<? extends MessageContent>> myMessages = new ArrayList<>();
myMessages.add(CustomRedPacketMessage.class);
RongCoreClient.registerMessageType(myMessages);

// Message receiving example: Set message receiving listener, will automatically callback when receiving messages
RongCoreClient.addOnReceiveMessageListener(new OnReceiveMessageWrapperListener() {
          @Override
          public void onReceivedMessage(Message message, ReceivedProfile profile) {
              int left = profile.getLeft();
              boolean isOffline = profile.isOffline();
              boolean hasPackage = profile.hasPackage();
          }
      });

// Returned `Message` object reference information below, you can use `objectName` or `content` to distinguish message types:

{
  "conversationType": "PRIVATE",
  "targetId": "userid3453",
  "messageId": 70,
  "channelId": "",
  "messageDirection": "RECEIVE",
  "senderUserId": "userid3453",
  "receivedStatus": "io.rong.imlib.model.Message$ReceivedStatus @560f848",
  "sentStatus": "SENT",
  "receivedTime": 1739428279001,
  "sentTime": 1739428279158,
  "objectName": "app:red_packet",
  "content": {
      "content": "Red packet message"
  },
  "extra": "",
  "readReceiptInfo": "io.rong.imlib.model.ReadReceiptInfo @b8d3c06",
  "messageConfig": {
      "disablePushTitle": false,
      "pushTitle": "",
      "pushContent": "",
      "pushData": "null",
      "templateId": "",
      "forceShowDetailContent": false,
      "iOSConfig": null,
      "androidConfig": null,
      "harmonyConfig": null
  },
  "canIncludeExpansion": false,
  "expansionDic": null,
  "expansionDicEx": null,
  "mayHasMoreMessagesBefore": false,
  "UId": "CKVO-0J6T-GM26-D3E6",
  "disableUpdateLastMessage": "false",
  "directedUsers": "0"
}
// Register custom message after SDK initialization but before connecting to IM
[[RCCoreClient sharedCoreClient] registerMessageType:[CustomRedPacketMessage class]];

// Register message receiving listener
[[RCCoreClient sharedCoreClient] addReceiveMessageDelegate: self];

// IMLib delegate callback
- (void)onReceived:(RCMessage *)message left:(int)nLeft object:(nullable id)object;

// Message content
// Retrieved custom message related content
_isOffline = false
_canIncludeExpansion = false
_hasChanged = false
_disableUpdateLastMessage = false
_conversationType = 1
_targetId =        @"123"
_channelId = @""
_messageId = 17
_messageDirection = 2
_senderUserId = @"123"
_receivedStatusInfo        RCReceivedStatusInfo *        0x3025eb5c0
_sentStatus = 30
_receivedTime = 1740566955000
_sentTime = 1740566955056
_objectName = @"app:red_packet"
_content CustomRedPacketMessage *        0x300691b80
       _RCMessageContent        RCMessageContent
               _senderUserInfo
               _mentionedInfo
               _auditInfo
               _destructDuration = 0
               _extra
               _rawJSONData
               _contentBaseKeys
       _content = @"Red packet"
_extra = @""
_messageUId = @"CL87-G08C-6L85-E222"
_readReceiptInfo
_groupReadReceiptInfoV2
_messageConfig        RCMessageConfig *        0x30279cee0
_messagePushConfig    RCMessagePushConfig *    0x300693110
_directedUserIds
_destructTime = 0
_expansionDicEx
// Set message listener
const Events = RongIMLib.Events
RongIMLib.addEventListener(Events.MESSAGES, (evt) => {
  console.log(evt.messages)
})
  // Register custom message
const PersonMessage = RongIMLib.registerMessageType('app:red_packet', true, true, [], false)

// Send custom message
// Build the custom message to send
const message = new PersonMessage({ name: 'someone', age: 18 })

// Receive this custom message example

// Call addEventListener to set message receiving listener. All received messages will callback in this interface method.
// Returns an array of IAReceivedMessage type messages. For types, refer to: https://doc.rongcloud.cn/apidoc/im-web/latest/zh_CN/interfaces/IMessagesEvent.html
const Events = RongIMLib.Events
const listener = (evt) => {
console.log(evt.messages)
};
RongIMLib.addEventListener(Events.MESSAGES, listener)

// Returned `Message` object reference information below, you can use `messageType` to distinguish message types:
{
  // Filter the gift message to be processed at the business layer based on messageType
  "messageType": "app:red_packet",
  "channelId": "",
  "content": {
      "content": "Red packet message"
  },
  "senderUserId": "user01",
  "targetId": "chart01",
  "conversationType": 4,
  "sentTime": 1743414376795,
  "receivedTime": 0,
  "messageUId": "Message unique value",
  "messageDirection": 1,
  "isPersited": true,
  "isCounted": true,
  "isMentioned": false,
  "disableNotification": false,
  "isStatusMessage": false,
  "canIncludeExpansion": false,
  "expansion": null,
  "receivedStatus": 0,
  "receivedStatusInfo": {
      "isRead": false,
      "isListened": false,
      "isDownload": false,
      "isRetrieved": false
  },
  "messageId": 8488190336485840000,
  "sentStatus": 30,
  "isOffLineMessage": false
}
4. Send Red Packet Message After Successful Payment
After the user successfully completes payment, you need to call RongCloud's message sending method to send the red packet message and set the message as extensible. Choose which end to send this type of message from based on your business logic.
- Android
- iOS
- Web
// Build red packet message
CustomRedPacketMessage redPacketMessage = CustomRedPacketMessage.obtain("0.01");
io.rong.imlib.model.Message message =
      io.rong.imlib.model.Message.obtain(targetId, conversationType, redPacketMessage);
// Set message as extensible
message.setCanIncludeExpansion(true);
HashMap<String, String> redInfo = new HashMap<>();
redInfo.put("open","false");
redInfo.put("count","1");
redInfo.put("amount","0.01");
message.setExpansion(redInfo);
// Send message. If using IMLib SDK, use RongCoreClient's sendMessage method
RongCoreClient.getInstance().sendMessage(message, null, null, null);
// Build red packet message
CustomRedPacketMessage *message = [CustomRedPacketMessage messageWithContent:@"0,01"];
RCMessage *msg = [[RCMessage alloc] initWithType:self.conversationType targetId:self.targetId direction:MessageDirection_SEND content:message];
// Set message as extensible
msg.canIncludeExpansion = YES;
msg.expansionDic = @{@"open":@"false",@"count":@"1",@"amount":@"0.01"};
// Send message
[[RCCoreClient sharedCoreClient] sendMessage:msg pushContent:@"Red packet arrived" pushData:nil successBlock:^(RCMessage *successMessage) {

} errorBlock:^(RCErrorCode nErrorCode, RCMessage *errorMessage) {

}];
// Build the custom red packet message to send
const message = new PersonMessage({ key1: 'value1', key2: 'value2' })

// Send message
RongIMLib.sendMessage({
   conversationType: RongIMLib.ConversationType.PRIVATE,
   targetId: '<targetId>'
}, message).then(res => {
 if (res.code === 0) {
   console.log(res.code, res.data)
 } else {
   console.log(res.code)
 }
})
Server Example Code
- Server SDK in Java
- Server SDK in PHP
- Server SDK in GO
 /**
* Send group gray bar message - targeted users (up to 1000 users per request)
*/
String[] targetIds = {"groupId"};
RedPacketMessage redPacketMessage =new RedPacketMessage("Red packet message");
HashMap<String, String> hashMap = new HashMap<>();
hashMap.put("open", "false");
hashMap.put("count", "1");
hashMap.put("amount", "2");
GroupMessage groupMessage = new GroupMessage()
      .setSenderId("fromId")
      .setIsIncludeSender(1)
      .setTargetId(targetIds) // Group ID
      .setContent(redPacketMessage)
      .setObjectName(txtMessage.getType())
      .setExpansion(true)
      .setExtraContent(hashMap);

ResponseResult redPackeReslut = group.send(groupMessage);
System.out.println("group info Notify message result:  " + redPackeReslut.toString());
require "./../../RongCloud.php";
define("APPKEY", '');
define('APPSECRET','');
use RongCloud\RongCloud;
use RongCloud\Lib\Utils;

/**
* Group message sending
*/
function send()
{
$RongSDK = new RongCloud(APPKEY,APPSECRET);
$message = [
    'senderId'=> 'Vu-oC0_LQ6kgPqltm_zYtI',// Sender ID
    'targetId'=> ['php group1'],// Group ID
    "objectName"=>'app:red_packet',// Message type Text
    'content'=>json_encode(['content'=>'Red packet message'])// Message Body
    'expansion'=>true,
    'extraContent'       => ['open' => 'false', 'count' => '2', 'amount' => '3'],// Custom message extension content, JSON structure, set in Key, Value format
];
$Result = $RongSDK->getMessage()->Group()->send($message);
Utils::dump("Group message sending",$Result);
}
send();
func TestRongCloud_GroupSend(t *testing.T) {

	rc := NewRongCloud(
		os.Getenv("APP_KEY"),
		os.Getenv("APP_SECRET"),
		REGION_BJ,
	)

	msg := TXTMsg{
		Content: "Red packet message",
		Extra:   "helloExtra",
	}
	// Create a map containing multiple key-value pairs
    dataMap := map[string]string{
        "open":    "false",
        "count":    "1",
        "amount": "2",
    }

    // Convert map to JSON format
    data, err := json.Marshal(dataMap)
	err := rc.GroupSend(
		"7Szq13MKRVortoknTAk7W8",
		[]string{"CFtiYbXNQNYtSr7rzUfHco"},
		"app:red_packet",
		&msg,
		"",
		"",
		1,
		0,
		WithMsgExpansion(true),
		WithMsgExtraContent(data),
	)
	t.Log(err)
}
5. Update Red Packet Extension When Opening Red Packet
After a user clicks to open a red packet, the red packet message status needs to be changed to "opened". At this point, you can update the Message Extension information of this message by setting the Message Extension Listener updateMessageExpansion, configuring the opening user ID and marking it as opened status, while simultaneously changing the locally displayed message style.
- Android
- iOS
- Web
// messageUid is the unique ID of the original red packet message.

RongIMClient.getInstance()
      .updateMessageExpansion(
              redInfo,
              messageUid,
              new RongIMClient.OperationCallback() {
                  @Override
                  public void onSuccess() {
                      // Initiator handles UI data refresh after extension update here
                  }

                  @Override
                  public void onError(RongIMClient.ErrorCode errorCode) {
                      Toast.makeText(
                                      getApplicationContext(),
                                      "Setup failed, ErrorCode : " + errorCode.getValue(),
                                      Toast.LENGTH_LONG)
                              .show();
                  }
              });
// Update red packet extension
[[RCCoreClient sharedCoreClient] updateMessageExpansion:dict messageUId:model.messageUId success:^{
    dispatch_async(dispatch_get_main_queue(), ^{
        // Update corresponding UI
    });

} error:^(RCErrorCode status) {

}];
// Update the extension fields of red packet message
RongIMLib.updateMessageExpansion({ key1: 'val1', key2: 'val2' }, message).then(res => {
  if (res.code === 0) {
    console.log(res.code, 'Update successful')
  } else {
    console.log(res.code, res.msg)
  }
})
Server Example Code
- Server SDK in Java
- Server SDK in PHP
- Server SDK in GO
/**
*
* Set message extension
*
*/
ExpansionModel msg = new ExpansionModel();
msg.setMsgUID("BS45-NPH4-HV87-10LM");
msg.setUserId("WNYZbMqpH");
msg.setTargetId("tjw3zbMrU");
msg.setConversationType(1);
HashMap<String, String> kv = new HashMap<String, String>();
kv.put("type1", "1");
kv.put("type2", "2");
kv.put("type3", "3");
kv.put("type4", "4");
msg.setExtraKeyVal(kv);
msg.setIsSyncSender(1);
ResponseResult result = expansion.set(msg);
System.out.println("set expansion:  " + result.toString());
/**
* Message module two-person message instance
*/


require "./../../RongCloud.php";
define("APPKEY", '');
define('APPSECRET', '');

use RongCloud\RongCloud;
use RongCloud\Lib\Utils;

/**
* Two-person message sending
*/
function set()
{
// Connect to the Singapore Data Center
// RongCloud::$apiUrl = ['http://api.sg-light-api.com/'];
$RongSDK = new RongCloud(APPKEY, APPSECRET);
$message = [
    'msgUID'            => 'BS45-NPH4-HV87-10LM',   // Message unique identifier, the server can obtain it through the full message routing function.
    'userId'            => 'WNYZbMqpH',             // Need to set the extended message delivery user Id.
    'targetId'          => 'tjw3zbMrU',             // Target ID, depending on the conversationType, could be a user ID or a group ID.
    'conversationType'  => '1',                     // Conversation type, one-to-one chat is 1, group chat is 3, only supports one-to-one chat and group chat types.
    'extraKeyVal'       => ['type1' => '1', 'type2' => '2', 'type3' => '3', 'type4' => '4',],// Custom message extension content, JSON structure, set in Key, Value format
    'isSyncSender'      => 0                        // Whether the sender accepts the terminal user's online status, 0 indicates not accepting, 1 indicates accepting, default is 0 not accepting
];
$res = $RongSDK->getMessage()->Expansion()->set($message);
Utils::dump("Two-person message sending", $res);
}
set();
func TestRongCloud_MessageExpansionSet(t *testing.T) {
    data, err := json.Marshal(map[string]string{"type": "3"})
    if err != nil {
        t.Log("marshal err", err)
        return
    }
    rc := NewRongCloud(
        os.Getenv("APP_KEY"),
        os.Getenv("APP_SECRET"),
        REGION_BJ,
    )
    if err := rc.MessageExpansionSet("C16R-VBGG-1IE5-SD0C",
        "u01",
        "3",
        "testExp0309",
        string(data),
        1,
    ); err != nil {
        t.Error(err)
        return
    }
    t.Log("do UGMessageGet suc")
}
6. Sender Updates Red Packet Message Extension
The red packet message sender can globally set message extension listeners to handle corresponding processing when receiving message extension update callbacks. It is recommended to call the client service API to obtain the latest red packet claim information.
- Android
- iOS
- Web
// Recipient Android example code
RongIMClient.getInstance().setMessageExpansionListener(new RongIMClient.MessageExpansionListener() {
    @Override
    public void onMessageExpansionUpdate(Map<String, String> expansion, Message message) {
        if (message.getContent() instanceof CustomRedPacketMessage){
            // Other custom processing
        }
    }
});
// Recipient iOS example code:
[RCCoreClient sharedCoreClient].messageExpansionDelegate = self;

// Message extension information change callback
- (void)messageExpansionDidUpdate:(NSDictionary<NSString *,NSString *> *)expansionDic message:(RCMessage *)message {
    // Perform business operations based on callback message
}
// Web receiver gets message extension notification:
RongIMLib.addEventListener(RongIMLib.Events.EXPANSION, ({ updatedExpansion, deletedExpansion }) => {
  console.log('Extension information updated:', updatedExpansion);
  console.log('Extension information deleted:', deletedExpansion);
})
7. Operations After Red Packet Claim
After opening the red packet, if you need to display "XX claimed the red packet", the server can send a group targeted message to the red packet sender and claimant, or monitor the message extension information to display the corresponding user information and claim status. The red packet sender can monitor the message extension information, and upon receiving the listener, proactively obtain the latest status of message claims from the business client.
- Android
- iOS
- Web
// Insert gray bar message
InformationNotificationMessage informationNotificationMessage = InformationNotificationMessage.obtain("You claimed the red packet sent by xxx");

ConversationType conversationType = ConversationType.PRIVATE;
String targetId = "user1";
String senderUserId = "Simulated sender's ID";
ReceivedStatus receivedStatus = new ReceivedStatus(0x1);
String sentTime = System.currentTimeMillis();

IMCenter.getInstance().insertIncomingMessage(conversationType, targetId, senderUserId, receivedStatus, informationNotificationMessage, sentTime, new IRongCoreCallback.ResultCallback<Message>() {
            @Override
            public void onSuccess(Message message) {
                // Successfully inserted gray bar message
            }

            @Override
            public void onError(IRongCoreEnum.CoreErrorCode e) {

            }
        });
RCInformationNotificationMessage *warningMsg =
     [RCInformationNotificationMessage
     notificationWithMessage:@"You claimed the red packet sent by xxx" extra:nil];
RCMessage *savedMsg = [[RCCoreClient sharedCoreClient]
     insertOutgoingMessage:self.conversationType targetId:self.targetId
     sentStatus:SentStatus_SENT content:warningMsg];
// Web message listener receives message, display UI as needed

const Events = RongIMLib.Events
const listener = (evt) => {
  console.log(evt.messages)
};
RongIMLib.addEventListener(Events.MESSAGES, listener)