APNs Remote Notification Integration
The RC server has integrated APNs server functionality. When the app process is killed, suspended in the background by the system, or remains active in the background for more than 2 minutes, the IMLib SDK's persistent connection will be disconnected. In such cases, the RC server can notify the client through the APNs channel.
RC Server Support for APNs
The RC server supports the following authentication methods with Apple APNs:
| Category | Differences | Required Credentials |
|---|---|---|
| Using Authentication Token (P8) | APNs processes token-based push requests faster. The same P8 certificate can be used across applications under the same account, with no distinction between sandbox and production environments. P8 certificates are permanently valid. | You need to obtain a signing key (.p8 text file) from your Apple Developer account and provide it to RC. RC will use your key to sign tokens in APNs push requests. |
| Using TLS Certificate (P12) | Must be bound to an Apple App ID and can only be used for that specific app. APNs certificates can support either sandbox environment only (P12 certificate) or both production and sandbox environments (universal P12 certificate). Valid for one year. | You need to obtain this certificate from your Apple Developer account and provide it to RC. RC will use this certificate for authentication with APNs. The certificate expires after one year - be sure to create and provide a new certificate before expiration. |
The above content is excerpted from Apple's official developer documentation. For any questions, please refer to Apple Developer Account Help: Communicate with APNs using authentication tokens and Communicate with APNs using a TLS certificate.
Taking TLS certificates as an example, the workflow for RC offline messages triggering APNs push is as follows:
Apple Developer Account Operations
You must have an App ID to use APNs push services. The following describes how to create an App ID from the Apple Developer Account page and enable Push Notifications for the App ID.
Creating an App ID
If you already have an App ID, skip this step and proceed directly to Enabling Push Notifications for App ID.
The following steps describe how to create an App ID from the Apple Developer Account:
-
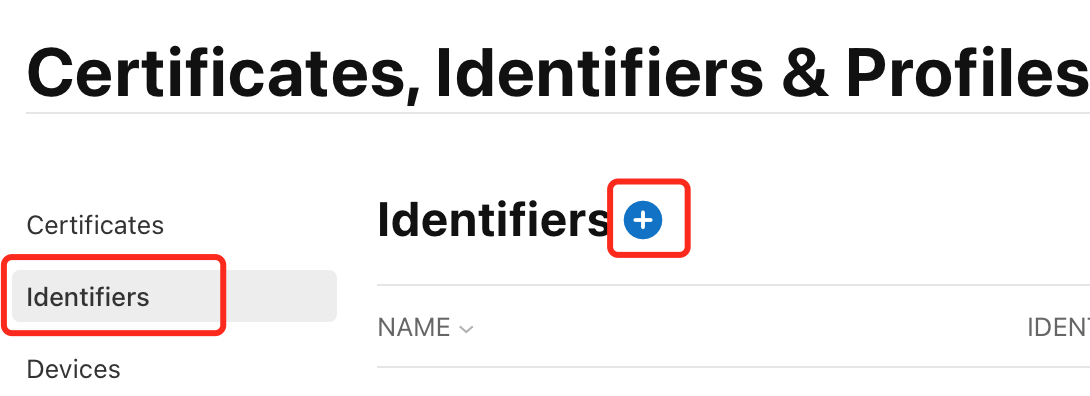
In Certificates, Identifiers & Profiles, click Identifiers in the sidebar, then click the add button (+) in the top-left corner.
-
Select App IDs from the options list and click Continue.
-
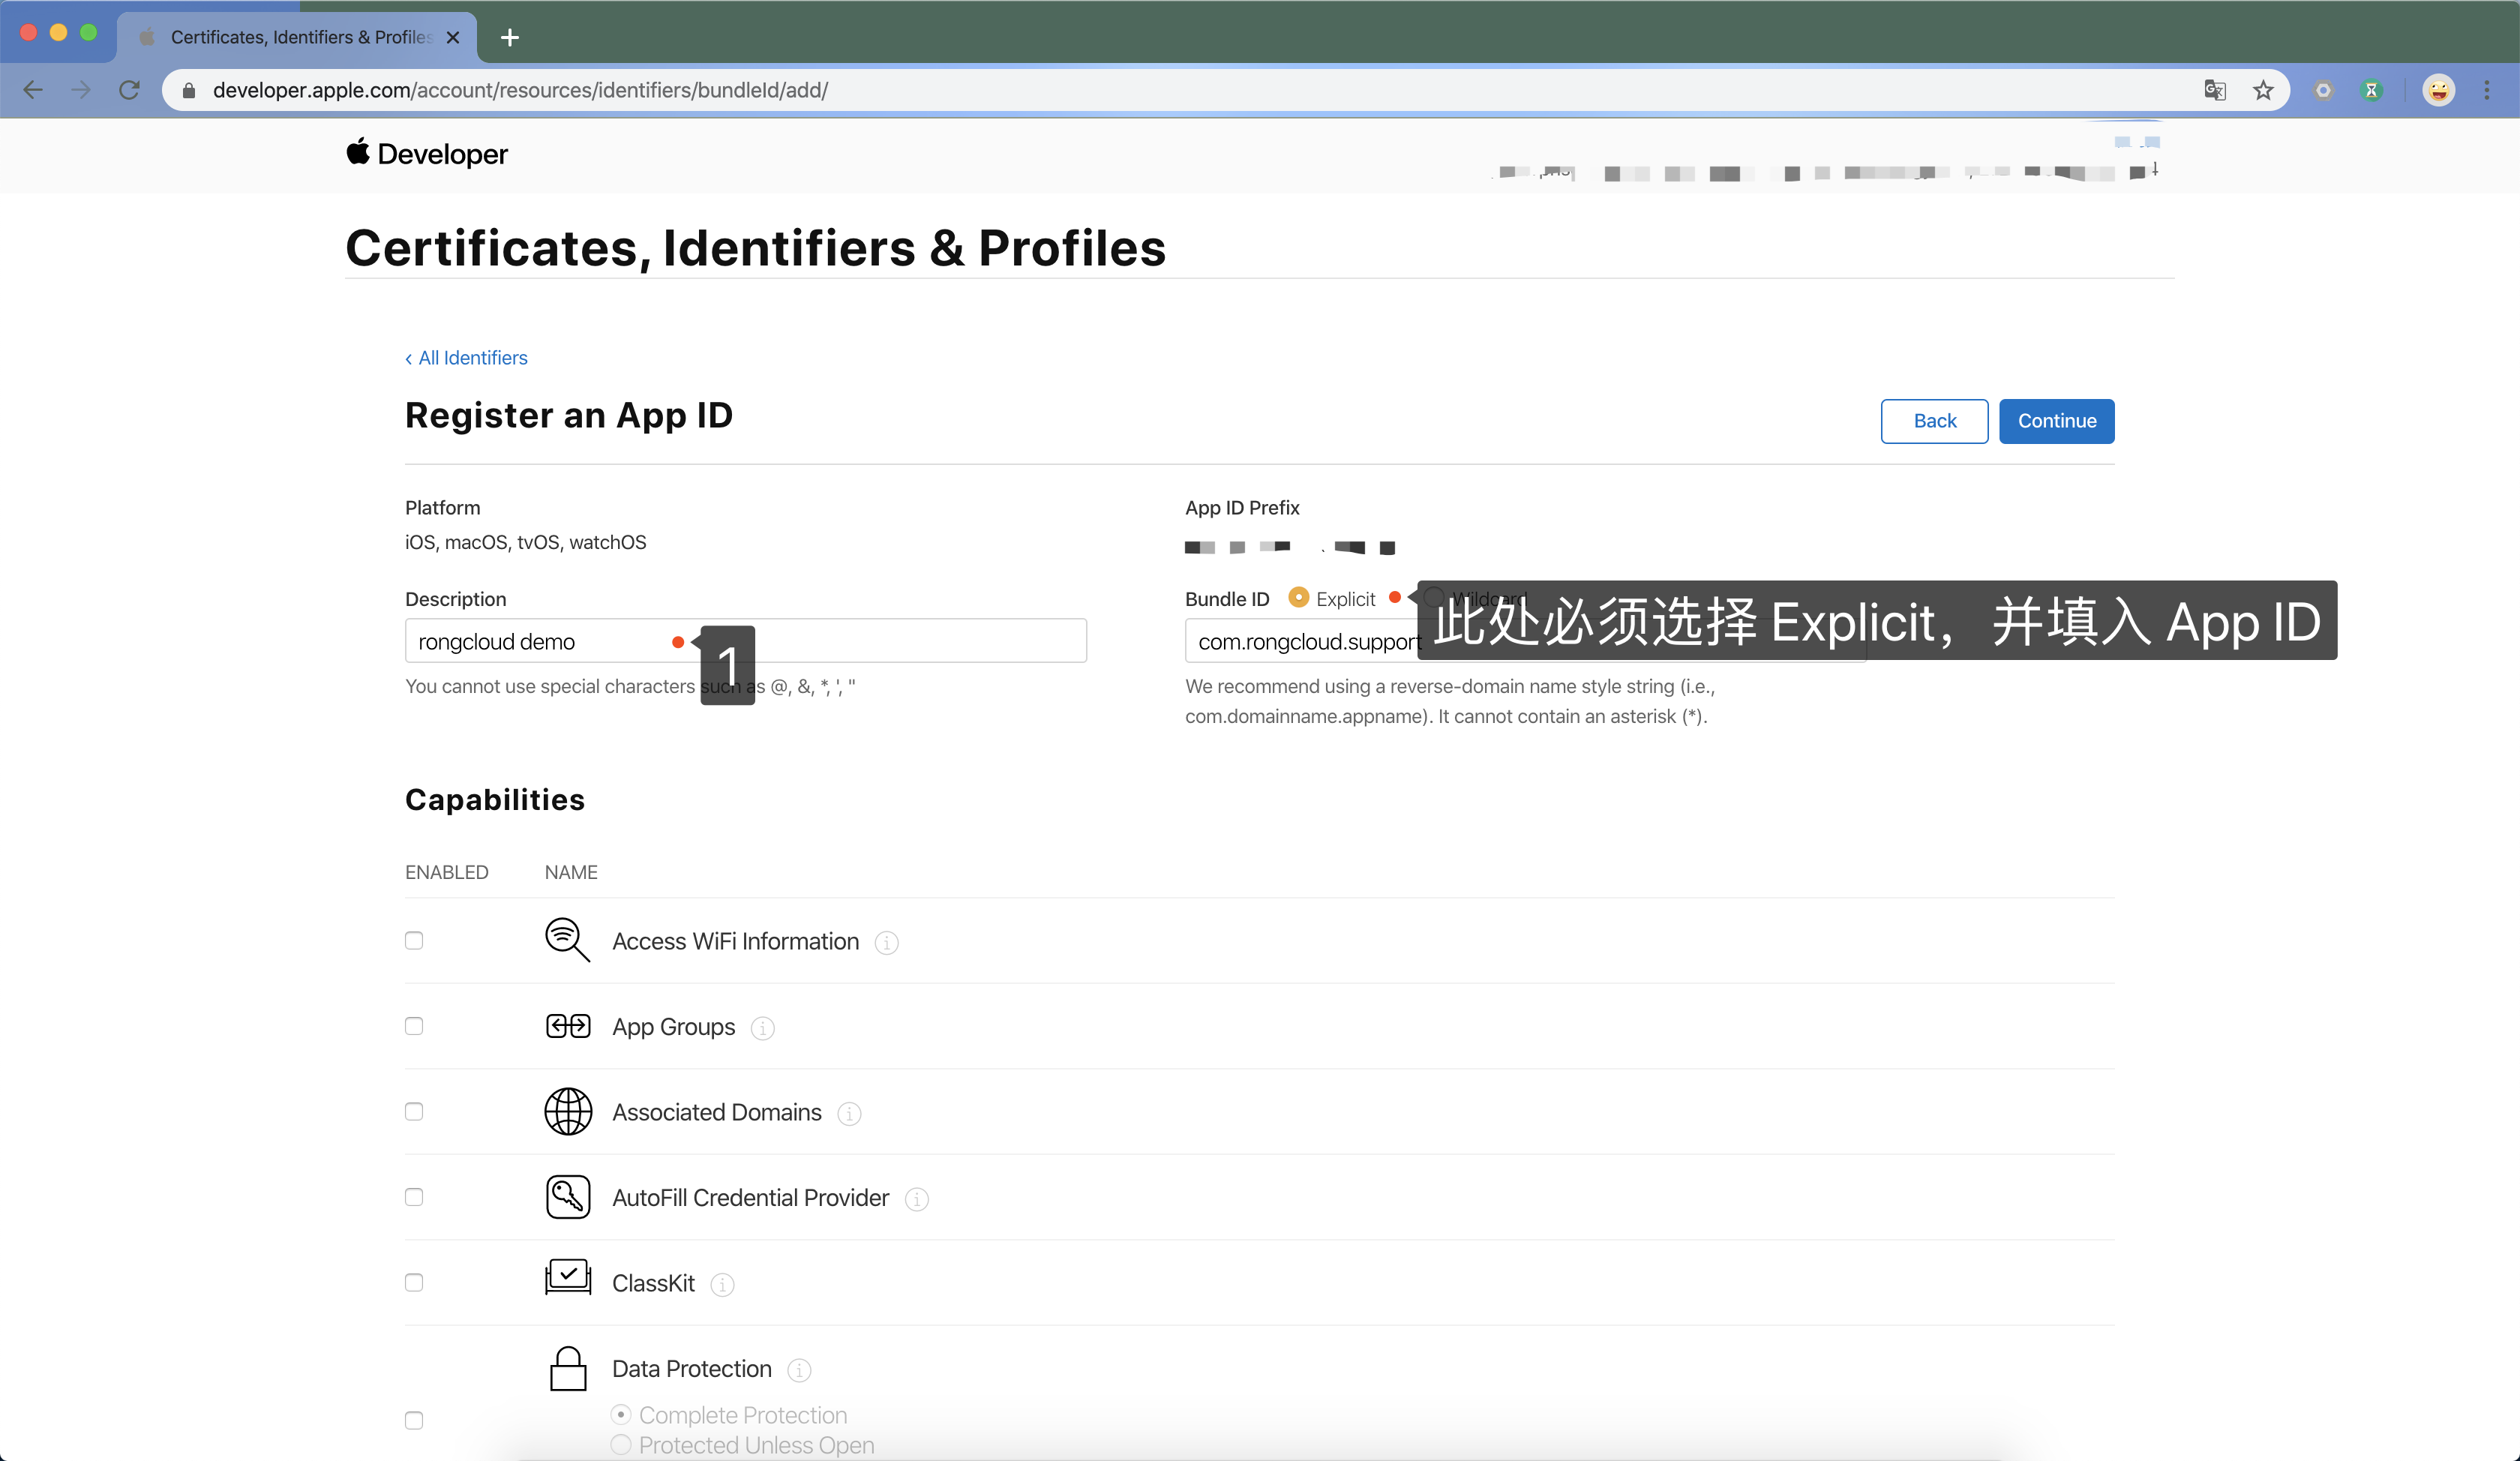
From the options, confirm that the App ID type is automatically selected, then click Continue.
-
Enter a name or description for the App ID in the Description field. Select Explicit App ID and enter the app's Bundle ID in the Bundle ID field.
The explicit App ID entered here should match the Bundle ID entered in the Summary panel of your Xcode target.
-
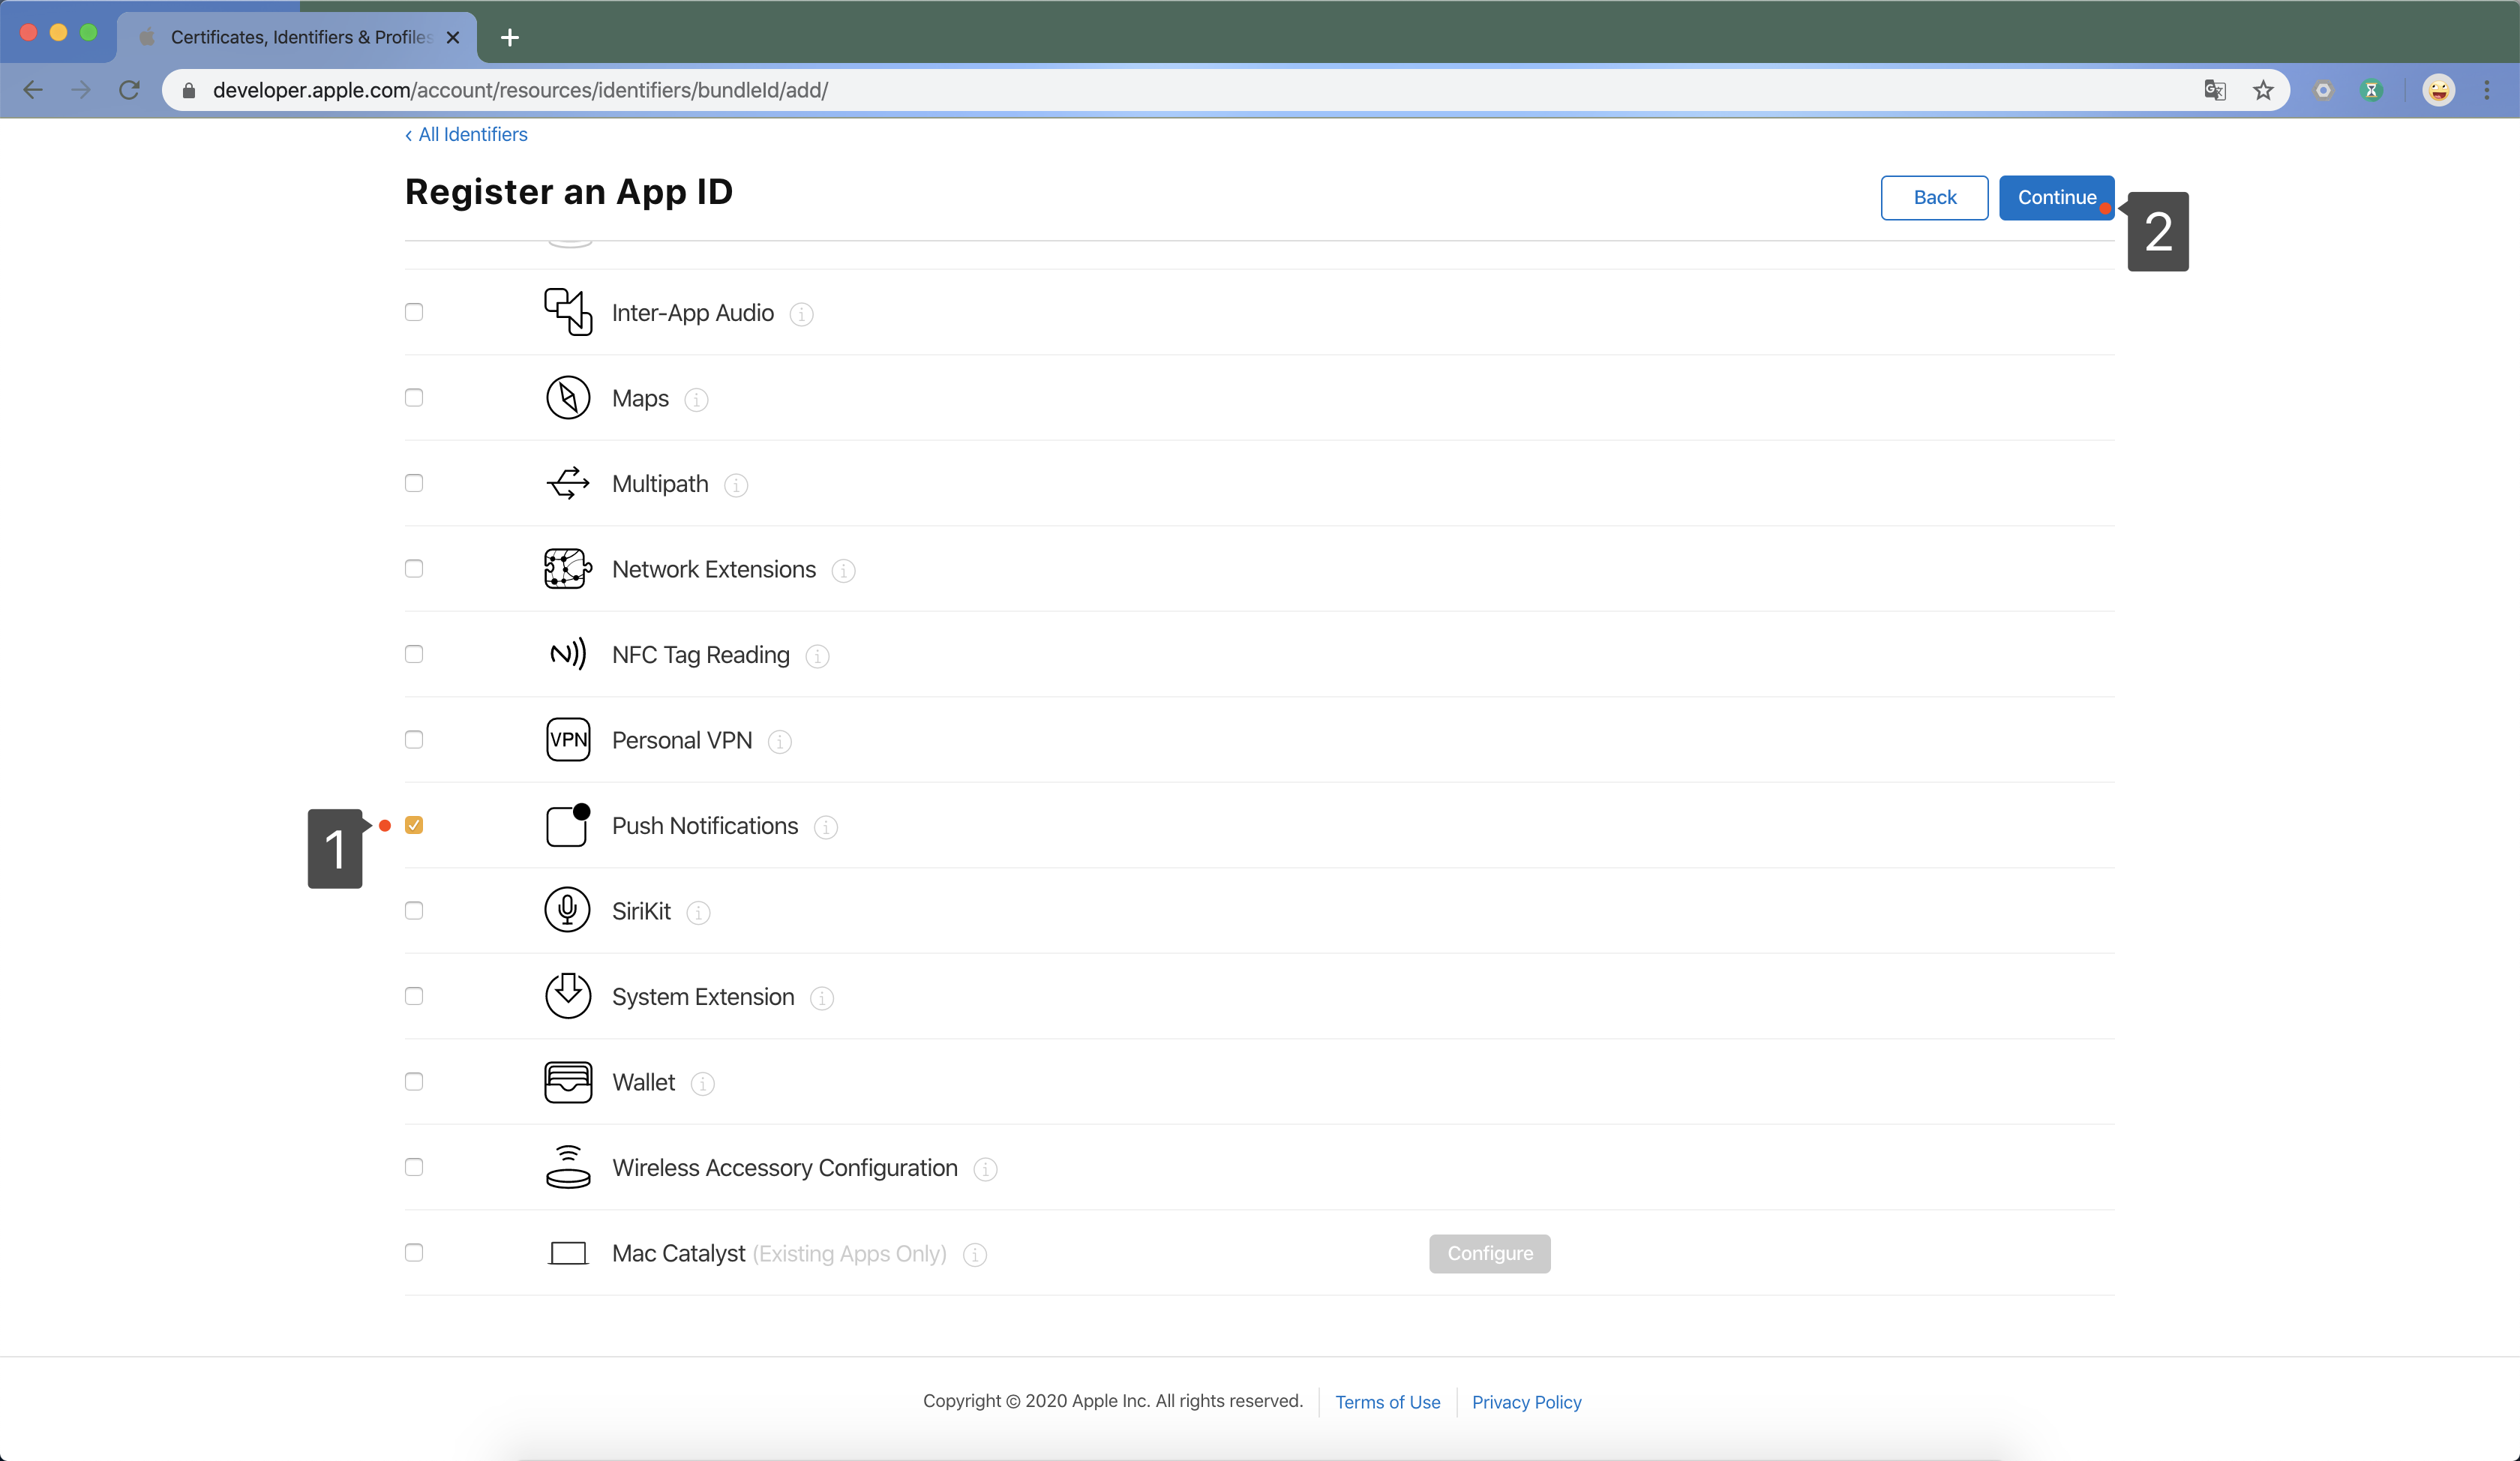
Under Capabilities, the available features for your app type will be displayed. Check the corresponding boxes to enable the features you want to use.
Make sure to check Push Notifications to enable push notification functionality.
-
Click Continue, review the registration information, then click Register.
For detailed instructions on creating an App ID, refer to Apple Developer Account Help: Register an App ID.
Enabling Push Notifications for App ID
The following content is from Apple Developer Account Help: Enable Push Notifications.
The following steps describe how to enable push notifications for an existing App ID from the Apple Developer Account. If already enabled, you can skip this step.
-
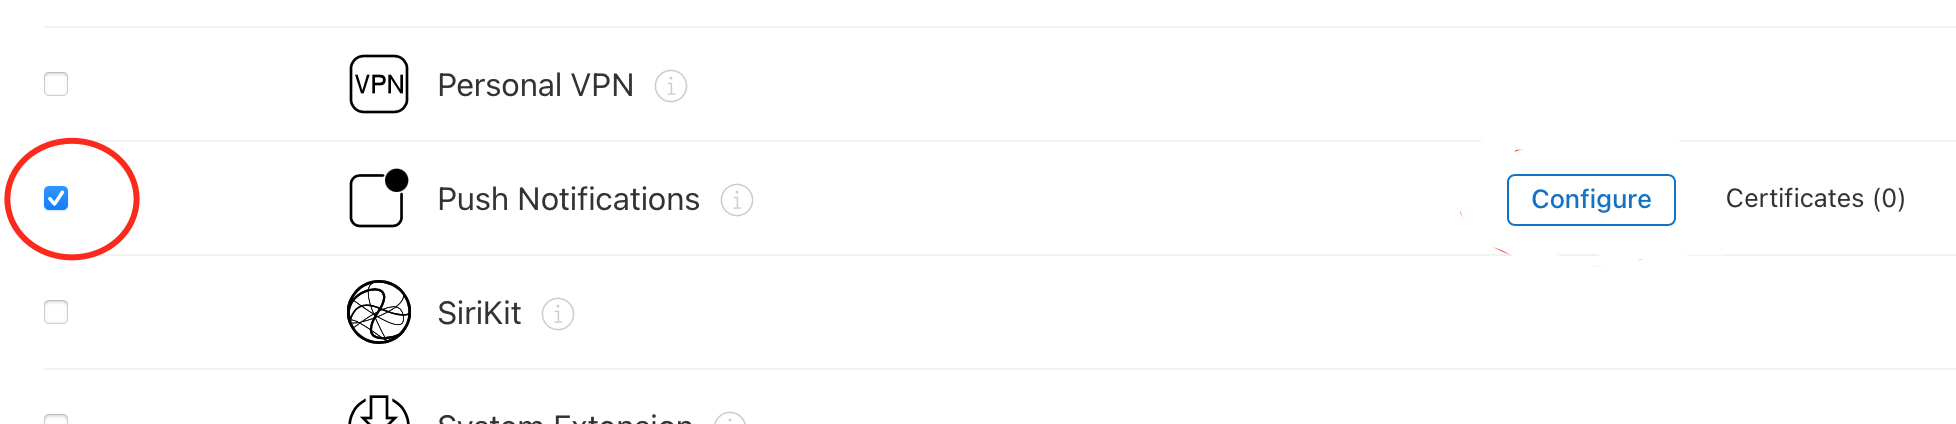
In Certificates, Identifiers & Profiles, click Identifiers in the sidebar, then locate the corresponding App ID to configure.
-
Check Push Notifications under Capabilities.
After enabling push notifications for the App ID, choose to create either a P8 certificate or P12 certificate as needed.
Using Authentication Token (P8)
For information about "Establishing a Token-Based Connection to APNs", refer to Apple Developer Documentation Establishing a Token-Based Connection to APNs. The following steps are from Apple Developer Account Help: Create and download a private key with APNs enabled.
You need to create and download a private key (.p8 text file, also known as "P8 certificate") for APNs push services from your Apple Developer Account.
-
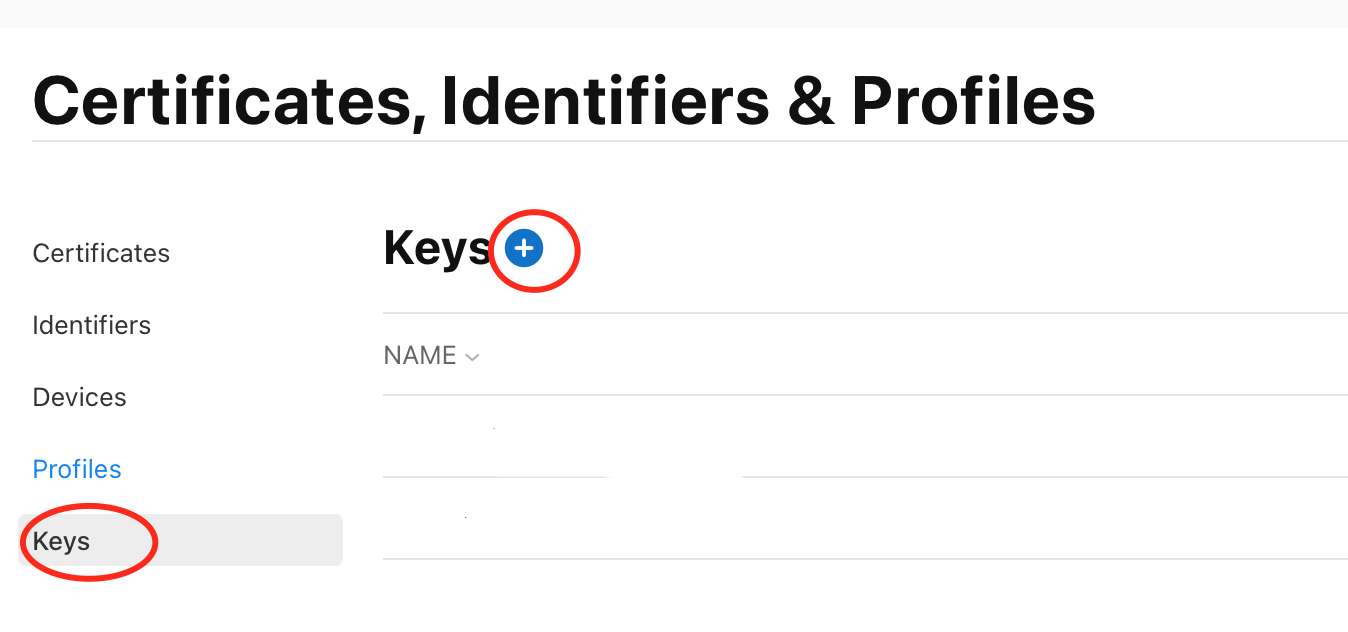
In Certificates, Identifiers & Profiles, click Keys in the sidebar, then click the add button (+) in the top-left corner.
-
Under Key Name, enter a unique name for the key. Check Apple Push Notifications service (APNs) to enable APNs service, then click Continue.
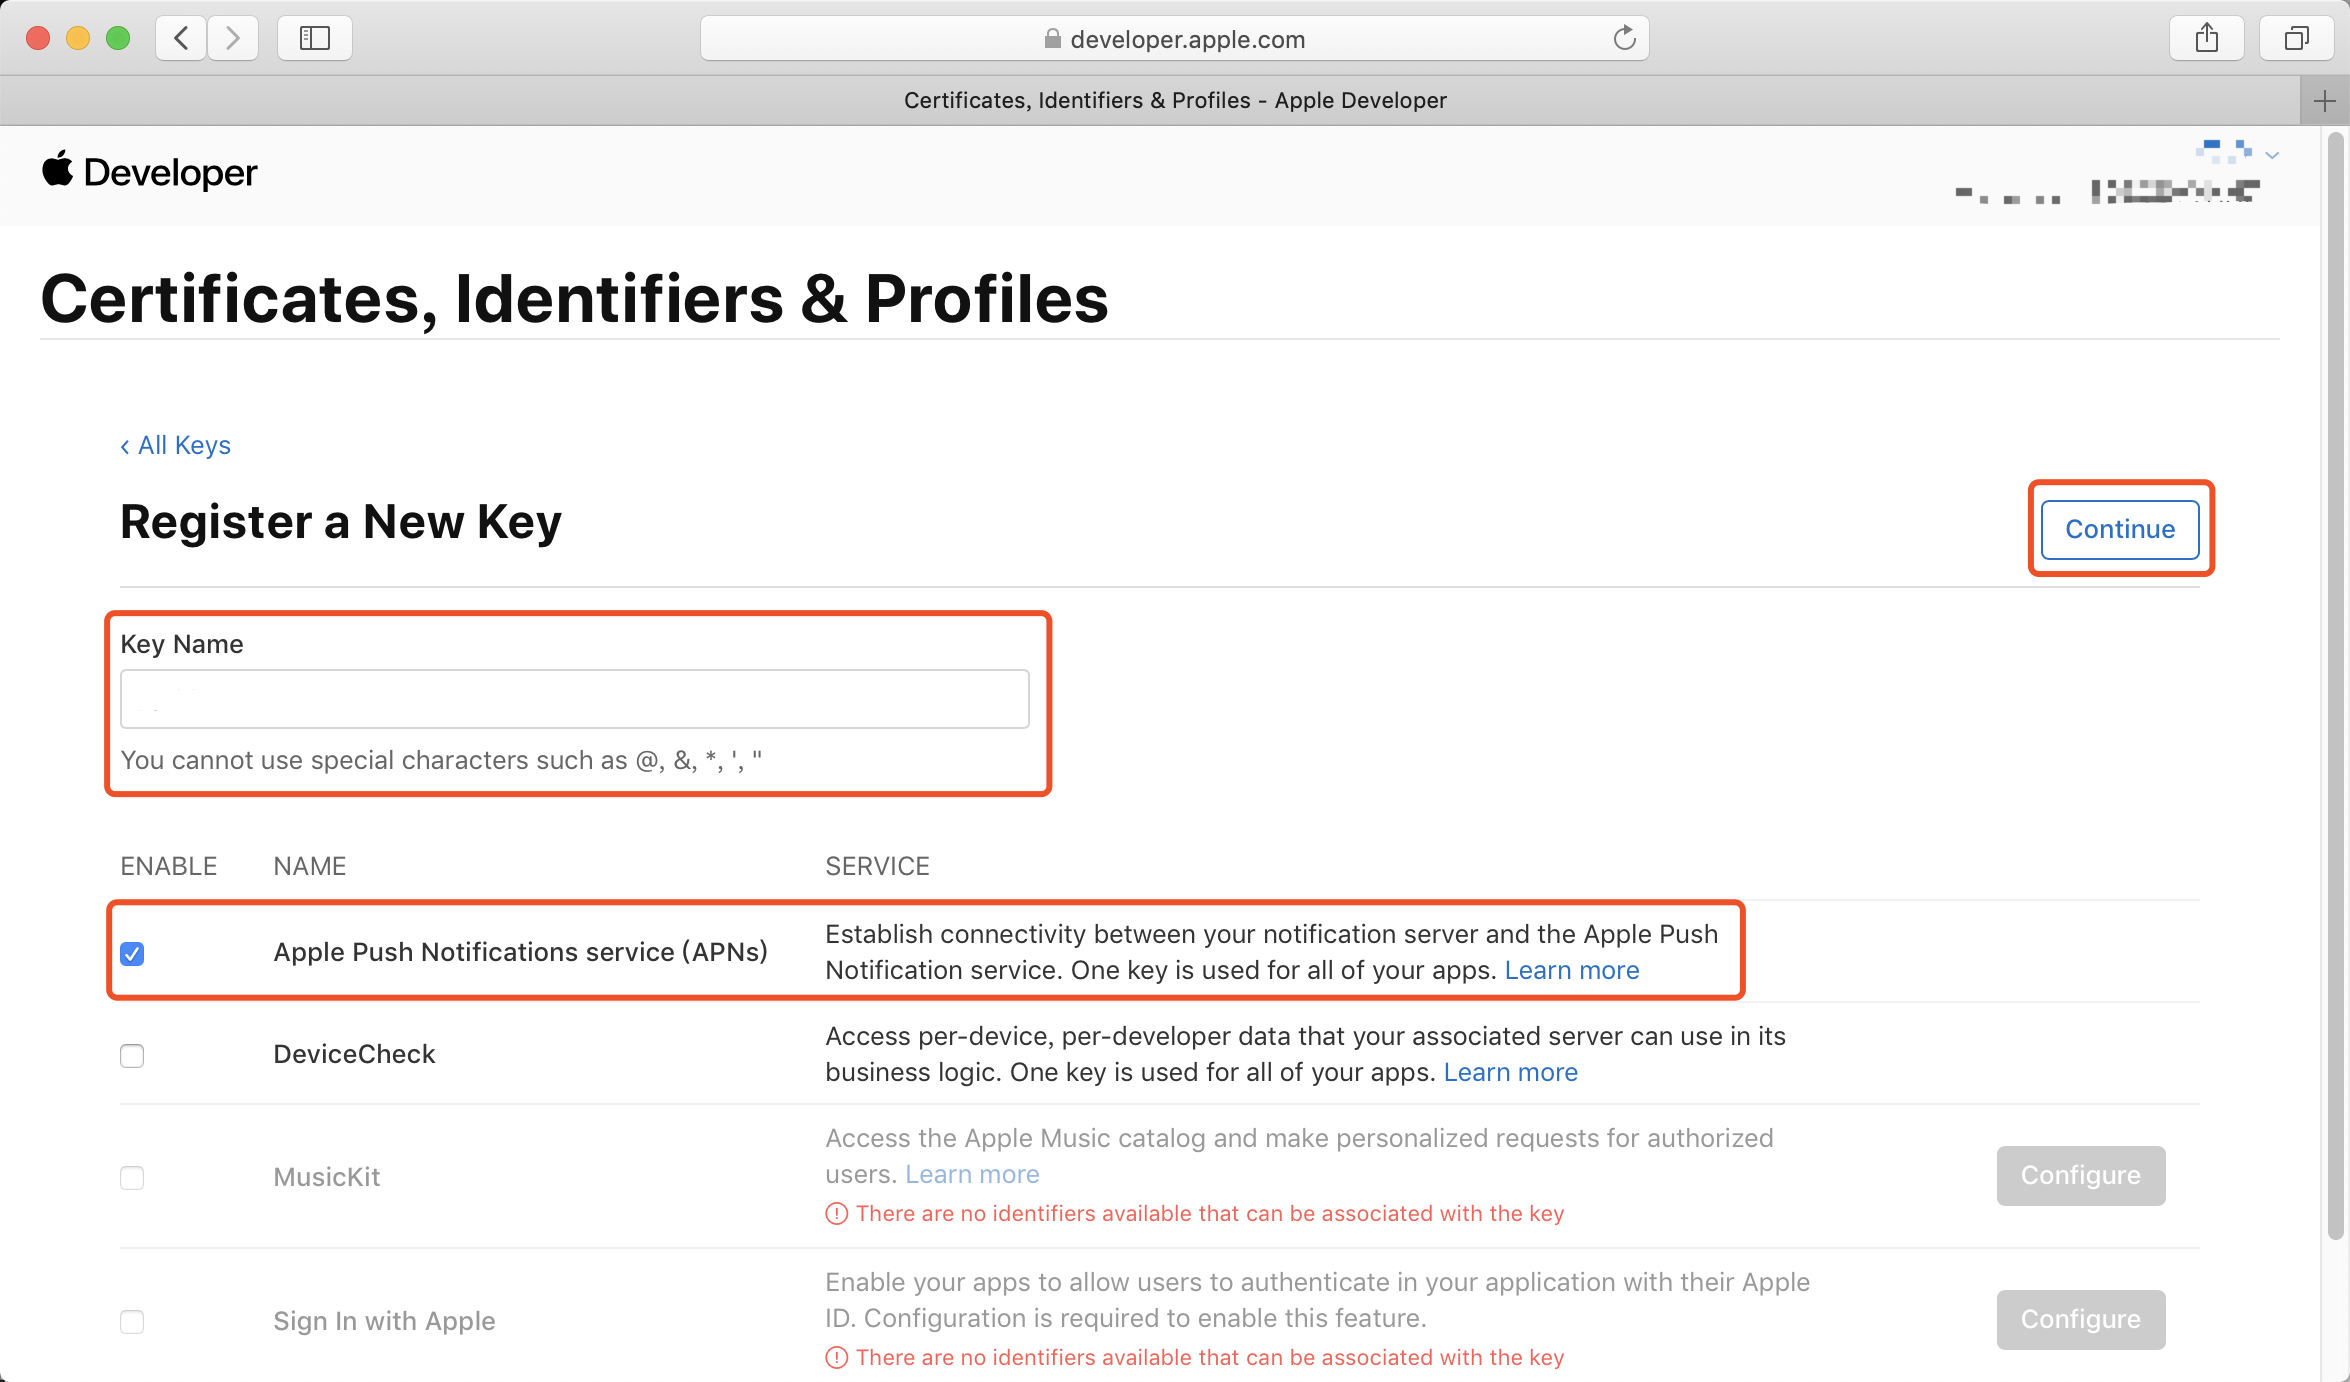
-
Review the key configuration, then click Confirm.
-
Click Download to immediately generate and download the key file. The key will be downloaded as a
.p8text file to your local machine.- Note: Be sure to record the Key ID as it will be needed later.
- Warning: The key can only be downloaded once. After downloading, it will be removed from your developer account, so be sure to store it securely. If the Download button is disabled, it means you've already downloaded this key.
-
Click Done.
After obtaining the .p8 file, you can upload it to the RC Console. See Uploading Certificates to RC.
Using TLS Certificate (P12)
For information about P12 certificates and "Establishing a Certificate-Based Connection to APNs", refer to Apple Developer Documentation Establishing a Certificate-Based Connection to APNs.
Creating a P12 certificate requires first creating a Certificate Signing Request (CSR) locally, then uploading the CSR to the [Apple Developer Account] to generate a certificate (.cer) file, downloading it locally, and exporting it as a .p12 format certificate on a Mac.
Creating a Certificate Signing Request
The Keychain Access app on Mac allows you to create a Certificate Signing Request (CSR).
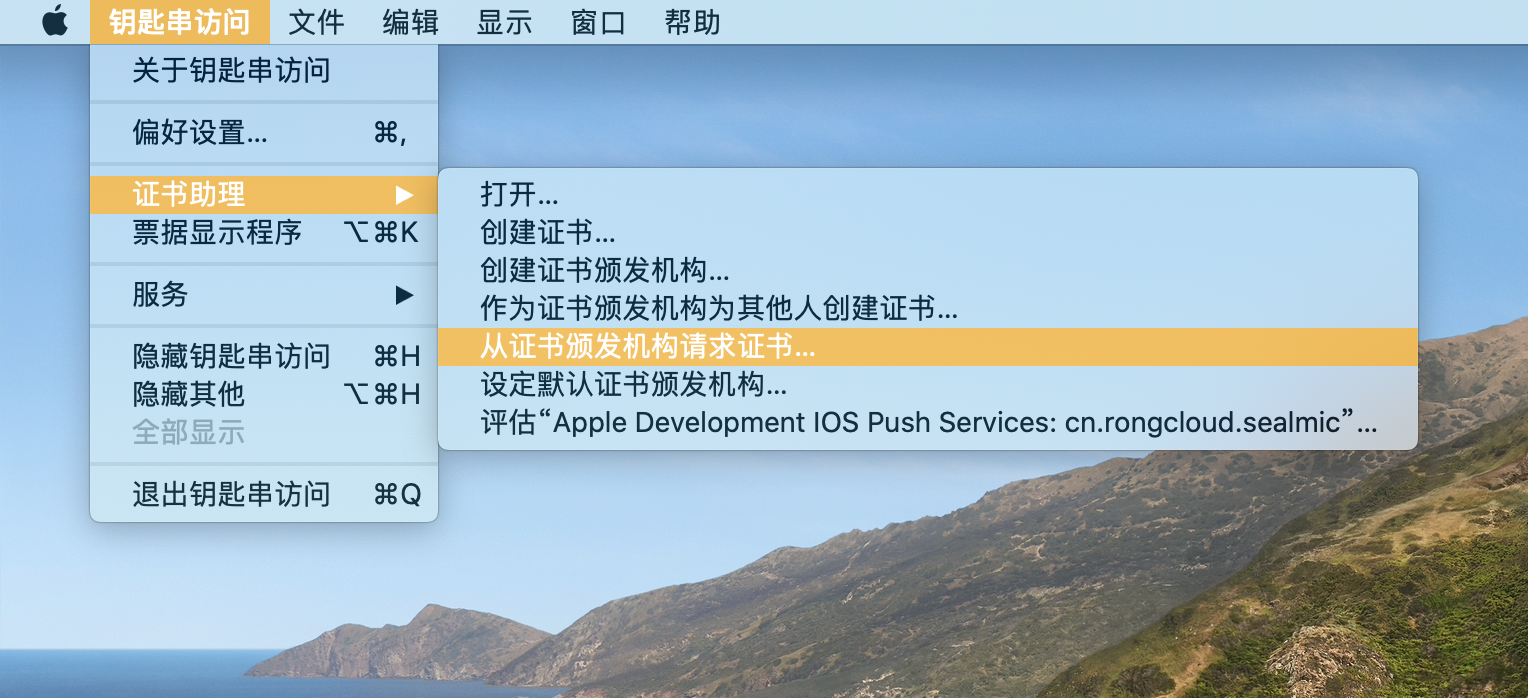
- Open the Keychain Access app on your Mac, select Certificate Assistant, then choose Request a Certificate From a Certificate Authority.
-
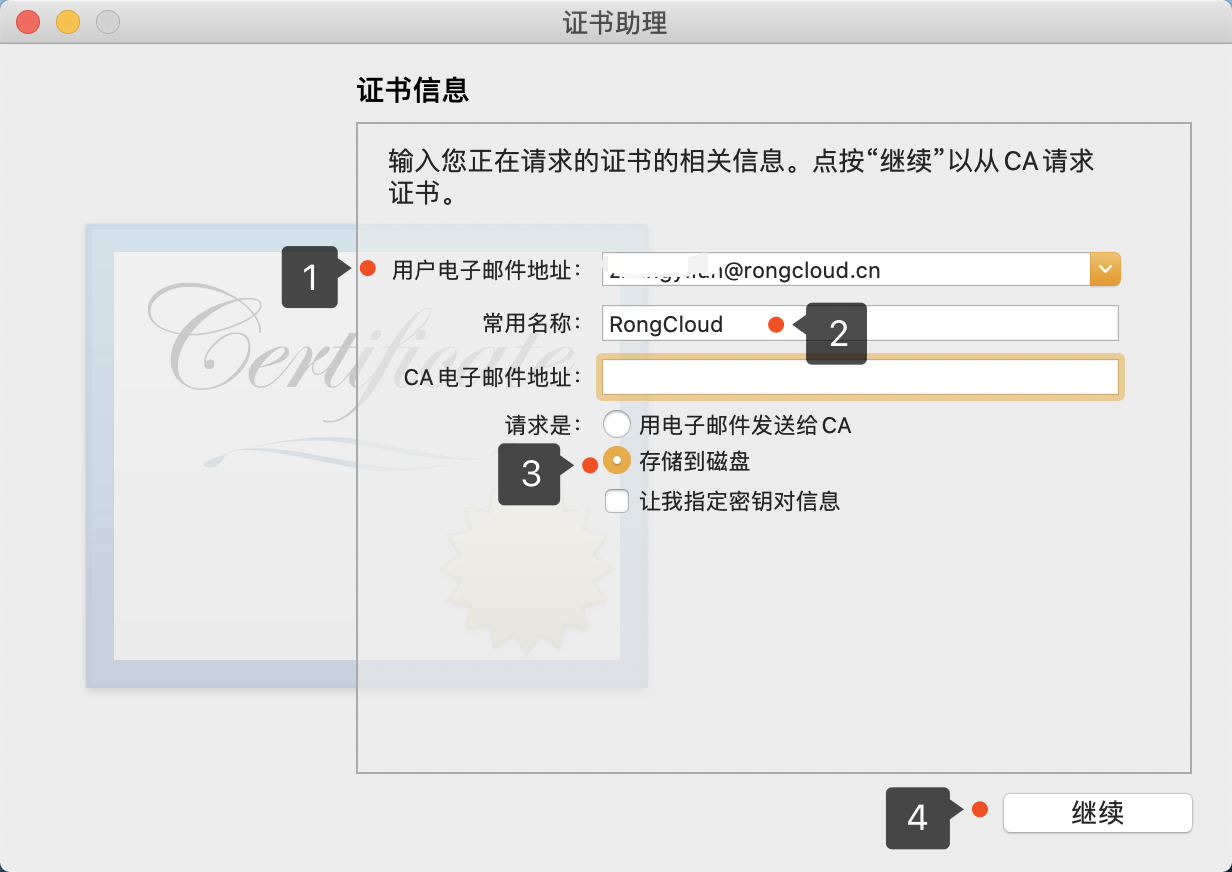
Fill in the certificate information and save it to disk.
- In the Certificate Assistant dialog, enter your email address in the "User Email Address" field.
- In the Common Name field, enter a name for the key (e.g., RongCloud).
- Leave the CA Email Address field blank.
- Select Save to Disk, then click Continue.
Generate cer Format Certificate
If you have multiple apps, you need to generate separate client TLS certificates for each app.
This section describes how to generate a .cer push certificate from the [Apple Developer Account]. Note that the .cer file created in this step must be converted to a .p12 file before it can be uploaded to the RC Console.
The following two methods differ only in UI operations; you can choose either one.
-
Method 1: Generate the
.cerfile from the Certificates page of the Apple Developer Account.-
In Certificates, Identifiers & Profiles, click Certificates in the sidebar, then click the add button (+) in the top-left corner.
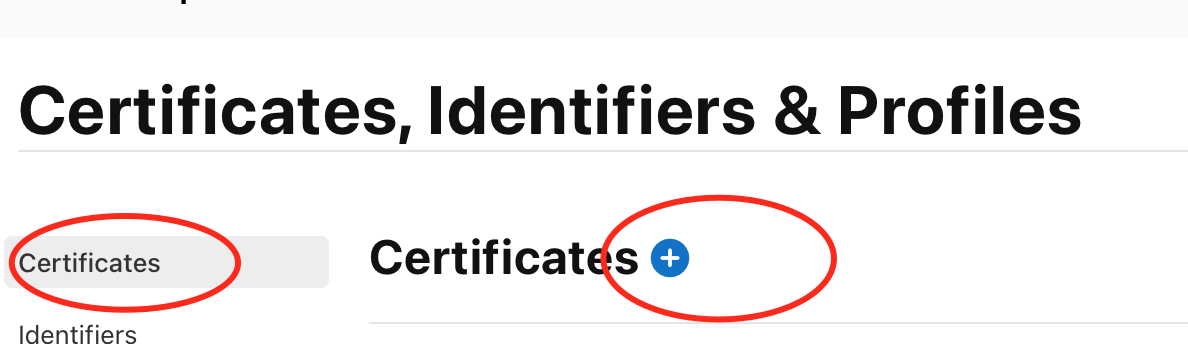
-
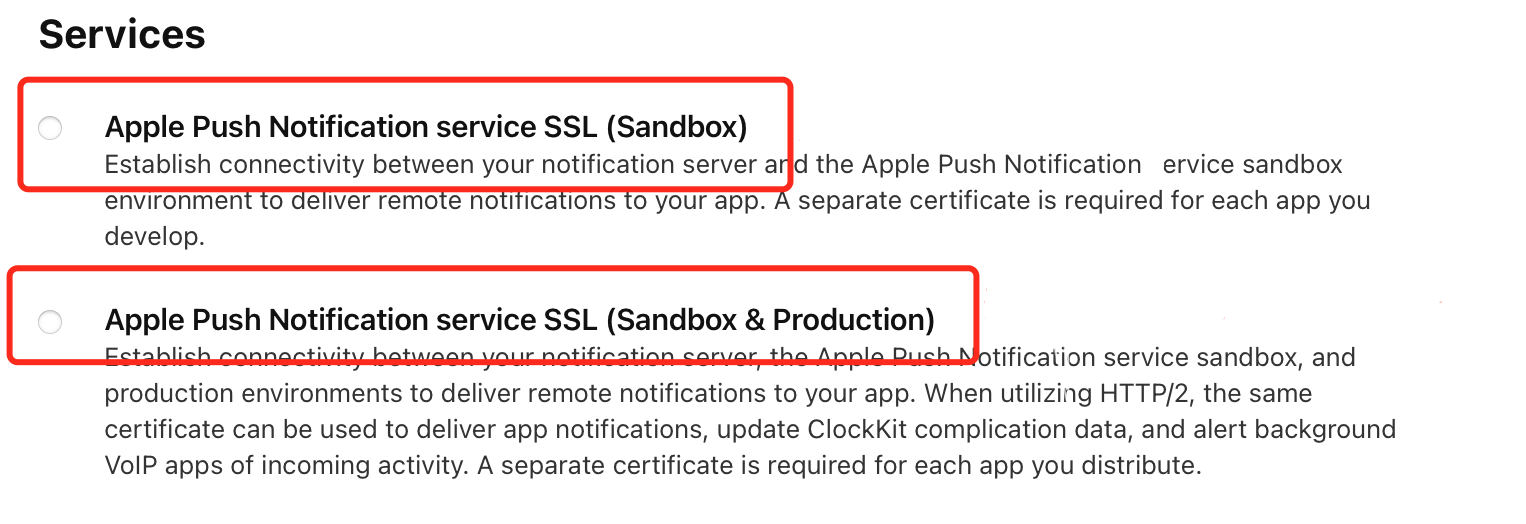
Select the certificate type and click Continue.
- Apple Push Notification service SSL (Sandbox): Can only push to the APNs Sandbox environment. This type of certificate can only be used in the RC Console's development environment and is not allowed in the production environment.
- Apple Push Notification service SSL (Sandbox & Production): Can push to both APNs Sandbox and Production environments and can be used in both the development and production environments of RC apps.
-
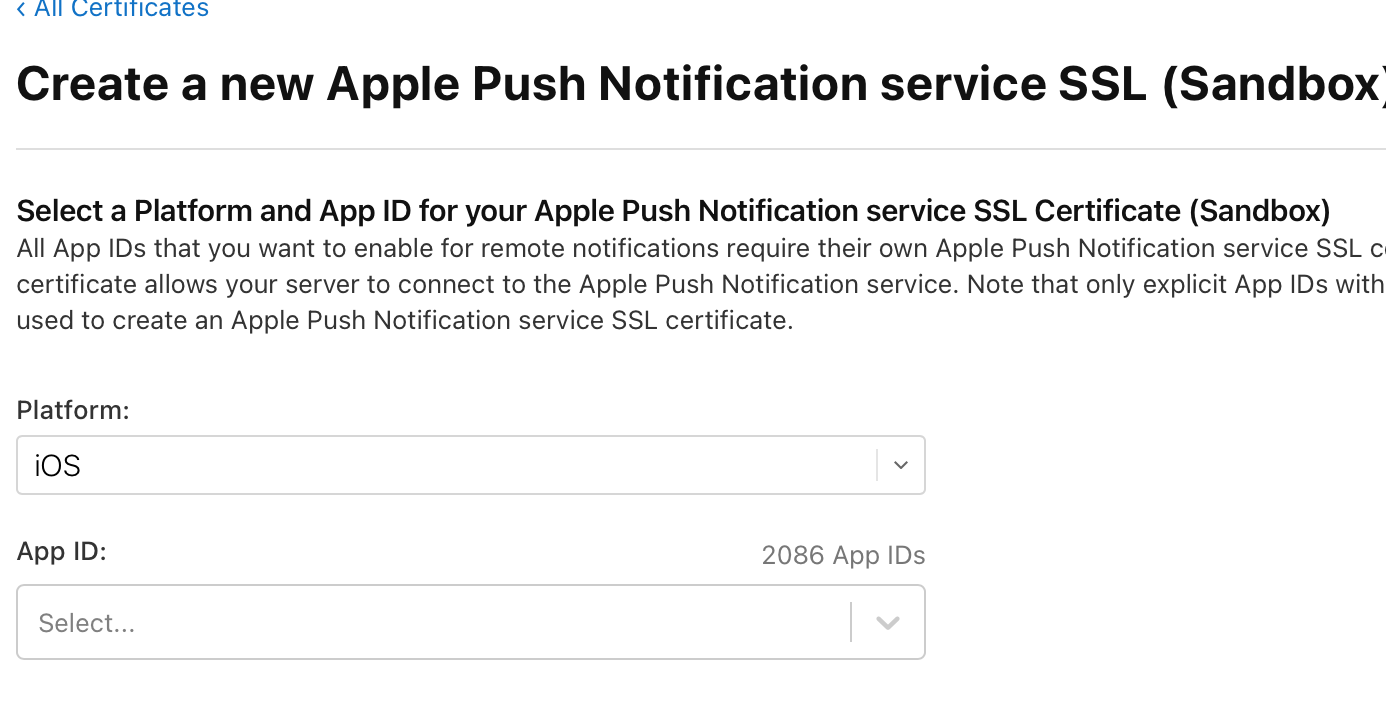
Select the App ID for which you want to generate the certificate and click Continue.
-
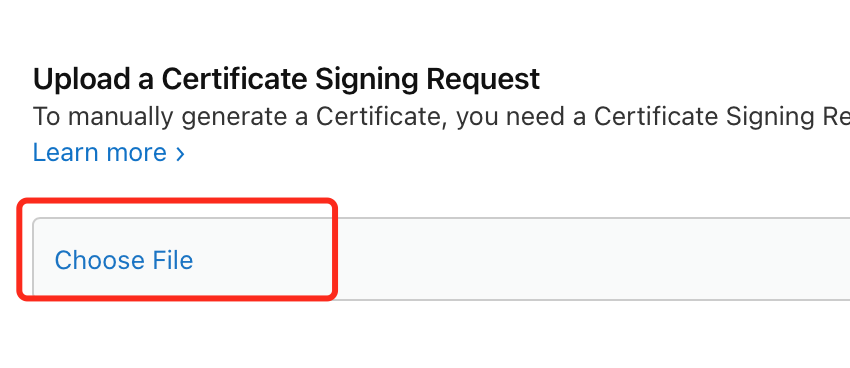
Create a Certificate Signing Request (CSR) on your Mac. If you have already created the CSR file as described above, you can skip this step.
-
Click Choose File, upload the generated CSR file, and click Continue.
-
Click Download to save the certificate to your local machine.
-
-
Method 2: Generate the
.cerfile from the Identifiers page of the Apple Developer Account.tipThe following steps are from the Apple Developer Account Help: Generate APNs Client TLS Certificate.
-
In Certificates, Identifiers & Profiles, click Identifiers in the sidebar, then select the App ID you want to configure.
-
Under Capabilities, ensure the Push Notifications checkbox is selected.
-
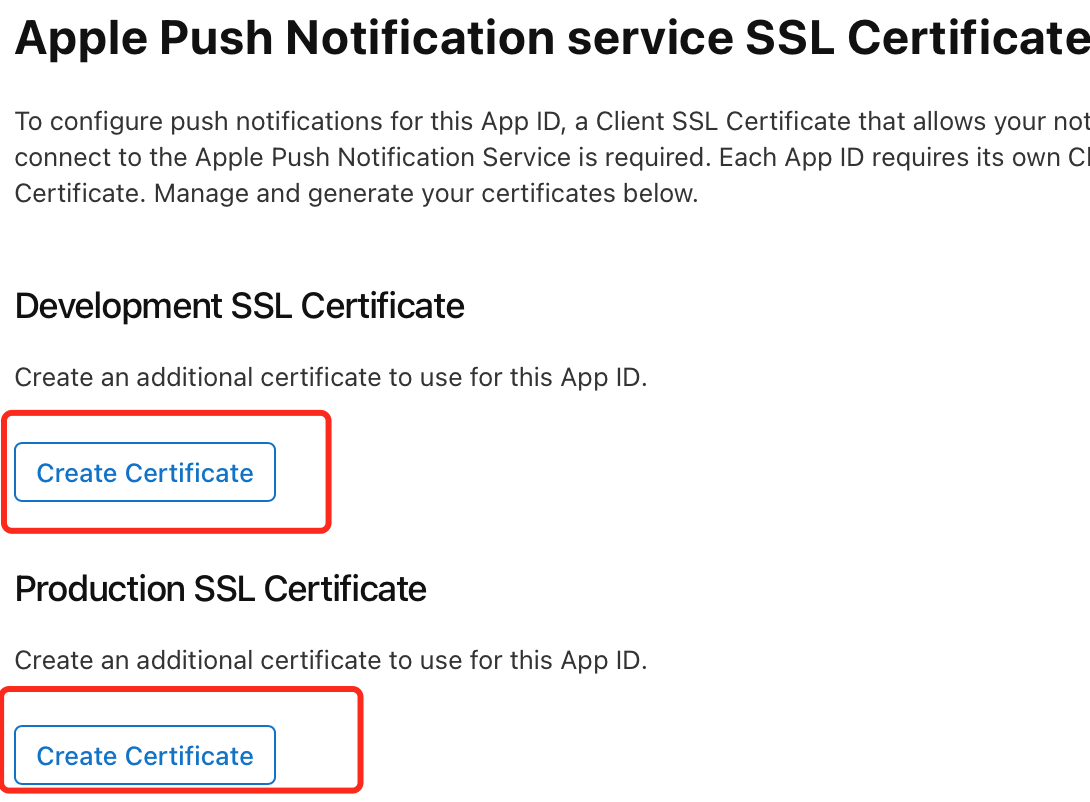
Click Configure to go to the certificate creation page. Select the environment for which you want to configure the certificate and click Create Certificate. APNs provides two environments: production and development.
- Development SSL Certificate: Can only push to the APNs Sandbox environment. This type of certificate can only be used in the RC Console's development environment and is not allowed in the production environment.
- Production SSL Certificate: Can push to both APNs Sandbox and Production environments and can be used in both the development and production environments of RC apps.
-
Create a Certificate Signing Request (CSR) on your Mac. If you have already created the CSR file as described above, you can skip this step.
-
Click Choose File, upload the generated CSR file, and click Continue.
-
Click Download to save the certificate to your local machine.
-
Convert cer File to P12 Format Certificate
-
Double-click the downloaded certificate file (
.cer), and the certificate will be automatically imported into the Keychain. The certificate name will beApple [Development/Production] iOS Push Services: [Bundle ID]orApple Push Services: [Bundle ID]. -
In the Keychain Access app on your Mac, click Login and Certificates on the left, select the newly imported certificate, right-click, and export it as a
.p12file.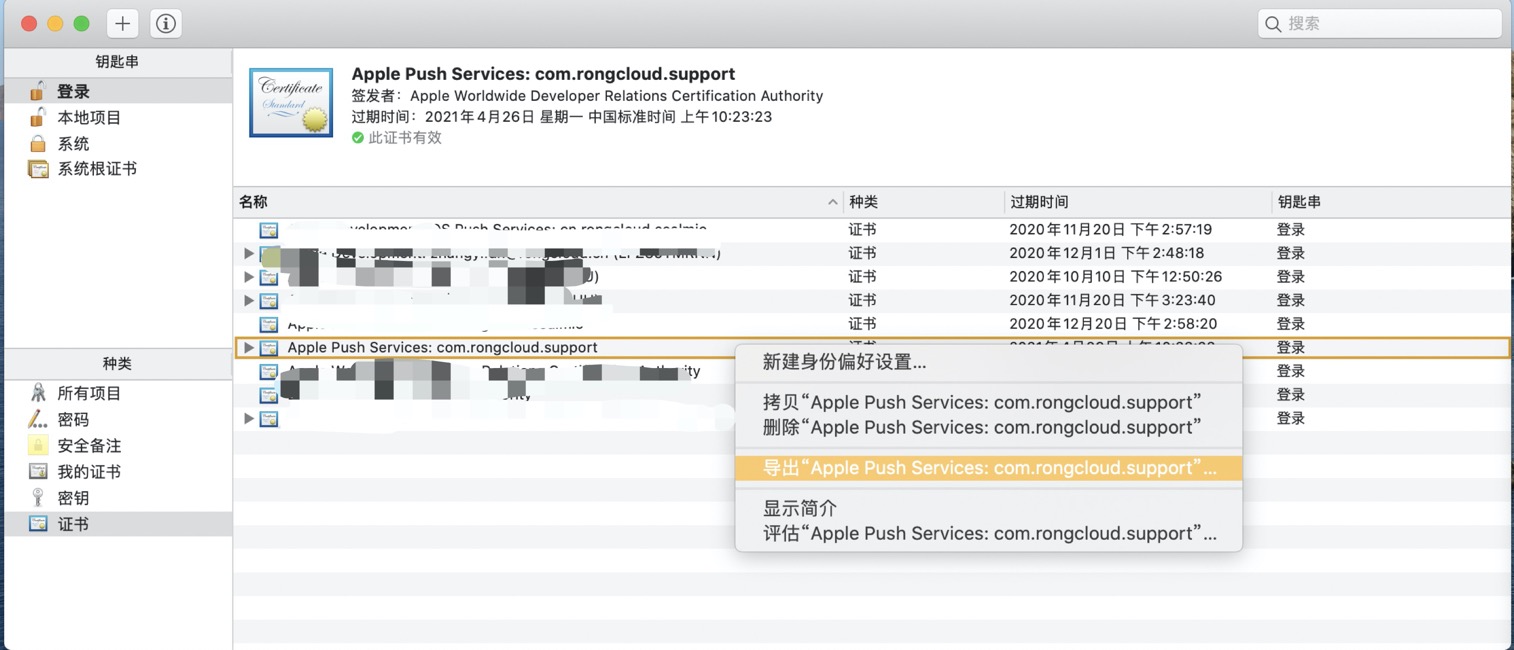
-
A dialog will appear prompting you to enter a password to protect the exported item. The password you enter here will be used when uploading the p12 certificate to the RC Console later, so be sure to record it.
-
Re-enter the certificate password to complete the export.
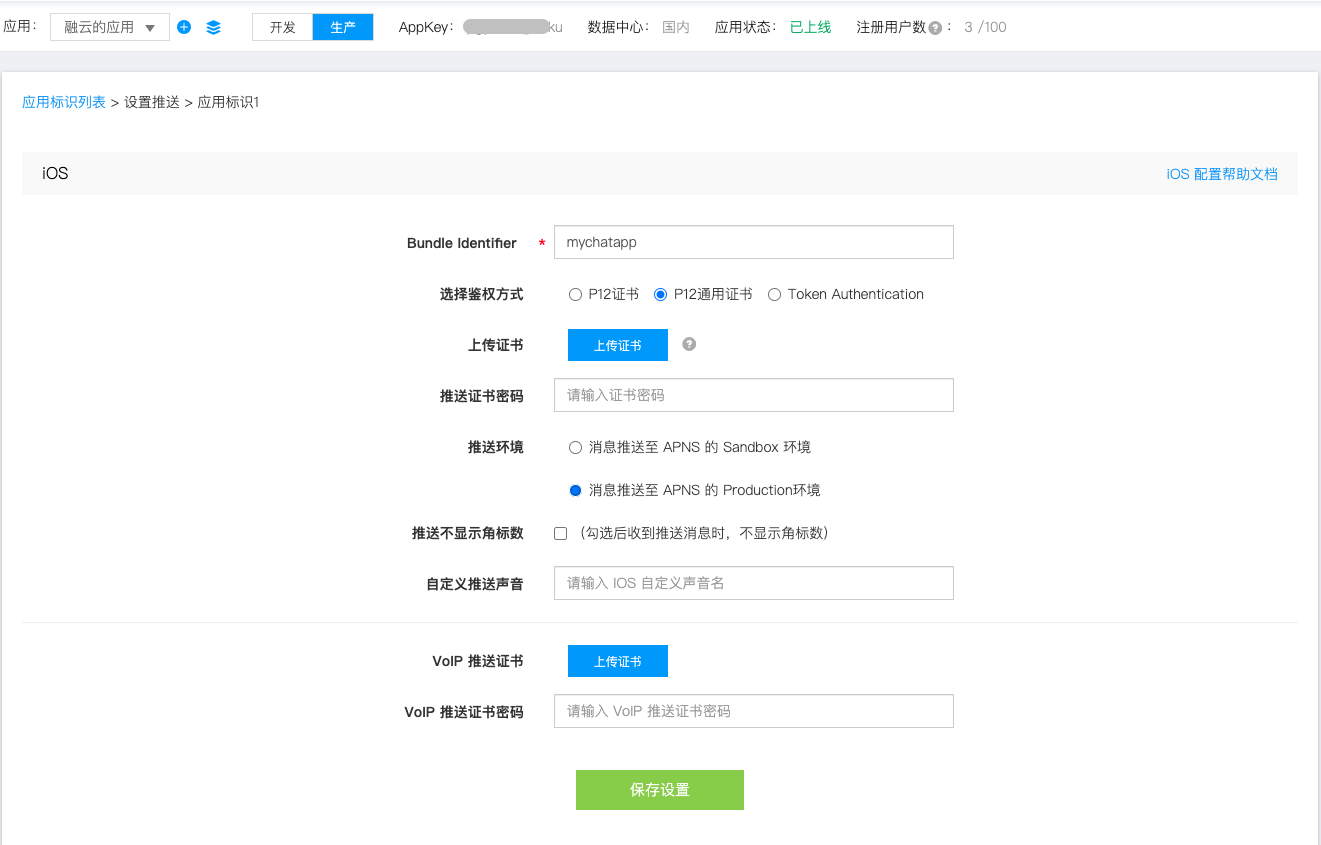
Configure APNs Push in RC Console
You need to upload the created APNs Auth Key file (P8) or TLS certificate (P12) to the RC Console so that the RC server can communicate with APNs and send push notifications to iOS clients.
The packaging method of the IPA file for push verification must match the certificate environment configured for the corresponding AppKey in RC:
- For development environment AppKeys, upload a development environment p12 push certificate or p8 certificate. You need to package a development IPA or run it directly in Xcode.
- For production environment AppKeys, upload a production environment p12 push certificate or p8 certificate. You need to package an ad-hoc release build for push testing.
-
Go to the RC Console, then navigate to IM Service > Offline Push > Application Identifier and Push Certificate Management > Configure Push. If not created, click Add.
-
Enter the Bundle Identifier.
-
If you created a P8 certificate file, select Token Authentication for Authentication Method. Follow these steps:
-
Click Upload P8 File and select the
.p8APNs signing key file you created.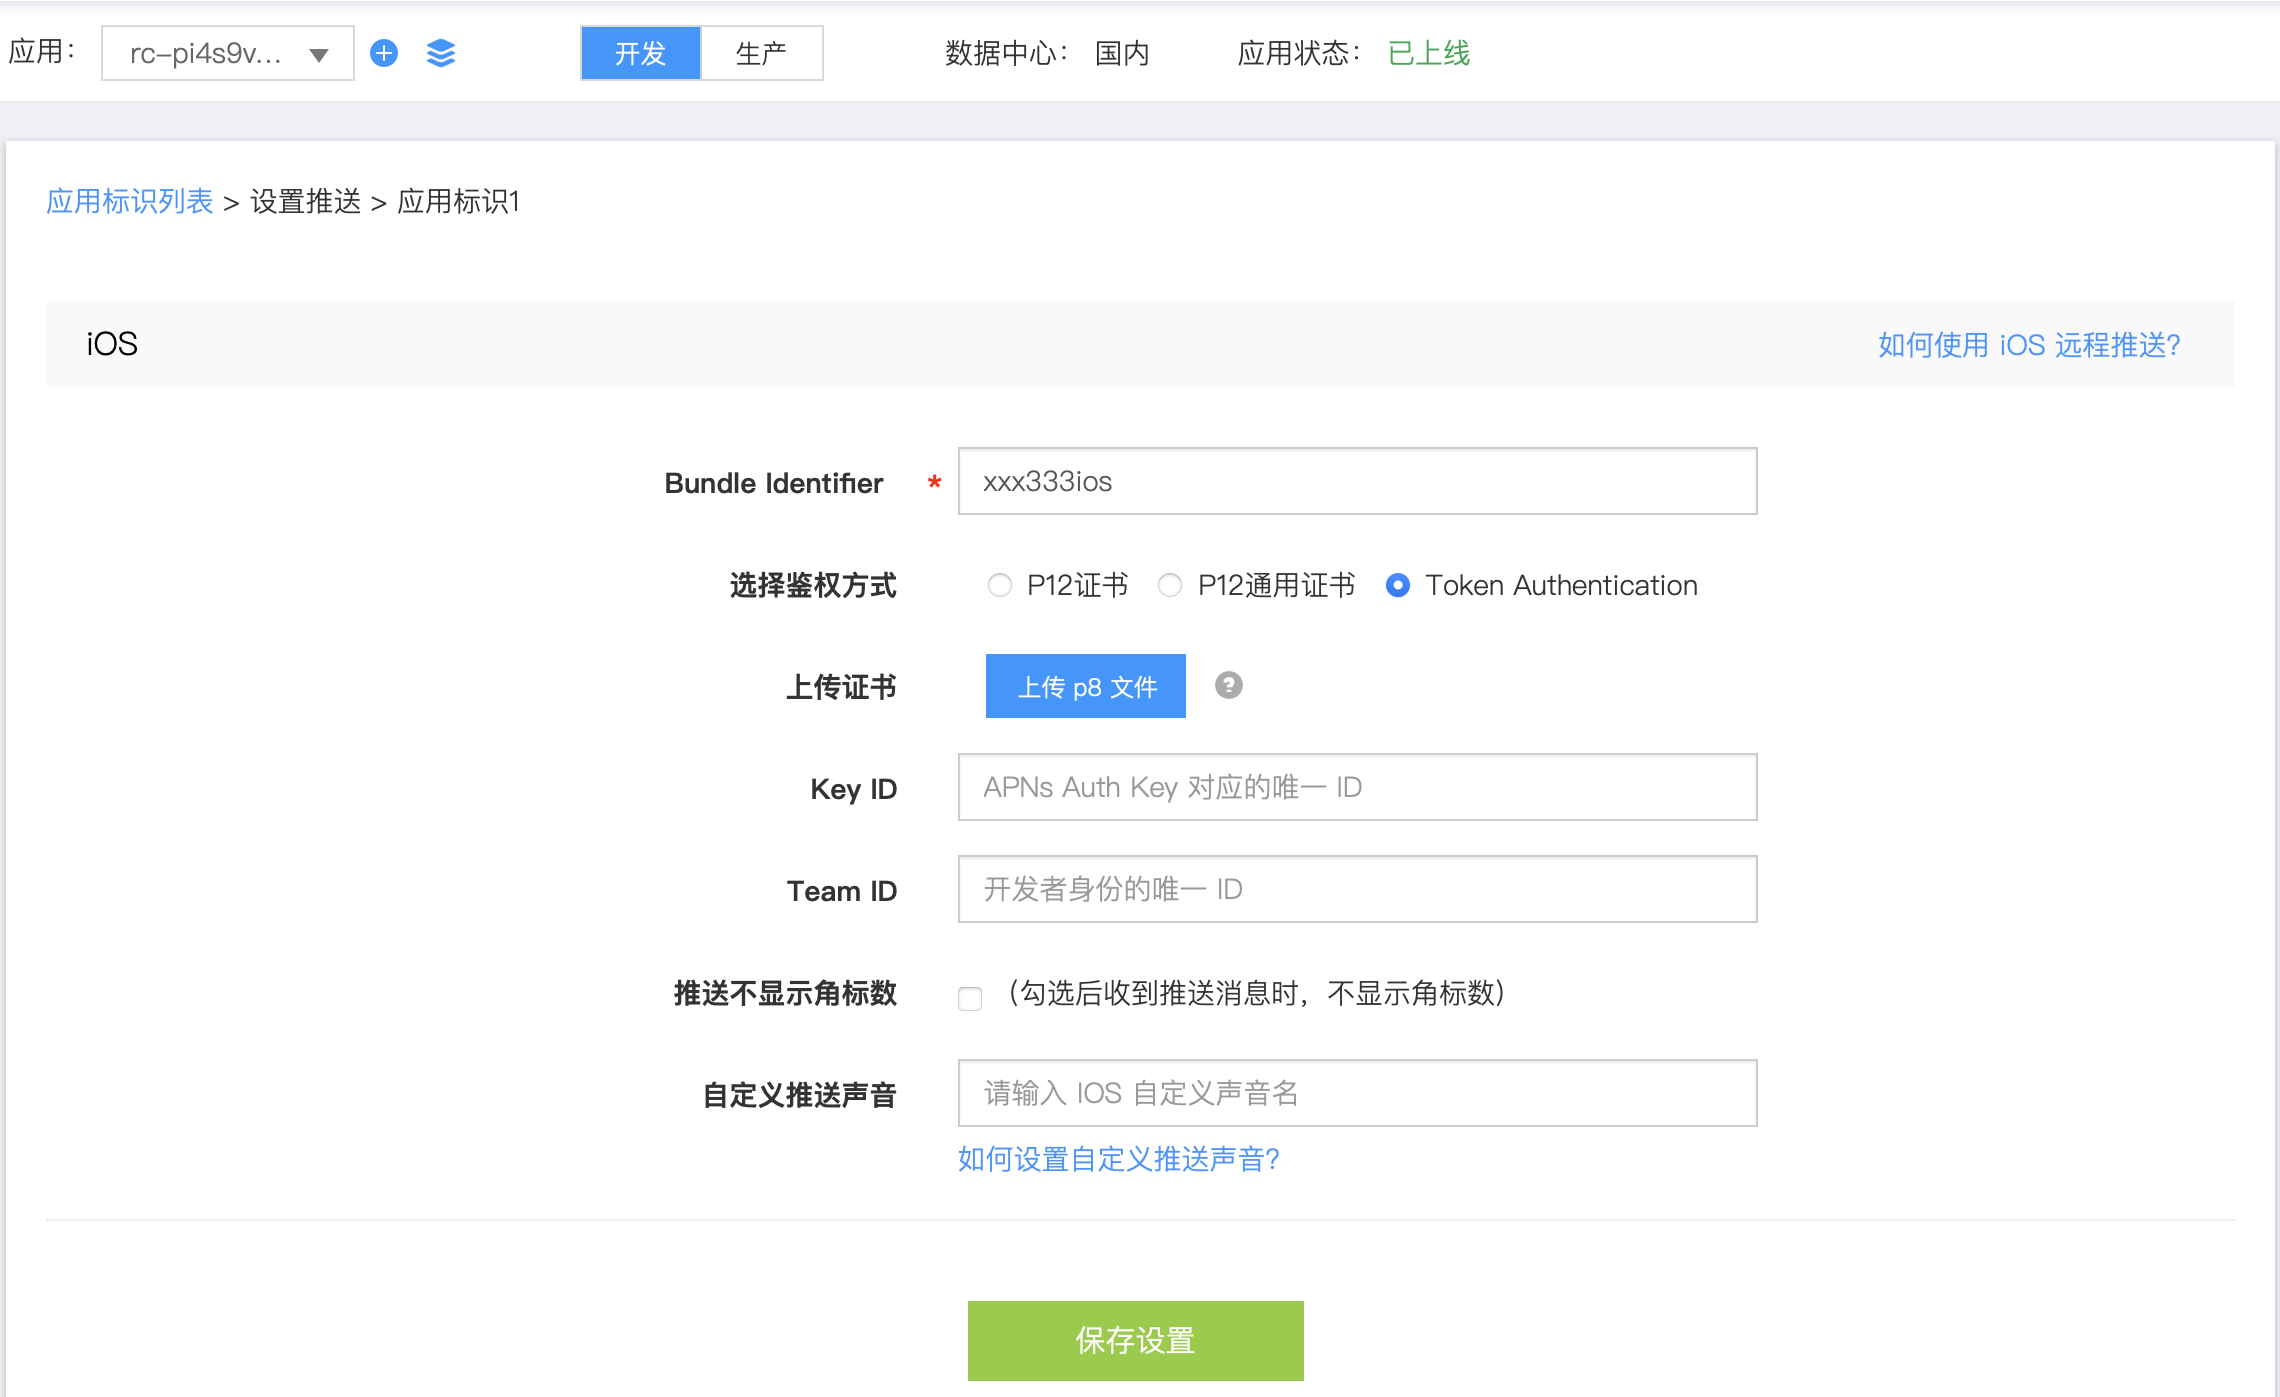
-
Enter the Key ID (see Create P8 Certificate).
-
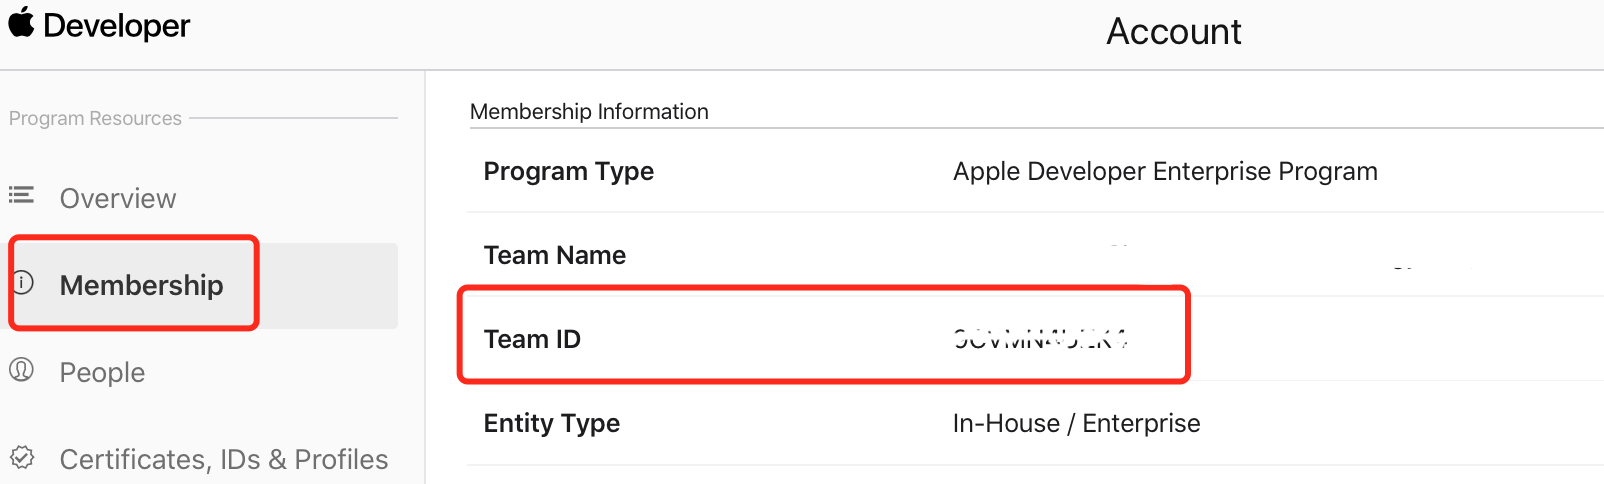
Enter the Team ID. You can find the Team ID on the Membership page of your [Apple Developer Account].
-
-
If you created a P12 certificate file, note that RC's production environment only accepts APNs universal certificates (Sandbox & Production). Choose the appropriate authentication method based on the certificate type and current environment:
- If uploading an APNs development certificate (Sandbox), select P12 Certificate.
- If uploading an APNs universal certificate (Sandbox & Production), select P12 Universal Certificate.
- Upload the certificate and enter the certificate password.
- If using an APNs universal certificate (Sandbox & Production) in RC's development environment, select whether to push to APNs' Sandbox or Production environment in Push Environment. In the production environment, universal certificates only support pushing to APNs' Production environment, so no selection is needed.
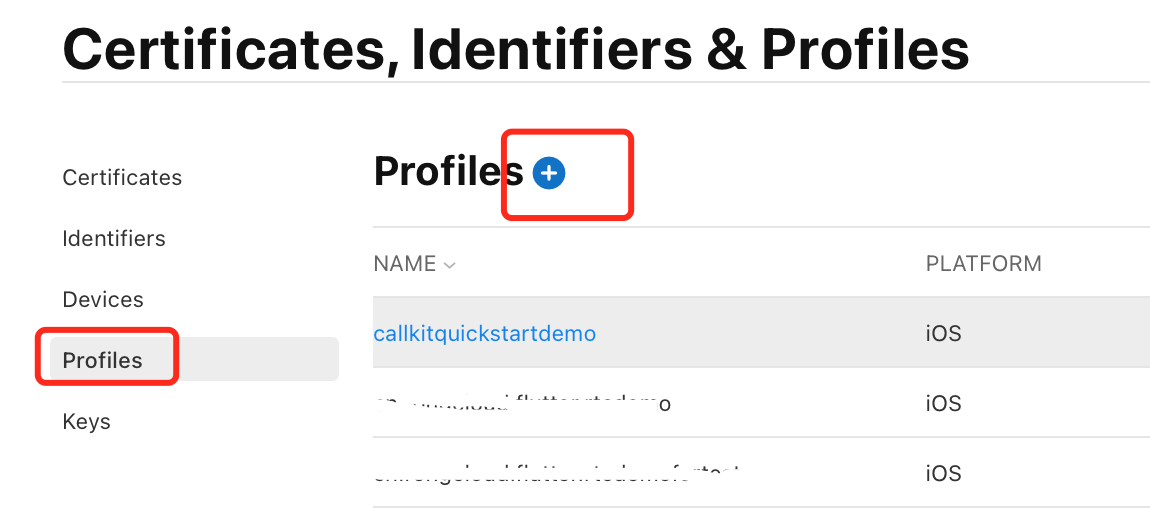
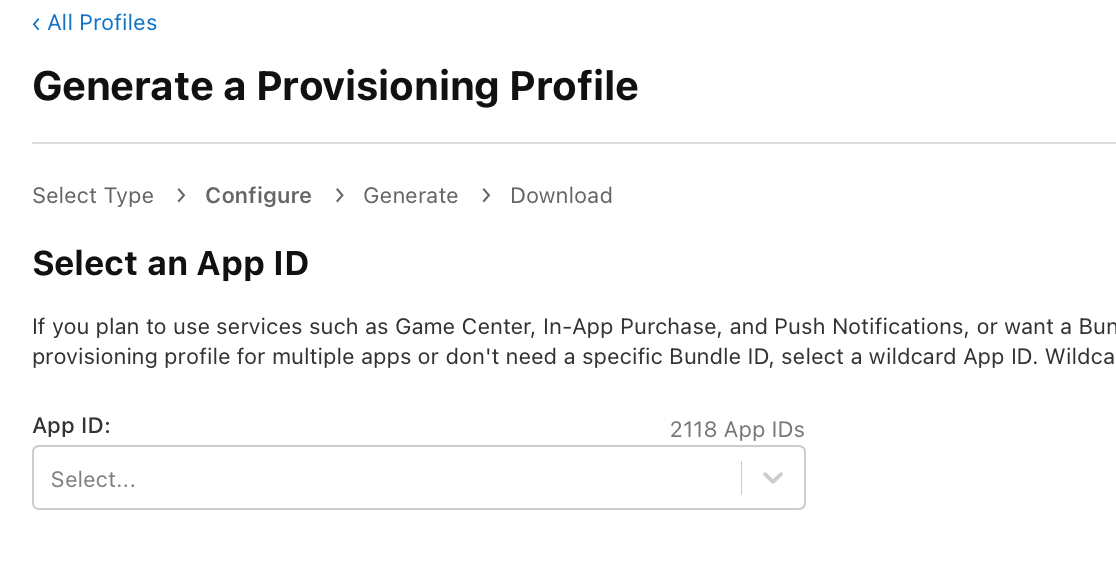
Create Provisioning Profile File
You need to create a Provisioning Profile to run your app on devices and use push notification functionality. You must create and download the provisioning profile from your [Apple Developer Account] and then install it in Xcode.
-
In Certificates, Identifiers & Profiles, click Profiles in the sidebar, then click the add button (+) in the top-left corner.
-
Select the environment for the Provisioning Profile and click Continue.
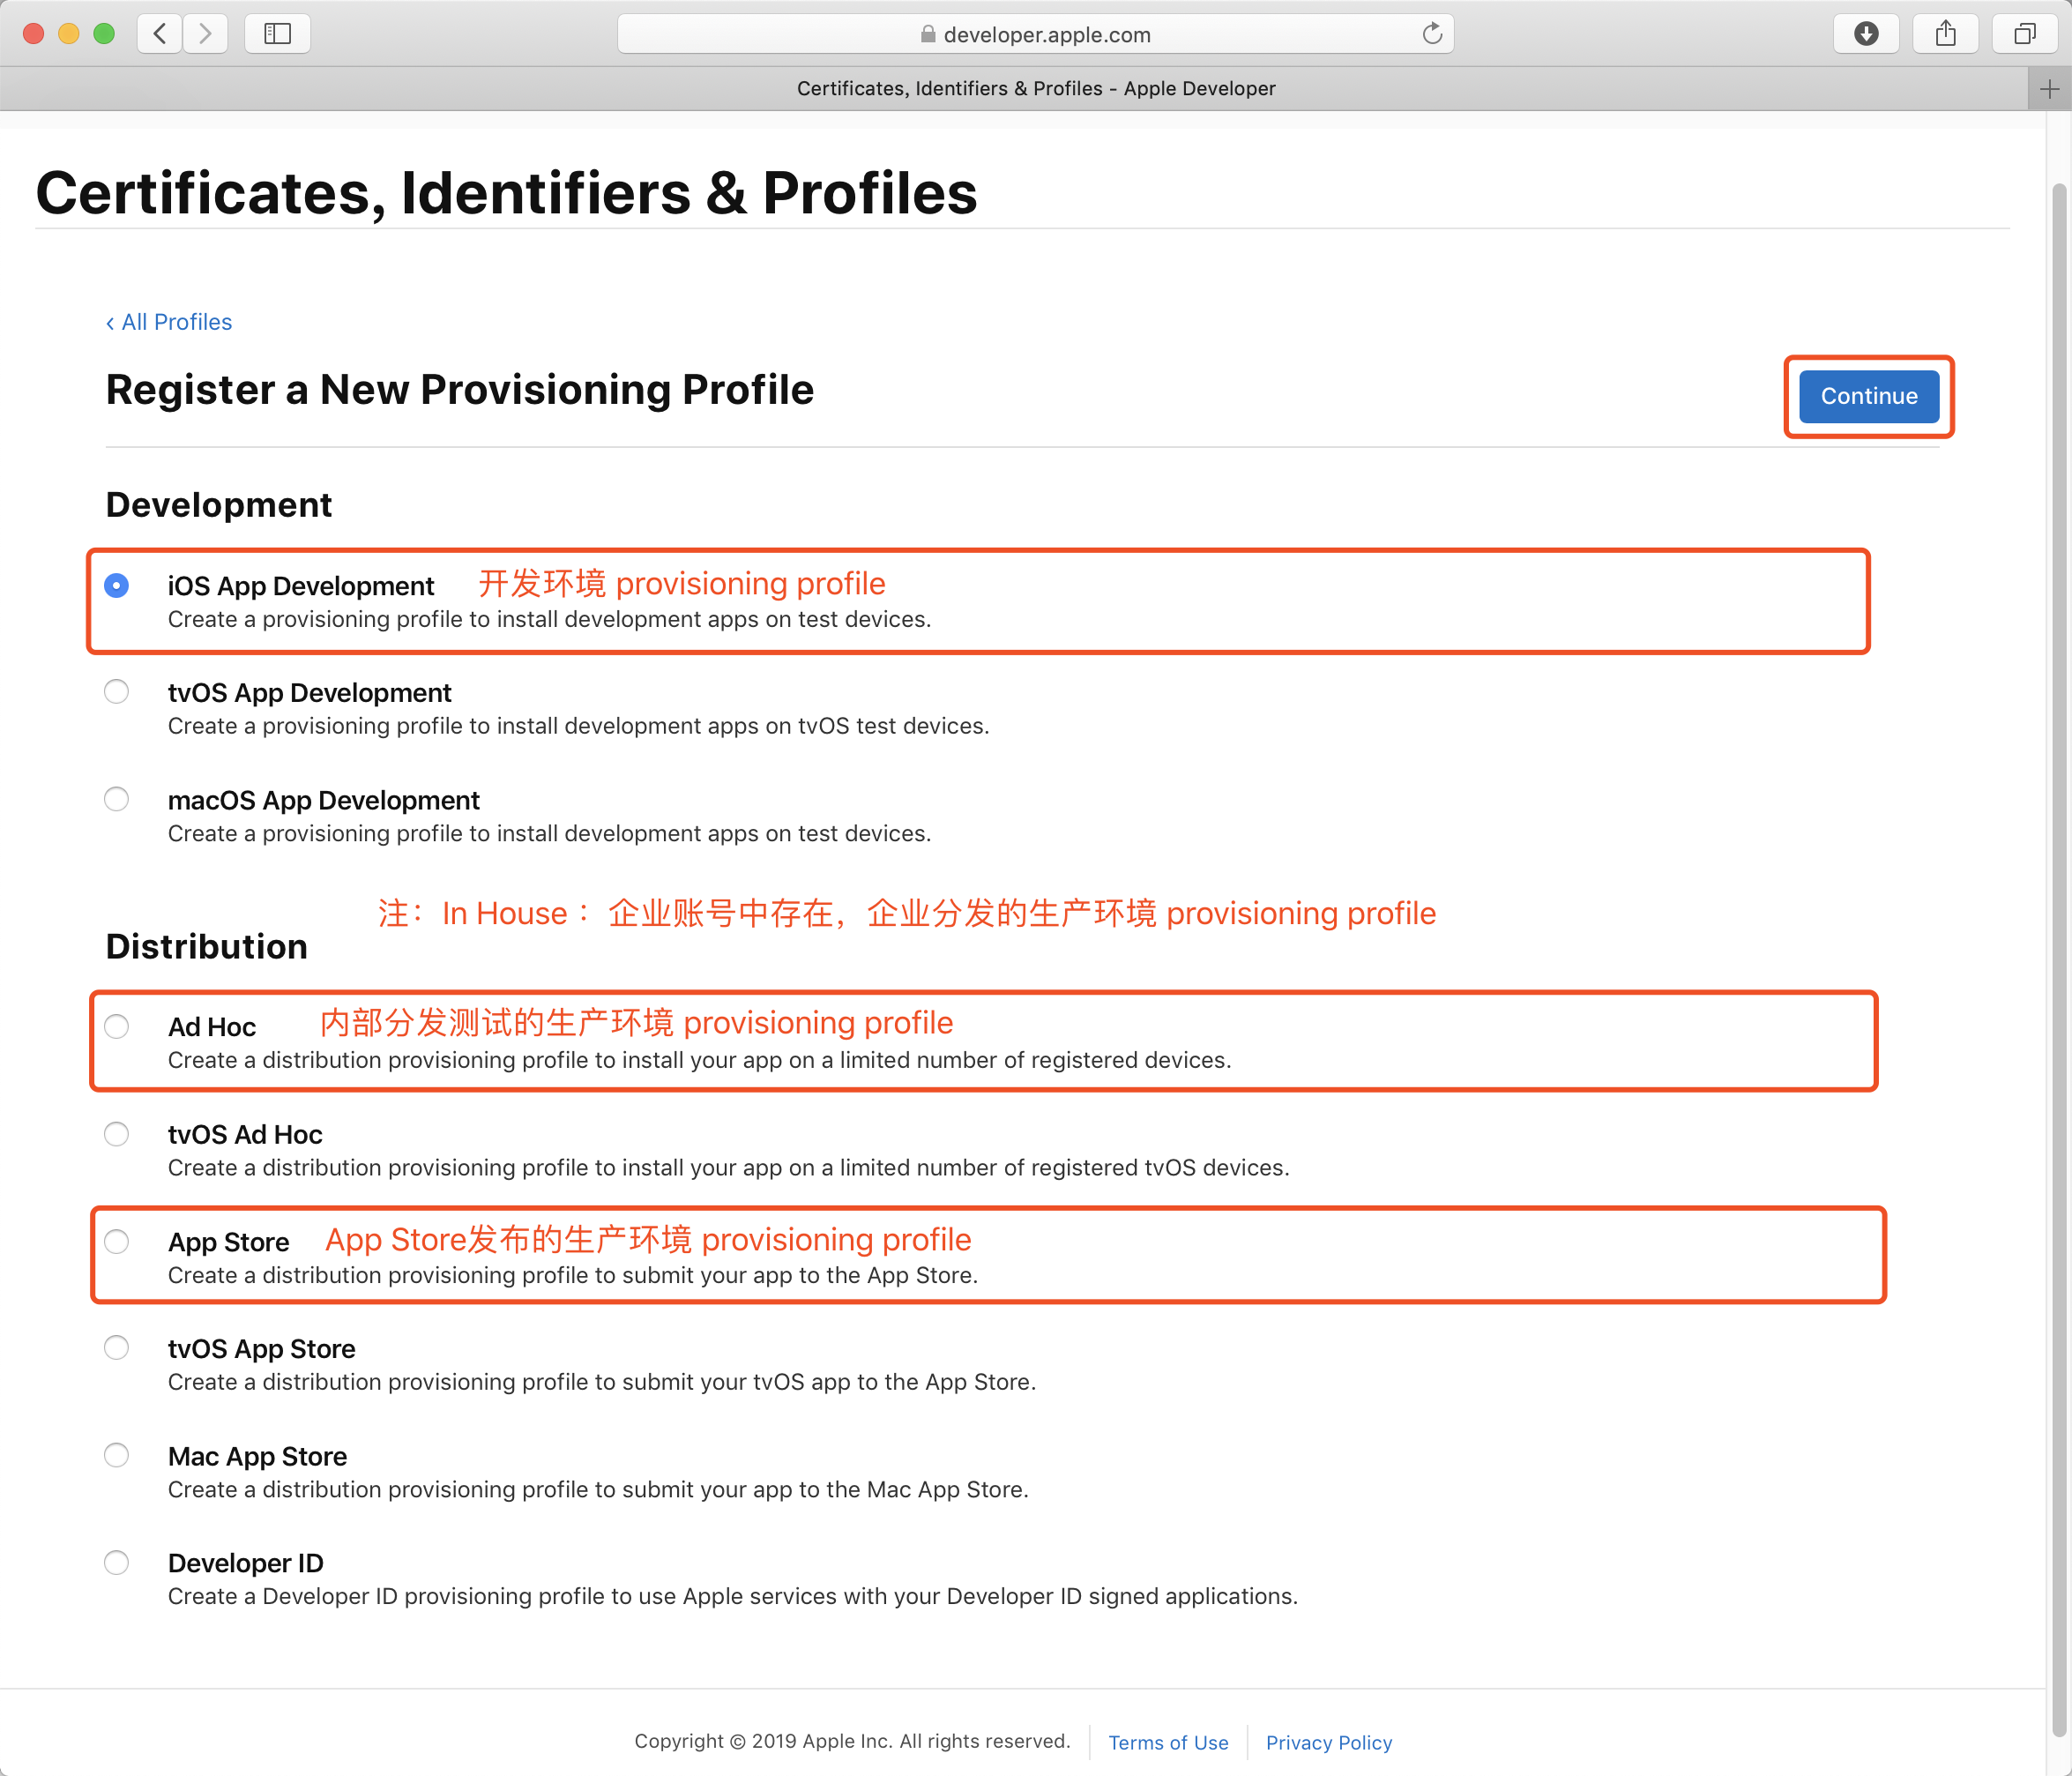
-
Select the App ID for which you want to create the Provisioning Profile and click Continue.
-
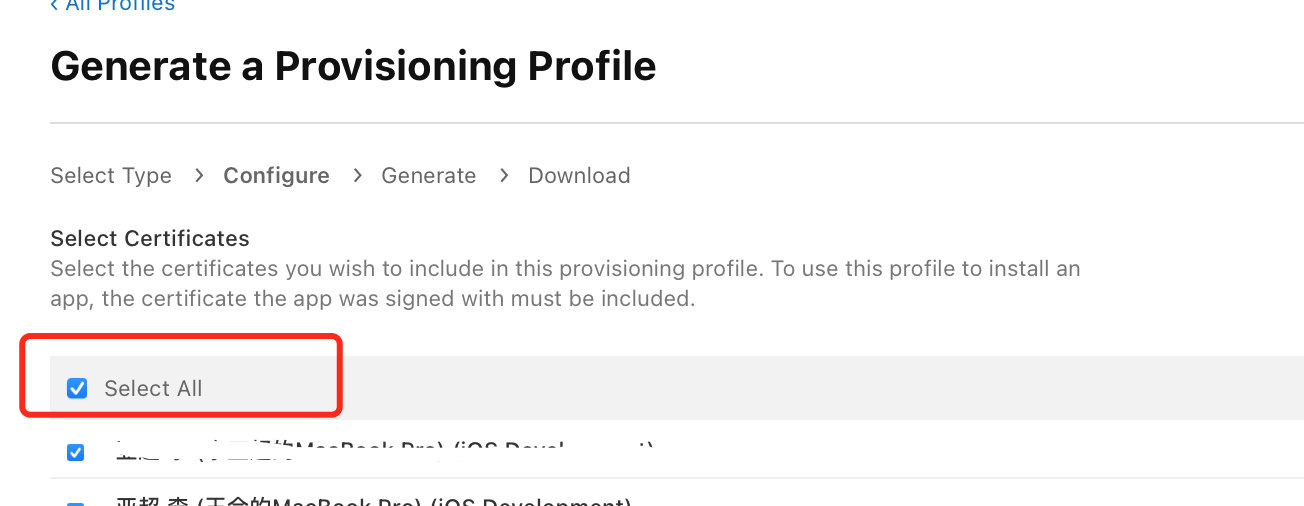
Select the developer certificate(s). If multiple are created, select Select All, then click Continue.
-
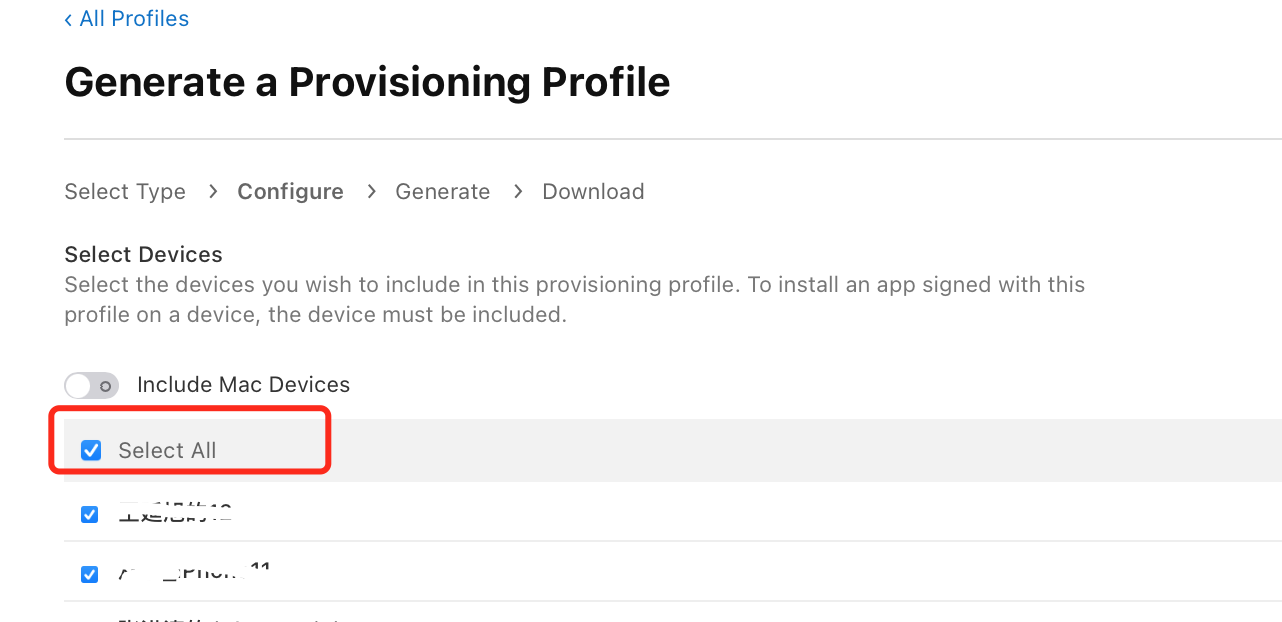
Select the devices on which the Provisioning Profile will be installed (usually Select All), then click Continue.
-
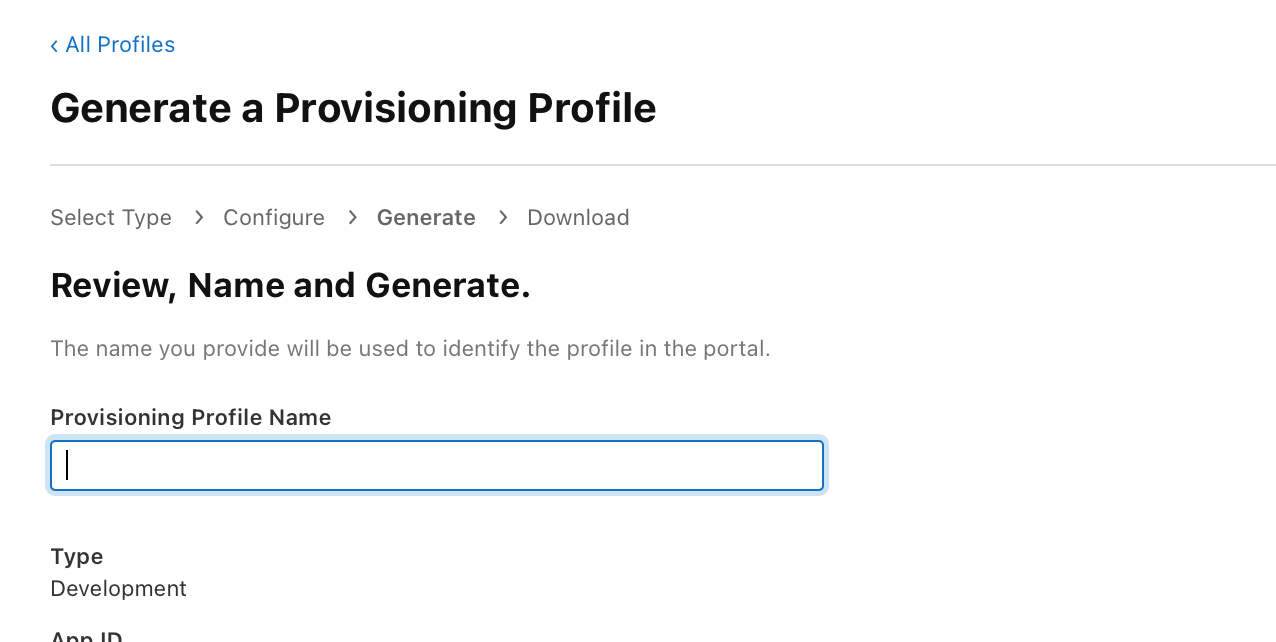
Enter a Profile Name. We recommend naming it Environment + AppID, then click Generate to complete the creation.
-
After successful creation, click Download to save it locally.
-
Double-click the downloaded Provisioning Profile file to add it to Xcode.
Client Configuration
Requesting Push Notification Permissions
Both local and remote push notifications require permission requests.
- (BOOL)application:(UIApplication *)application didFinishLaunchingWithOptions:(NSDictionary *)launchOptions {

    if ([[UIDevice currentDevice].systemVersion floatValue] >= 10.0) {
        UNUserNotificationCenter *center = [UNUserNotificationCenter currentNotificationCenter];
        center.delegate = self;
|         [center requestAuthorizationWithOptions:(UNAuthorizationOptionAlert | UNAuthorizationOptionBadge | UNAuthorizationOptionSound) completionHandler:^(BOOL granted, NSError * _Nullable error) { |
            if (granted) {
                //User granted permission
                [center getNotificationSettingsWithCompletionHandler:^(UNNotificationSettings * _Nonnull settings) {

                }];

            } else {

            }
        }];
    }else if ([[UIDevice currentDevice].systemVersion floatValue] >8.0){
        //iOS8 - iOS10
|         [application registerUserNotificationSettings:[UIUserNotificationSettings settingsForTypes:UIUserNotificationTypeAlert | UIUserNotificationTypeSound | UIUserNotificationTypeBadge categories:nil]]; |
    }
}
After user consent, you need to obtain a device token on the user's device. RC servers use this token to submit requests to Apple Push Notification service (APNs), which then identifies the device and app through the token to deliver notifications to users.


- For iOS 10 and later, register with APNs to obtain device token:

    ```objectivec
    // iOS 10+, register to get device Token
    [application registerForRemoteNotifications];
-
For iOS 8-10, register with APNs in the [application:didRegisterUserNotificationSettings:] callback to obtain device token:
- (void)application:(UIApplication *)application didRegisterUserNotificationSettings:(UIUserNotificationSettings *)notificationSettings{
    [application registerForRemoteNotifications];
}
Setting Device Token
After registering with APNs, the user device obtains an NSData type device token.
Provide this device token to RC via [setDeviceTokenData] in the [application:didRegisterForRemoteNotificationsWithDeviceToken:] callback.
- (void)application:(UIApplication *)application didRegisterForRemoteNotificationsWithDeviceToken:(NSData *)deviceToken {
    [[RCIMClient sharedRCIMClient] setDeviceTokenData:deviceToken];
}
******


## Retrieving Push Data \{#pushdata}

For apps supporting iOS 7+, use [didReceiveRemoteNotification:fetchCompletionHandler:] to retrieve push data (`userInfo`).

On iOS 10+, you need to use two `UNUserNotificationCenterDelegate` methods to obtain notification information:


- When the app is in foreground, use [userNotificationCenter:willPresentNotification:withCompletionHandler:] to get push data (`userInfo`)


- When users tap notifications, use [userNotificationCenter:didReceiveNotificationResponse:withCompletionHandler:] to get push data (`userInfo`)

    ```objectivec
    /// ios ≥ 10.0
#pragma mark - UNUserNotificationCenterDelegate

#if __IPHONE_OS_VERSION_MAX_ALLOWED >= __IPHONE_10_0
    - (void)userNotificationCenter:(UNUserNotificationCenter *)center didReceiveNotificationResponse:(UNNotificationResponse *)response withCompletionHandler:(void(^)(void))completionHandler NS_AVAILABLE_IOS(10_0){
        // userInfo contains remote push content
        completionHandler();
    }
#endif
If the app was suspended by the system when a remote notification was tapped, use:
- (BOOL)application:(UIApplication *)application
    didFinishLaunchingWithOptions:(NSDictionary *)launchOptions {
    // Remote push content
    NSDictionary *remoteNotificationUserInfo = launchOptions[UIApplicationLaunchOptionsRemoteNotificationKey];

    ...

    return YES;
}
Apps can retrieve remote push data using [getPushExtraFromLaunchOptions] or [getPushExtraFromRemoteNotification].

RC message remote push content follows this format:

```json
{
  "aps" :
			{
				 "alert" : "You got your emails.",
				 "badge" : 1,
				 "sound" : "default"
			},
	 "rc":{
				 "cType":"PR",
				 "fId":"2121",
				 "oName":"RC:TxtMsg",
				 "tId":"3232",
				 "rId":"3243",
				 "id":"5FSClm2gQ9V9BZ-kUZn58B",
				 "rc-dlt-identifier":"2FSClm2gQ9Q9BZ-kUZn54B"
	 },
	 "appData":"xxxx"
}
| Parameter         | Type   | Description                                                                                                                                               |
|:------------------|:-------|:----------------------------------------------------------------------------------------------------------------------------------------------------------|
| alert             | String | Push notification content. Built-in messages have default displays. For custom messages, you need to set this when sending (corresponds to `pushContent` in iOS message sending API). |
| cType             | String | Conversation type: `PR` (private), `DS` (discussion), `GRP` (group), `CS` (customer service), `SYS` (system), `MC` (in-app public service), `MP` (cross-app public service), `PH` (push-only), `UG` (ultra group). |
| bId               | String | Ultra group channel ID. Only appears in ultra group message pushes. Empty string if message doesn't belong to any channel.                                             |
| fId               | String | Sender's user ID.                                                                                                                                         |
| oName             | String | Message type. Either RC built-in types (see [Built-in Message Types](/platform-chat-api/message-about/about-message-types) `ObjectName`) or custom message types.                         |
| tId               | String | Target ID.                                                                                                                                                |
| rId               | String | Recipient's user ID.                                                                                                                                      |
| id                | String | Unique message identifier for current push, corresponds to msgUID in message routing.                                                                     |
| rc-dlt-identifier | String | When pushing a recall notification, this is the ID of the message to be recalled (corresponds to msgUID in message routing).                              |
| appData           | String | Additional push data, corresponds to `pushData` in iOS message sending API.                                                                               |


## Custom Push Notifications


- To customize remote push notification content, provide pushContent when sending messages. If using IMKit UI to send messages, you can intercept and set it through the [WillSendMessage] callback.


- To intercept and modify remote push notification content, your app needs to create a `Notification Service Extension`. Refer to Apple's official developer documentation [Modifying Content in Newly Delivered Notifications].


- To customize the display style of remote push notifications, your app needs to create a `Notification Content Extension`. Refer to Apple's official developer documentation [Customizing the Appearance of Notifications].


## Testing APNs Remote Push Notifications

After completing APNs push integration, you can refer to [Testing APNs Remote Push Notifications] for testing.

<!--links-->
[Testing APNs Remote Push Notifications]: ./test-push
[Apple Developer Account]: https://developer.apple.com/account
[didReceiveRemoteNotification:fetchCompletionHandler:]: https://developer.apple.com/documentation/uikit/uiapplicationdelegate/1623013-application?language=objc
[userNotificationCenter:didReceiveNotificationResponse:withCompletionHandler:]: https://developer.apple.com/documentation/usernotifications/unusernotificationcenterdelegate/1649501-usernotificationcenter?language=objc
[application:didRegisterUserNotificationSettings:]: https://developer.apple.com/documentation/uikit/uiapplicationdelegate/1623022-application?language=objc
[application:didRegisterForRemoteNotificationsWithDeviceToken:]: https://developer.apple.com/documentation/uikit/uiapplicationdelegate/1622958-application?language=objc
[setDeviceTokenData]: https://doc.rongcloud.cn/apidoc/imlib-ios/latest/zh_CN/documentation/rongimlib/rcimclient/setdevicetokendata(_:)?language=objc
[userNotificationCenter:willPresentNotification:withCompletionHandler:]: https://developer.apple.com/documentation/usernotifications/unusernotificationcenterdelegate/1649518-usernotificationcenter?language=objc
[getPushExtraFromLaunchOptions]: https://doc.rongcloud.cn/apidoc/imlib-ios/latest/zh_CN/documentation/rongimlib/rcimclient/getpushextrafromlaunchoptions(_:)?language=objc
[getPushExtraFromRemoteNotification]: https://doc.rongcloud.cn/apidoc/imlib-ios/latest/zh_CN/documentation/rongimlib/rcimclient/getpushextrafromremotenotification(_:)?language=objc
[Customizing the Appearance of Notifications]: https://developer.apple.com/documentation/usernotificationsui/customizing_the_appearance_of_notifications?language=objc
[Modifying Content in Newly Delivered Notifications]: https://developer.apple.com/documentation/usernotifications/modifying_content_in_newly_delivered_notifications?language=objc
[willSendMessage]: https://doc.rongcloud.cn/apidoc/imkit-ios/latest/zh_CN/documentation/rongimkit/rcconversationviewcontroller/willsendmessage(_:)?language=objc