Importing the SDK
You can choose either of the following methods:
- Use CocoaPods to add remote dependencies and import the Framework
- Manually import the Framework
Environment Requirements
- Xcode version 11 or later is required.
- iOS devices must run iOS 9.0 or later.
- If you plan to integrate the SDK via CocoaPods, CocoaPods 1.10.0 or later is required. This is because the CallKit SDK switched to XCFramework starting from version 5.1.1, and CocoaPods fully supports XCFramework integration only from version 1.10.0 onwards.
To install CocoaPods, follow the CocoaPods Installation Guide.
Check the Version
Before importing the SDK, you can visit the RC official website SDK download page to confirm the latest version number.
CocoaPods
Import the Framework
-
If your project doesn’t have a
Podfile, open Terminal, navigate to the project’s root directory, and run thepod initcommand. This will automatically create a defaultPodfile. Add the following content to thePodfile:pod 'RongCloudRTC/RongCallKit', '~> x.y.z'tip- CallKit automatically downloads the corresponding version of the IMKit library as a dependency, so manual specification is generally unnecessary. Note: From version 5.2.0 to 5.4.4 (exclusive), CallKit must match the version of the IMKit SDK it depends on (the first three digits must be identical). Starting from 5.4.4, CallKit and its dependent IMKit SDK must share the first two digits of their version numbers. CallKit 5.4.4 cannot be paired with an IMKit SDK version lower than 5.4.4.
x.y.zrepresents the specific version number of CallKit. You can check the latest version on the RC official website SDK download page or by runningpod repo updatefollowed bypod search RongCloudRTCin Terminal to query the CocoaPods repository.
-
Open Terminal, navigate to the directory containing the
Podfile, and run the following command:pod installtipIf you encounter errors like
CocoaPods could not find compatible versions for, first runpod repo updatein Terminal, then executepod install. -
Open the
xcworkspacefile in your project directory using Xcode to load the project.
Import the Source Code
Starting from CallKit SDK 5.1.9, debugging and integration via CocoaPods using source code is supported.
-
If your project doesn’t have a
Podfile, open Terminal, navigate to the project’s root directory, and run thepod initcommand. This will automatically create a defaultPodfile. Add the following content to thePodfile:pod 'RongCloudRTCOpenSource/RongCallKit','x.x.x' # RongCallKit -
Open Terminal, navigate to the directory containing the
Podfile, and run the following command:pod installtipIf you encounter errors like
CocoaPods could not find compatible versions for, first runpod repo updatein Terminal, then executepod install. -
Open the
xcworkspacefile in your project directory using Xcode to load the project. -
Reference the library as follows:
#import <RongCallKit.h>
For developers customizing the UI, here are some recommendations:
- Avoid modifying the source code directly to prevent overwriting changes during future updates.
- Extend business logic by inheriting and overriding specific classes or methods that differ from your requirements.
- Use the SDK’s exposed interfaces. Calling private interfaces may lead to issues during version upgrades.
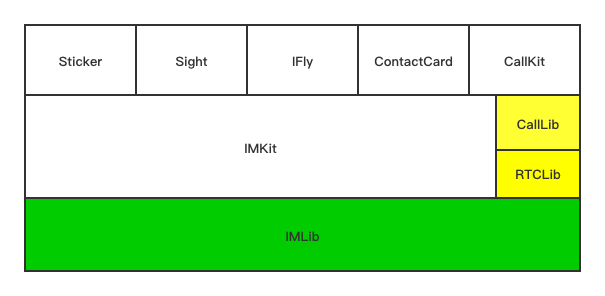
SDK Open Source Code Notes
- IMLib (green) exists as a framework and belongs to
RongCloudIM. - RTCLib and CallLib (yellow) exist as frameworks and belong to
RongCloudRTC. - IMKit, its plugins, and CallKit (white) can exist as source code and belong exclusively to
RongCloudOpenSource.
The white components in the diagram (IMKit, Sticker, IFly, ContactCard, CallKit) may have corresponding frameworks. However, in your project, these components must all be either source code or frameworks to avoid conflicts.
Manual Integration
-
You can visit the RC official website SDK download page to download the audio/video call (with UI) SDK locally.
-
Open your project in Xcode and manually drag the downloaded SDK into your project. The required SDKs are as follows:
Framework - RongCallKit.xcframework
- RongCallLib.xcframework
- RongRTCLib.xcframework
- RongIMLib.xcframework
- RongIMKit.xcframework
- RongIMLibCore.xcframework
tipStarting from version 5.2.0, CallKit/CallLib/RTCLib must match the version of the IMKit/IMLib SDK they depend on (the first three digits must be identical).
-
Modify your project configuration. Under
General→Frameworks, Libraries, and Embedded Binaries, set all manually imported CallKit SDK frameworks toEmbed & Sign.
Project Configuration
- Audio/video calls require camera and microphone permissions. Add the following keys to your project’s Info.plist:
- Privacy - Microphone Usage Description
- Privacy - Camera Usage Description
- Under your project’s Target → Signing & Capabilities → Background Modes, enable the following options:
- Audio, AirPlay, and Picture in Picture
- Remote notifications
For SDK versions 5.1.1 and earlier, HTTP requests are required for audio/video calls. Add the following key to your project’s Info.plist:
App Transport Security Settings
Under this key, add Allow Arbitrary Loads and set its value to YES.
Import Header Files
Import the CallKit header file in the relevant business layer to use the SDK’s methods for call-related functionalities. Example:
#import <RongCallKit/RongCallKit.h>