Internationalization
Global IM UIKit comes with built-in Simplified Chinese and English language packs and supports internationalization.
Switching SDK Supported Languages
Global IM UIKit supports Chinese and English by default and follows the system language settings. To switch the language within the app, you can use the following interface to change the language of Global IM UIKit:
[RCIMKitConfig shared].languageCode = @"zh_CN";
Note The language code format is (ISO-639 Language Code)_(ISO-3166 Country Codes), e.g., zh_CN. Currently, the supported built-in languages are zh_CN and en.
Adding New Languages
If the built-in Simplified Chinese and English languages do not meet your application's business needs, you can also add new language resources.
-
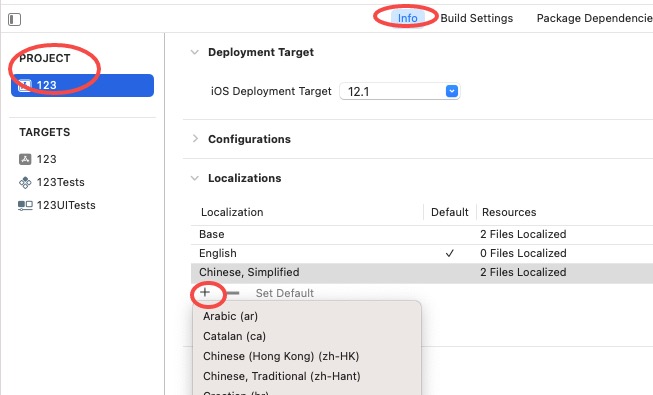
In the PROJECT -> Info section of your project, create Localizations and select the language. The following example uses Arabic.

-
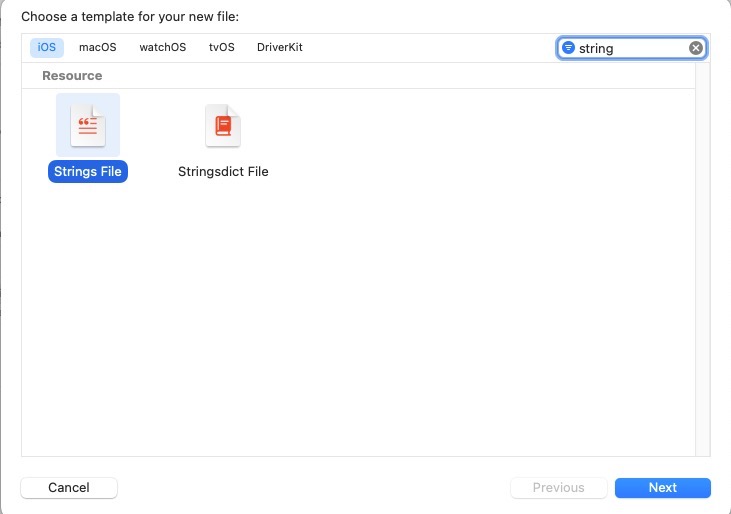
Create a Strings file with a name that must match Global IM UIKit's internationalization file, GlobalIMUIKit, and click Create.

-
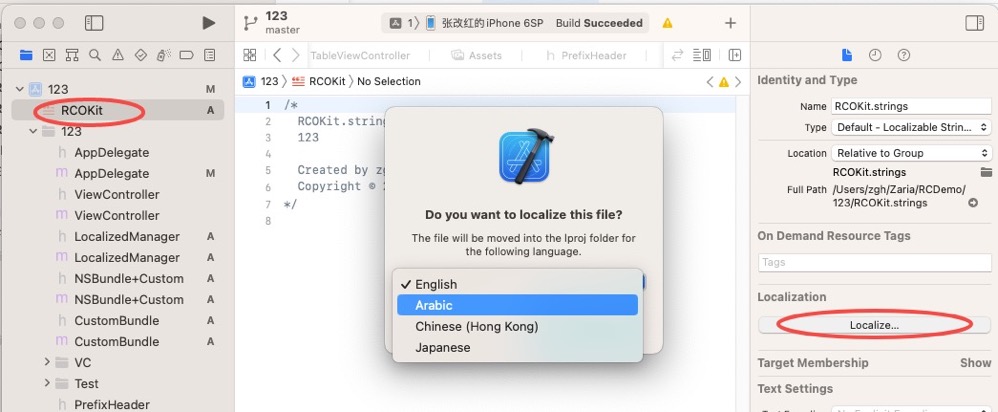
Select the newly created Strings file, click Localize, and choose Arabic in the Xcode right-hand menu.

-
Copy the content from Global IM UIKit's internationalization file into the newly created Strings file and modify the corresponding value to Arabic.
-
Switch the language to Arabic (refer to the section below on
Switching to Newly Added Languages in the SDK) and check the display.
Switching to Newly Added Languages
-
In the PROJECT -> info section of your project, create Localizations and select the language. The following example uses Arabic.

-
Create a Strings File with a name that must match Global IM UIKit's internationalization file, GlobalIMUIKit, and click Create.

-
Select the newly created Strings file, click Localize, and choose Arabic in the Xcode right-hand menu.

-
Copy the content from Global IM UIKit's internationalization file into the newly created Strings file and modify the corresponding value to Arabic.
-
Switch the language to Arabic and check the display.
Below is a reference method for switching languages within the app:
Internationalization will always go through NSBundle's - (NSString *)localizedStringForKey:(NSString *)key value:(nullable NSString *)value table:(nullable NSString *)tableName method. Use a custom Bundle to replace NSBundle to implement language switching within the app.
Adding an In-App Language Management Class
@interface LocalizedManager : NSObject

+ (instancetype)sharedInstance;

// Current language
- (NSString *)currentLanguage;

// Set the language to switch to
- (void)setLanguage:(NSString *)language;

// Set to system language
- (void)systemLanguage;

@end
@implementation LocalizedManager

+ (instancetype)sharedInstance {
    static LocalizedManager *instance = nil;
    static dispatch_once_t onceToken;
    dispatch_once(&onceToken, ^{
        instance = [[LocalizedManager alloc] init];
    });
    return instance;
}

- (NSString *)currentLanguage {
    NSString *language=[[NSUserDefaults standardUserDefaults]objectForKey:AppLanguage];
    return language;
}

- (void)setLanguage:(NSString *)language {
    [[NSUserDefaults standardUserDefaults] setObject:language forKey:AppLanguage];
}

- (void)systemLanguage {
    [[NSUserDefaults standardUserDefaults] removeObjectForKey:AppLanguage];
 }

@end
Custom CustomBundle Inheriting NSBundle
Override the mainBundle method to determine which language should be loaded through the language management class.
#import "CustomBundle.h"
#import "LocalizedManager.h"
#import <Foundation/Foundation.h>

@interface CustomBundle : NSBundle

@end

@implementation CustomBundle
- (NSString *)localizedStringForKey:(NSString *)key value:(NSString *)value table:(NSString *)tableName {
    if ([CustomBundle custom_mainBundle]) {
        return [[CustomBundle custom_mainBundle] localizedStringForKey:key value:value table:tableName];
    } else {
        return [super localizedStringForKey:key value:value table:tableName];
    }
}

+ (NSBundle *)custom_mainBundle {
    if ([LocalizedManager sharedInstance].currentLanguage.length) {
        NSString *path = [[NSBundle mainBundle] pathForResource:[LocalizedManager sharedInstance].currentLanguage ofType:@"lproj"];
        if (path.length) {
            return [NSBundle bundleWithPath:path];
        }
    }
    return nil;
}
@end
Intercepting the Internationalization Method
Use categories and runtime to intercept and replace NSBundle with the custom CustomBundle.
#import "NSBundle+RC.h"
#import "RCDLanguageManager.h"
#import <objc/runtime.h>
#import "CustomBundle.h"
#import "LocalizedManager.h"

@interface NSBundle (Custom)

@end

@implementation NSBundle (Custom)

+ (NSString *)currentLanguage {
    return [LocalizedManager sharedInstance].currentLanguage ?: [NSLocale preferredLanguages].firstObject;
}

+ (void)load {
    static dispatch_once_t onceToken;
    dispatch_once(&onceToken, ^{
        object_setClass([NSBundle mainBundle], [CustomBundle class]);
    });
}

@end
Example Usage
Switch to English
[[LocalizedManager sharedInstance] setLanguage:@"en"];
Follow System Language
[[LocalizedManager sharedInstance] systemLanguage];